Become A Sponsor
|
Why Ads
Reflector Baking
We like to do reflector baking in our troop. Reflector baking is a fun way to bake our favorite goodies
- pizza, breads, cookies, pies, etc. - by campfire. We like reflector baking mainly for two reasons. First, when we
reflector-bake we can build our campfire high, with lots of flames. This is great on a cold night or when we want to have
campfire ceremonies. Also, we like reflector baking because we can see the food while it bakes. This makes it easy for us
to adjust the cooking time and temperature as needed.
Wed like to share with you what weve learned about reflector baking, and also get your ideas on how we might do it better.
If you havent done reflector baking before, go out and give it a try! If you have, please e-mail us and share your experiences.
We are Herndon, VA Boy Scout Troop 1570, at Reclaff@aol.com.
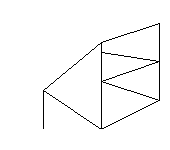
Whats a Reflector Oven?
Reflector baking is done in a reflector oven, which is a shiny aluminum half-box with a shelf in the middle to support the food
being baked. A metal bar or legs in back of the oven supports it and keeps the shelf horizontal. A reflector oven looks
something like this:
Dimensions vary, but a common size is 18 3/4" X 9 1/2" X 13 1/2" assembled. This oven weighs only 2 1/2 pounds. The
oven is easily taken apart and folded for packing. Folded, its dimensions are 13 1/4" X 13 1/2" x 3/4".
TIP: When we first assembled our reflector oven, we noticed that the shelf simply rests on a ridge on each side of the oven.
But if the oven is bumped hard enough on the side, the shelf will come off the ridges and drop down - a disaster during baking!
We drilled a small hole through the shelf and ridge on each side, so we can fasten the shelf securely to the two ridges using two
small nuts and bolts (and yes, we carry extra nuts and bolts on our campouts just in case). This is cheap insurance against
accidentally dropping our precious homemade cake or pie into the fire!
How does a Reflector Oven Work?
There are three ways of heating food:
Conduction - heating by contact. When frying or broiling, heat goes directly from a hot frying pan or Dutch oven into the
food by conduction. When boiling, heat goes directly from hot water into the food, also by conduction.
Convection - heating by hot moving air. Air expands when it is heated, causing it to move and heat food in its path. This is
natural convection. Hot air can also be made to heat food by using a fan to blow the air over the food. This is forced
convection. If your oven at home has a fan, its a forced convection oven. When you bake bread in a Dutch oven, the air
at the bottom of the oven is heated by conduction, causing the air to expand, rise, and displace the cooler air over it. This
motion of air inside the oven bakes the bread evenly by natural convection.
Radiation - heating by radiant energy. A fire gives off radiant energy, which travels in all directions around the fire. The
hotter the fire, the more radiant energy it gives off. Because of this, a hot fire can heat food even without conduction or
convection.
The simplest example of heating by radiation is the suns heating of the earths surface. Radiant energy from the sun passes
through space in all directions. Some of this energy is absorbed by the earths surface, creating our climate and weather.
Radiation is also how your microwave oven works. A device inside your oven gives off microwave radiant energy and
directs it at the food. The radiant energy is not absorbed much by the air inside your oven, but it is absorbed by the food.
It is this absorbed energy that cooks the food. Im sure you noticed that the air inside your microwave is cool, even though
your food is hot. The microwave cooks by radiation, not convection, so the air inside your oven is not heated.
A reflector oven heats food by capturing radiant energy from the campfire and directing it on the food. The food to be
baked is placed on the shelf of the oven. When radiant energy from the fire strikes the shiny, sloped top or bottom of the
oven, the energy is reflected toward the shelf, where the food absorbs it and starts to bake.
The amount of energy captured by the oven depends a lot on the temperature of the fire, and on the ovens distance from the
fire. If the temperature of the fire is doubled, the amount of energy captured by the oven with increase by a factor of
sixteen! So you will want a good, hot fire with lots of flames. Also, if the distance between the fire and the oven is
cut in half, the amount of energy captured by the oven will increase by a factor of four. So you can adjust the
temperature of your oven by changing its distance from the fire.
Tips on Using a Reflector Oven
A reflector oven needs a source of high, steady heat. Weve found that the best kind of campfire for reflector baking is a large
box- or log cabin-style fire, such as might be built for a ceremonial campfire. Ideally, the fire should produce steady flames
that extend higher than the oven. Not as effective is a teepee fire, particularly if its somewhat windy and the flames tend to
flicker or move about.
Be sure to have lots of dry wood on hand, as you will need to keep those steady flames going for the entire time your are
baking.
You will need to be VERY careful when you position the oven. You will have to work near the fire, as the oven should be
placed about a foot or so from the edge of the fire. This is not the place to fool around! It seems close, but we
have found that the baking time increases a lot if the oven is much further away than 1½ feet. Many pictures in camping
books show a reflector oven at some distance from the campfire. This is done so you can get a good view of the oven, but
do not rely on these pictures when actually placing your oven in the field.
On the other hand, be sure not to place your oven so close to the fire that flames pass under and lick the bottom of the
oven shelf. If they do, you will wind up frying food that should be baked, and you will have disappointing results.
Before putting food on the shelf of your oven, be sure the oven is secure and the shelf is level. You do not want your food
to slide down the shelf, nor do you want liquids such as cake batter to be distributed unevenly in the pan.
We started out using an oven thermometer, and trying to keep an eye on the oven temperature as we baked. We have
given this up, because we found it hard to keep the oven temperature steady in the 300-400 degree range called for in
most recipes. Our oven almost invariably winds up too hot; perhaps this is merely a matter of poor control on our part.
So we bake by visual inspection; when the knife blade inserted into the food comes out clean, its done. Also, we rotate
the food when it looks as though the side of the food nearer the campfire is getting a little overdone.
A SAFETY TIP: because you are cooking with radiant energy, the oven will always be much hotter than the air
around it. The oven gets VERY hot. You must use oven mitts when handling the hot oven or the pans you put in it. Treat
the oven with the same respect you treat the oven in your kitchen back home!
Recipes - YUM!
Here are some of our favorite foods to bake in a reflector oven:
Berry Pie
2 cups flour
1 teaspoon salt
2/3 cup plus 2 tablespoons shortening
5 tablespoons water
5-6 cups berries
4 tablespoons flour
1 cup brown sugar
½ teaspoon salt
2 tablespoons butter
Measure 2 cups flour and 1 teaspoon salt into bowl. Cut in shortening thoroughly. Sprinkle in water, 1 tablespoon at a time,
mixing until all the flour is moistened and dough almost cleans side fo bowl. Gather dough into ball, divide in half. Shape into
flattened round on flour-covered wax paper. Flour and place wax paper on top. Roll dough 2 inches larger than inverted
pie pan. Ease dough into pan and peel off wax paper. Roll dough for top crust. Stir together 4 tablespoons flour, brown
sugar, and ½ teaspoon salt for filling. Pour over berries and toss gently to mix. Pile mixture into pie pan and dot with butter.
Carefully cover with dough for top crust. Pinch edges and cut slits for steam. Bake until crust is browned and filling is
bubbling hot. Turn pie in oven as needed for even baking. Cool before serving.
Bannock Bread
1 cup flour
1 teaspoon baking powder
¼ teaspoon salt
1 tablespoon sugar
1 egg
Mix ingredients with a few tablespoons water. Bake until bread rises, is browned, crust is stiff when tapped, and knife blade
inserted into bread comes out clean.
Biscuits
3 cups flour
6 tablespoons baking powder
½ teaspoon salt
6 tablespoons oil
1 cup milk
Mix ingredients. Roll on a flat, flour-covered surface. Cut out biscuits and place in baking pan. Bake until browned
and stiff, and knife blade inserted into biscuits comes out clean.
Chocolate Chocolate Chip Cookies
2½ cups flour
½ teaspoon baking soda
¼ teaspoon salt
½ cup unsweetened cocoa powder
1 cup dark brown sugar, packed
¾ cup white sugar
1 cup butter, softened
3 eggs
2 teaspoons vanilla
2 cups (12 ounces) semisweet chocolate chips
In a bowl, combine flour, baking soda, salt, cocoa powder. Mix well, set aside. In separate bowl, blend sugars well. Add
butter, beat to form grainy paste. Add eggs, vanilla. Beat until light and fluffy. Add flour mixture, chocolate chips. Blend
until just combined. Drop by spoonfuls onto ungreased cookie sheet. Bake until knife blade inserted into cookie comes
out clean.
Brownies
1 cup sugar
½ cup shortening
2 eggs
½ cup flour
2 squares melted baking chocolate
½ teaspoon vanilla
pinch salt
Mix ingredients well. Pour into greased 8-inch square pan. Bake until knife inserted into brownies comes out clean.
Apple Pie
2 cups flour
1 teaspoon salt
2/3 cup and 2 tablespoons shortening
5 tablespoons water
2¼ pounds apples
2 tablespoons lemon juice
2/3 cup brown sugar, packed
1/3 cup white sugar
1 teaspoon cinnamon
1/8 teaspoon cloves
1/8 teaspoon nutmeg
grated orange peel
grated lemon peel
2 tablespoons orange juice
2 tablespoons butter
Mix salt and flour. Cut in shortening. Sprinkle in water, 1 tablespoon at a time, until all flour is moistened and sides of bowl
are clean. Split dough in half. Roll out crusts to 2 inches larger than pie pan. Peel, core, slice apples. Sprinkle with lemon
juice. Combine sugars, spices, and peels. Lay out lower crust in pie pan. Top with layer of apples. Sprinkle sugar mixture
over apples. Repeat, layering apples and sugar mixture to fill pan. Dot with orange juice and butter. Cover with top crust,
pinching crust all the way around to seal. Cut slits in top. Bake until crust is browned and filling is bubbly. Cool before
serving.
Muffins
Store-bought muffins bake fine in lined muffin tins in a reflector oven. Our favorite is chocolate chip!
When this article was written, reflector ovens had not been sold by BSA for some time. That has changed! In the 2002 BSA Catalog, BSA now sells a reflector oven (of the same dimensions as the one described above) as a "Scout Classic."
|