February 2006 Cub Scout Roundtable Issue |
Volume 13, Issue 7
March 2007 Theme |
Theme: Baloo Skies
Webelos:
Athlete & Engiineer
Tiger Cub Activities |
PACK AND DEN ACTIVITIES
The Water Cycle
(from the U.S. Geological Survey Website: http://ga.water.usgs.gov/edu/watercycle.html)
What is the water cycle?
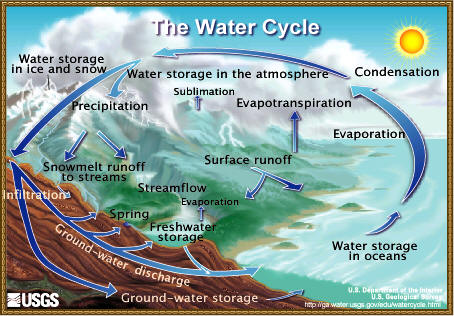
The water cycle describes the existence and movement of water on, in, and above the Earth. Earth's water is always in movement and is always changing states, from liquid to vapor to ice and back again. The water cycle has been working for billions of years and all life on Earth depends on it continuing to work; Earth would be a pretty stale place to live without it.
A quick summary of the water cycle
The water cycle has no starting point, but we'll begin in the oceans, since that is where most of Earth's water exists.
The sun, which drives the water cycle, heats water in the oceans. Some of it evaporates as vapor into the air. Ice and snow can sublimate directly into water vapor.
Rising air currents take the vapor up into the atmosphere, along with water from evapotranspiration, which is water transpired from plants and evaporated from the soil. The vapor rises into the air where cooler temperatures cause it to condense into clouds.
Air currents move clouds around the globe and cloud particles collide, grow, and fall out of the sky as precipitation. Some precipitation falls as snow and can accumulate as ice caps and glaciers, which can store frozen water for thousands of years. Snowpacks in warmer climates often thaw and melt when spring arrives, and the melted water flows overland as snowmelt.
Most precipitation falls back into the oceans or onto land, where, due to gravity, the precipitation flows over the ground as surface runoff. A portion of runoff enters rivers in valleys in the landscape with streamflow moving water towards the oceans.
Runoff and ground-water seepage accumulate and are stored as freshwater in lakes. Not all runoff flows into rivers, though. Much of it soaks into the ground as infiltration. Some water infiltrates deep into the ground and replenishes aquifers (saturated subsurface rock), which store huge amounts of freshwater for long periods of time. Some infiltration stays close to the land surface and can seep back into surface-water bodies (and the ocean) as ground-water discharge, and some ground water finds openings in the land surface and emerges as freshwater springs. Over time, though, all of this water keeps moving, some to reenter the ocean where the water cycle "ends" ... oops - where it "begins."
Evaporation: The process by which water is changed from liquid to a gas or vapor
Sublimation: The changing of snow or ice to water vapor without melting
Evapotranspiration: The transfer of water from the soil to the atmosphere by evaporation and plant transpiration
Water storage in the atmosphere: Water stored in the atmosphere as vapor, such as clouds and humidity
Condensation: The process by which water is changed from vapor to liquid
Precipitation: The discharge of water, in liquid or solid state, out of the atmosphere, generally upon a land or water surface
Water storage in ice and snow: Freshwater stored in frozen form, generally in glaciers, icefields, and snowfields
Snowmelt runoff to streams: The movement of water as surface runoff from snow and ice to surface water
Surface runoff: Precipitation runoff which travels over the soil surface to the nearest stream channel
Streamflow: The movement of water in a natural channel, such as a river
Freshwater storage: Freshwater existing on the Earth's surface
Infiltration: The downward movement of water from the land surface into soil or porous rock
Ground-water storage: Water existing for long periods below the Earth's surface
Ground-water discharge: The movement of water out of the ground
Spring: Place where a concentrated discharge of ground water flows at the ground surface
Water Cycle Match Puzzle
Match the words describing the water cycle with their meaning.
TERM |
ANSWERS |
1 |
Evaporation |
A |
The change of water vapor to liquid water, as when fog or dew forms. |
2 |
Transpiration |
B |
General name for water in any form falling from clouds. This includes rain, drizzle, hail, snow and sleet. |
3 |
Condensation |
C |
The top of the water surface in the saturated part of a well or spring. |
4 |
Precipitation |
D |
The process of changing a liquid (like water) to a vapor. It’s the opposite of condensation. |
5 |
Runoff |
E |
The release of water from plant leaves. Every day an actively growing plant releases 5 to 10 times as much water as it can hold at once. |
6 |
Infiltration |
F |
Excessive rain or snowmelt that is not absorbed into the ground and becomes part of a stream, river or lake. |
7 |
Groundwater |
G |
The downward movement of water from the land surface into oil or porous rock. Also called percolation. |
8 |
Water Table |
H |
Water that exists for an extended period below the Earth’s land surface. |
Water Cycle Match Puzzle (answers)
 1D - The process of changing a liquid (like water) to a vapor. It’s the opposite of condensation. - evaporation 1D - The process of changing a liquid (like water) to a vapor. It’s the opposite of condensation. - evaporation
2E - The release of water from plant leaves. Every day an actively growing plant releases 5 to 10 times as much water as it can hold at once. - transpiration
3A - The change of water vapor to liquid water, as when fog or dew forms. - condensation
4B - General name for water in any form falling from clouds. This includes rain, drizzle, hail, snow and sleet. - precipitation
 5F - Excessive rain or snowmelt that is not absorbed into the ground and becomes part of a stream, river or lake. - runoff 5F - Excessive rain or snowmelt that is not absorbed into the ground and becomes part of a stream, river or lake. - runoff
6G - The downward movement of water from the land surface into soil or porous rock. Also called percolation. – infiltration
7H - Water that exists for an extended period below the Earth’s land surface. - ground water
8C - The top of the water surface in the saturated part of a well or spring. - Water Table
ACTIVITIES
Evaporation Experiment #1
Moisture in the air (humidity) is one part is the water cycle. This mainly comes from the oceans and smaller bodies of water (lakes & streams). This experiment will show how the water gets into the air.
Materials Needed:
- 2 jars of the same size (one with a screw on lid (cover)).
- Water
Directions:
- Place an equal amount of water in the two jars.
- Place a narrow strip of paper up the side of each jar
- Screw the lid on one jar.
- Place both jars on a table and leave for 1 week.
- Check them every 24 hours and mark the level on the strip, record your results and observations in a log.
Expected results:
The jar that was open contains less water than the jar that was covered.
This occurs because, even at room temperature, the tiny particles or molecules of water in the uncovered jar move fast enough to escape into the air. The water turns into water vapor, an invisible gas. This process is known as evaporation. The molecules of water in the covered jar cannot escape and remain in the jar. An example of this is how puddles of water disappear after the rain has stopped.
Evaporation Experiment #2
 Which container of water will evaporate faster – a large flat dish or a narrow deep jar? Which container of water will evaporate faster – a large flat dish or a narrow deep jar?
Materials Needed:
- Large, flat dish
- Narrow, deep jar
- Water
Directions:
- Place an equal amount of water in the dish and jar.
- Place both on a table and leave for 1 week.
- Check them every 24 hours and record your results and observations.
Expected results:
The large, flat dish contains less water than the narrow, deep jar.
This occurs because the molecules of water can escape only from the surface. Therefore, water will evaporate faster when the surface is large. An example of this is a wide, shallow puddle will dry up faster than a deep, narrow one.
Evaporation Experiment #3
What role does the sun play in the evaporation of water into the air?
Materials Needed:
- 2 dishes
- sunny window
- Water
Directions:
- Place an equal amount of water in the dishes so that they are half full.
- Place one dish in the sunny window and the other in the shade and leave for 1 week..
- Check them every 24 hours and record your results and observations. Observe the dishes and note which one dries out first.
Expected results:
The warmer the water, the faster the molecules move into the air. Therefore warmer water will evaporate faster than cooler water. Most water vapor comes from lakes, rivers, oceans, leaves of plants and wet ground. The heat from the sun causes the water to change from liquid to gas – thus evaporating into the air. As its temperature increases, air can hold more and more water. As it gets colder, air holds less and less water.
Evaporation Experiments Table
Use this table to conduct your evaporation experiments. The first lines are filled out as an example.
Start |
Stop |
Experiment |
Initial Conditions |
Observations |
Friday
7:30 am |
Saturday
7:30 am |
Evaporation
#1 |
Jar 1 (covered) = 4 oz.
Jar 2 (uncovered) = 4 oz. |
Jar 1 had 3.5 oz and Jar 2 had 4 oz of water.
The uncovered jar evaporated faster than the covered jar. |
Saturday
7:30 am |
Sunday
8:00 am |
Evaporation
#1 |
Jar 1 had 3.5 oz and Jar 2 had 4 oz of water. |
Jar 1 had 3.2 oz and Jar 2 had 4 oz of water.
The uncovered jar evaporated faster than the covered jar. |
Sunday
8:00 am |
Monday
8:00 am |
Evaporation
#1 |
Jar 1 had 3.2 oz and Jar 2 had 4 oz of water. |
|
|
|
|
|
|
|
|
|
|
|
|
|
|
|
|
|
|
|
|
|
Air Pressure Experiment
Materials needed to make a homemade barometer:
- glass mayonnaise or canning jar
- balloon
- heavy duty rubber band
- straw
- toothpick
- glue
- index card
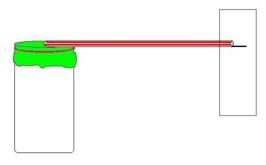
Directions:
- Carefully cut open a balloon so that it forms a thin sheet.
- Stretch the balloon over the jar and secure with a heavy duty rubber band, sealing the jar tightly.
- Glue the straw sideways to the balloon, placing it from the center of the balloon so that it extends over the side of the jar.
- Glue a toothpick into the end of the straw that hangs freely over the side of the jar.
- Tape an index card to a wall and set the barometer next to it so that the end of the straw points to the middle of the index card but does not touch it.
- Mark the spot on the card where the toothpick is pointing.
- Write the date next to this mark.
- Take measurements daily and mark the spot where the toothpick is pointing.
- Record the data in the Air Pressure Measurement Table.
- Be sure to note if the pressure is higher (toothpick moves up) or lower (toothpick moves down).
Explanation:
Barometers keep track of air pressure. When air pressure is high (which means fair weather), the toothpick will point up because air will be pressing down on the balloon. When air pressure is low (which means stormy weather is coming), the toothpick will point down because air inside the jar will be pushing up against the balloon.
Air Pressure Measurement Table
Date |
Pressure
(Higher or Lower) |
Observed weather outside |
Predicted weather for NEXT day |
Was prediction accurate? |
|
|
|
|
|
|
|
|
|
|
|
|
|
|
|
|
|
|
|
|
|
|
|
|
|
|
|
|
|
|
|
|
|
|
|
|
|
|
|
|
|
|
|
|
|
|
|
|
|
|
|
|
|
|
|
|
|
|
|
|
Rainfall Measurement Experiment
Materials Needed:
Directions:
- Set the jar outside in an open area before it starts raining.
- Make sure the jar is not under anything like trees or plants and away from structures like the house.
- At a specific time each day, use a ruler to measure the amount of rain in the jar and record this in the Rain Measurements Table.
- Empty the jar and set it back in the same place.
- Record the amount of rainfall at the same time the next day.
- Do this for 1 week.
Date |
Time |
Amount of Rainfall
(inches) |
Observations |
|
|
|
|
|
|
|
|
|
|
|
|
|
|
|
|
|
|
|
|
|
|
|
|
|
|
|
|
|
|
|
|
|
|
|
|
|
|
|
|
|
|
|
|
|
|
|
|
Weather Forecast Form
Use this form to record the forecast from a local television station.
Date:
|
Time:
|
Channel:
|
The forecast (what was said?):
|
Follow up (where they right?):
|
What did you learn?:
|
CRAFTS
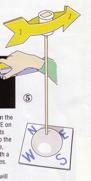
Make A Weather Vane
It's easy to see which way the wind blows!
Materials: Cardboard, Drinking straw or a thin wooden dowel, Thread spool, Tape, Stapler, Modeling clay, and a few stones or rocks.
Directions:
- On a piece of cardboard about 6 inches square, mark the points of the compass: N, W, S, E.
- Tape a little piece of paper over the hole on top of the spool. On cardboard, draw two identical arrows about 7 inches long
- Cut the arrows out and tape one to the spool.
- Staple the other arrow to the first one and tape the ends together.
- Put a straw or a wooden dowel inside the spool. The spool should move freely. Put some modeling clay on the center of the cardboard square, then stick the straw or dowel into it. Position the cardboard so the compass points face the correct directions. (Use a compass).
- To keep the cardboard in place, weight it down with a few rocks or stones.
- When the wind blows, the arrow will point in the direction from which it comes.
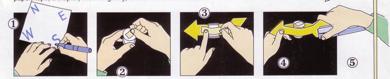
Uncle Jonathan's Easiest Kites
20 Kids – 20 Kites – 20 minutes – GUARANTEED!!!
From “The big Wind Kite Factory,” http://www.molokai.com/kites/
Material list for 20 kites:
- 20 sheets of brightly colored 8 1/2" x 11" paper.
- 20 8" bamboo bar-b-que shish kebab sticks.
- 1 roll of florescent surveyor's flagging plastic tape.
A plastic bag cut in a 1" wide spiral all around will also work
- 1 roll 1/2" wide masking tape or any type of plastic tape..
- 1 roll of string. (At least 200', 6 to 10 feet for each child.)
- 20 pieces of 1"x 3" cardboard on which to wind the string.
- Scissors, Hole punch. (optional)
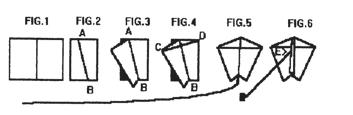
Directions:
- Fold a sheet of 8 1/2" x 11" paper in half to 8 1/2" x 5 1/2".
- Fold again along the diagonal line A in Fig.2.
- Fold back one side forming kite shape in Fig.3 and place tape firmly along fold line AB.(No stick is needed here because the fold stiffins the paper and acts like a spine.)
- Place bar-b-que stick from point C to D and tape it down firmly.
- Cut off 6 to 10 feet of plastic ribbon and tape it to the bottom of the kite at B.
- Flip kite over onto its back and fold the front flap back and forth until it stands straight up.(Otherwise it acts like a rudder and the kite spins around in circles.)
- Punch a hole in the flap at E, about 1/3 down from the top point A.
- Tie one end of the string to the hole and wind the other end onto the cardboard string winder.
Be sure to check their website for more pictures about how to do this and lots of neat stuff on kites!!! http://www.molokai.com/kites/
Straw Blown Painting
Can you see the wind? Maybe not, but you can see evidence of the wind. Cover your workspace with newspaper. Tape the corners of a clean piece of drawing paper in the center. Place one color of water-diluted poster paint on the paper and, using the straw and your own powerful lungs, blow the paint around on the paper. Before it dries, add another color and blow it around. Let some paint overlap or blend. Try different blowing techniques: from the center or from the corner.

Miniature Windsocks
Materials:
- Toilet tissue roll
- Crepe paper
- Yarn
- Construction paper, stickers or paint
- Decorate the tissue roll with construction paper, paint or stickers.
- Cut crepe paper strips 1 ½ “x 6” and glue to the inside of the tissue roll.
- Cut three evenly spaced holes in the top of the roll.
- Tie a 7” piece of yarn to each hole.
- Tie all three ends of the yarn together and hang.
Make a Thermometer
(http://www.weatherwizkids.com)
Materials:
- clear, plastic bottle (11oz. water bottle works)
- water
- rubbing alcohol
- clear plastic drinking straw
- modeling clay
- food coloring
Fill about ¼ of the bottle full with equal parts of water and rubbing alcohol. Add a few drops of food coloring. Put the straw in the bottle, but don't let it touch the bottom. Use the modeling clay to seal the neck of the bottle, so the straw stays in place. (Make sure the straw does not touch the bottom of the bottle.) Hold your hands on the bottom of the bottle and watch the mixture move up through the straw.
Explanation:
Why does this happen? Just like any thermometer, the mixture expanded when it was warmed. This made the mixture no longer fit in the bottom of the bottle. As the alcohol expanded the colored mixture moved up through the straw. If the bottle were to get extremely hot, the mixture would have come up through the top of the straw.
Materials found in Baloo's Bugle may be used by Scouters for Scouting activities provided that Baloo's Bugle and the original contributors are cited as the source of the material.
Materials found at the U. S. Scouting Service Project, Inc. Website ©1997-2006 may be reproduced and used locally by Scouting volunteers for training purposes consistent with the programs of the Boy Scouts of America (BSA) or other Scouting and Guiding Organizations. No material found here may be used or reproduced for electronic redistribution or for commercial or other non-Scouting purposes without the express permission of the U. S. Scouting Service Project, Inc. (USSSP) or other copyright holders. USSSP is not affiliated with BSA and does not speak on behalf of BSA. Opinions expressed on these web pages are those of the web authors.
|
|