April 2006 Cub Scout Roundtable Issue |
Volume 13, Issue 9
May 2007 Theme |
Theme: Cubs and Bugs
Webelos:
Outdoorsman & Artist
Tiger Cub Activities |
WEBELOS
OUTDOORSMAN
OUTDOORS GROUP
Baltimore Area Council
Webelos Scouts learn the basics of camping and cooking in order to live outdoors and be comfortable. The Outdoorsman Activity is in the Outdoor group.
Objectives
To encourage Webelos Scouts to camp with their families. To introduce Webelos to Boy Scout camping. To familiarize boys with fire safety. To emphasize the “outing” in Scouting.
Where to Go and What to Do
- Demonstrate how to make an improvised bedroll.
- Practice building a fire for cooking and for a campfire, and have a den cookout.
- Webelos Parent-Son campouts.
- Camporees
- Contact a local Boy Scout troop and arrange to camp with them.
- Take hikes at different times of the year and have boys notice the differences in their surroundings.
- Have a knot-tying contest or play knot-tying games to learn and improve skills.
- Make some camp gadgets.
- Invite a member of the district or council camping committee to talk about low impact camping.
Be a Prepared Webelos Leader
Take advantage of the Outdoor Webelos Leaders training available through your district or council. It will give you the necessary skills needed to perform a successful campout and is also a requirement to receive your Webelos Leader knot.
Games
Pack Your Backpack
Pack a backpack with TONS of stuff. Have the boys evaluate what should and shouldn’t go in it. Sleeping bag or bedroll, blanket, fresh batteries & flashlight, poncho or raingear, comfortable shoes or boots, warm clothes, coat, hat that covers ears, soap, washcloth, towel, toothbrush & toothpaste, knife & fork & spoon, mess kit including cup, toilet paper, personal first-aid kit, Webelos handbook
Fun Tents
Take some heavy trash bags and cut them into miniature “tents”. Each team of two boys gets “stakes” and a “tent” and some thin rope. They have to pitch their tent FIRMLY and SECURELY using sheet bends, two half hitches and clove hitches, as appropriate. You might need to make a knot guide available nearby. If they aren’t familiar enough with the knots, you can offer to tie one for them, but ask them to be very positive about which knot it should be.
Edible Fire
Teach the art of fire building by letting the participants make an edible fire. Make sure you OK the fire before they consume it! Use frosting to assemble one of the following lists into an edible fire:
Plan A
Napkin = base
Small Marshmallows = fire ring
Flaked Coconut = kindling
Red Hots or Raisins = coals
Candy Corn = fire
Pretzel Sticks = logs
Kool-Aid = water to put out fire
Plan B -
Large cookie = base
Peanut M&Ms = rock ring
Potato Sticks = kindling
Pretzel Sticks = logs
Candy Corn = fire
Tootsie Rolls = fuel wood
Granola = dirt Small cup
Small cups = water buckets
Inexpensive Cold Weather Sleeping Mat
Stuff two large heavy-duty plastic garbage bags with crumpled up newspaper balls. Leave room to tie off the bag. Remove excess air and flatten the bag to make an insulated sleeping mat. An extra blanket can be wrapped around it burrito style and pinned if you tend to slide off.
Hands-On Experience
Ask one buddy team to set up a fire lay. Ask a second team to light it. Ask a third team to extinguish it in the proper manner and clean up the area. If wood fires are not permitted, show how to lay and start a charcoal fire in a grill.
Outdoor Cooking
Aluminum Foil Dinner
1/4# hamburger, sliced potatoes, sliced carrots, slice of onion, one or two teaspoons of water, salt and pepper. Use heavy foil. Fold over edges, leaving space for steam. Place directly in hot coals; avoid puncturing package while handling. Use tongs. Turn after 10 minutes, cook for 20 minutes total time. To test to see if it’s cooked, unfold, refold in airtight fold. Eat directly from foil.
Egg and Bacon in a Paper Bag
This requires a green roasting stick, a small brown paper bag with rectangular bottom, a strip of bacon, one egg, salt and pepper.
Place bacon on the stick and broil it slowly over the hot coals. When partially cooked, place bacon in the bottom of bag. Put stick through the two sides of the bag. Hold the bag over hot coals for a short time to get bottom of bag greasy. Break egg into bag. Put over coals again. DO NOT get bag too close to coals or it will go up in flames. Do this slowly. Use the bag as your plate. Toast bread on a stick. BREAKFAST IS READY!
“Coffee Can” Stew
Each Scout brings from home a l lb. Coffee can. Inside the can, all your ingredients for stew, meat and vegetables packed separately (you need to brown the meat). You can also prepare everything at home and just do the simmering on the campout.
Dutch Ovens
Nothing beats Dutch-oven main courses, unless it’s a Dutch-oven dessert. My two favorites are cobbler and pineapple upside-down cake.
Omelets in Zip-Locs
Mix your eggs and other ingredients; place them in a sealed zip-loc bag and drop in almost boiling water. It works great and there’ s no clean-up.
Stuffed Potatoes
Core small potatoes; insert a small precooked sausage or wiener. Wrap in foil and set in hot ashes to bake. Takes 45-90 minutes.
Hobo Popcorn
In center of 18 X 18 inch square of heavy aluminum foil, place one teaspoon cooking oil and one tablespoon popcorn. Bring foil centers together to make a pouch. Seal the edges by folding, but allow room for the popcorn to pop. Tie each pouch to a long stick with a string and hold the pouch over hot coals. Shake constantly until all corn has popped. Season with margarine and salt.
Baked Apples
Core an apple and place it on a square of aluminum foil. Fill the core with raisins, brown sugar and a dash of cinnamon. Or fill with cinnamon candies. Wrap and bake for 10 minutes in hot coals.
Hot Dog Plus
Slit side of wiener, insert wedge of cheese, and wrap with bacon. Broil over coals until cheese melts and bacon is crisp. Serve in a toasted wiener bun.
Fruit Cobbler
Place three cans of fruit pie filling in the bottom of a foil lined Dutch oven. Pour in one box cake mix, distribute evenly but do not stir into fruit. Add some cinnamon and small amount of butter. Place coals under Dutch oven and some on the lid for about 45 minutes until done.
If You’re Lost in the Woods
Fill in the blanks with a word from this list. All words should be used once.
dry fire head hole leaves
nightfall run sheltered signal wander
- Stop, sit down, and try to figure out where you are.
Use your _________, not your legs.
- If caught by night, fog or a storm, stop at once and
make camp in a ______________ spot.
- Build a ____________ in a safe place.
- Gather plenty of ____________ fuel.
- Don’t _______________ about. Travel only downhill.
- If injured, choose a clear spot and
make a _____________ (smoke) fire.
- Don’t ____________, don’t worry and
above all, don’t quit.
- If caught out during ___________, find shelter quickly -
a ledge, a large boulder or a fallen tree.
- Use ___________ and branches as a blanket to
shelter yourself.
- If without a sleeping bag, build a fire in a deep ___________, cover 6 inches of hot coal (wood)
with 6 inches of earth and sleep on the warmed earth.
(Answers: 1-head, 2-sheltered, 3-fire, 4-dry, 5-wander, 6-signal, 7-run, 8-nightfall, 9-hole, 10-leaves)
Franklin Goes Camping Maze
Franklin is loading up for the bus and you can help him. Pick up every piece of camping gear in the puzzle, then head toward the bus. Pick up the gear in order from one to ten. When you enter a box that contains some camping equipment, you must leave through the opposite path -don’t double back. Happy packing!
- canteen
- can opener
- flashlight
- baseball and bat
- net
- bug spray
- pan
- umbrella
- sleeping bag
- lantern
- matches
- football
- fishing rod
- cooler
- first aid kit
- axe
- canoe
Maze is at end of Baloo’s Bugle
Northern Star Council
The Outdoorsman Activity Badge is recommended to be presented in a one month format, as outlined in the Webelos Program Helps booklet. This example outline presents the Badge in four weekly meetings. The goal of this outline is to work on every requirement in four meetings, though it may not be possible to complete every one of the electives in that time.
This badge lends itself to a field trips, campouts and lots of family outings. I believe it is best to do this badge during a month when you can plan a Webelos campout, take part in a joint campout with a Boy Scout Troop, Camporee or a Pack Family camp. Many of the activities can be accomplished on a campout. There are so many camping requirements that it is really necessary to do it this way. Camporee or a joint camp with a troop satisfies requirement 8 also.
Many of the requirements can be accomplished in the backyard of the leader -- I've done it that way and it is a lot of fun. This outline is structured so that all but the camping requirements are worked in the Den setting, assuming that campouts will take place.
With this outline in particular, you will want to move things around so that the proper elements are covered prior to campouts or other outings.
Use the Webelos book in the meeting. Have the Scouts read sections from the book. Use all the resources you have available, such as the Program Helps and the Webelos Den Activities Book. Make sure you sign off their books each meeting.
Week 1
Requirements to be fulfilled:
Do Five of These:
1. Show your ability to tie the following knots:
Square Knot
Bowline
Clove Hitch
Two half hitches
Taut Line Hitch
Discussion :
1. Read the introduction and requirements on pages 231 - 232. Discuss the requirements and how they will be worked on in and outside the Den.
2. Read pages 233 - 234 on Camp Knots.
Give each Scout a length of rope, 3 - 4 feet long. This is their practice rope. When not in use, it should be tied into their binders. No horsing around with the rope is ever allowed -- they lose it! Demonstrate each knot. Let each scout practice it. Buddy up for the hitches, so that the buddy's arm or leg can be used.
3. Read pages 235 - 237 on Camping Out in a Backyard, Homemade Tent and Envelope Bed.
Homework:
1. Talk to your parents about the camping gear you have. What kinds of weather conditions are you prepared for?
2. Practice your knots.
Week 2
Requirements to be fulfilled:
2. Use two half hitches and a tautline hitch to pitch a tent. Sleep in your tent for at least one night using a ground bed you have put together.
Discussion :
1. Drill on knots.
2. Bring a blanket and safety pins and demonstrate how to make a ground bed.
Bring one or more pup tents or tarps and poles, and have the Scouts put up the tents using two half hitches and tautline hitches. [This activity can be done at the leader's backyard while waiting for dinner to cook (week 4) or can be done at the campout when the Scouts that set up the tent will sleep in it.]
Bring two sleeping bags of different construction, and show the Scouts how they are constructed differently and cold they will protect a person to.
3. Read pages 238 - 241 on Camping away from Home, Packing for a Campout and Activities in Camp.
Homework:
1. Work on your knots.
Week 3
Requirements to be fulfilled:
7. Know and practice the rules of outdoor fire safety.
Discussion :
1. Drill on knots.
2. Read pages 242 - 246 on Cooking in Camp, Fire Building and Safety, and Cleanup.
Drill the Scouts on Fire Safety. Where do you build a fire? How far do you clear around the fire lay? What about above the fire? How big do you build a fire? What equipment do you need when you build a fire? What do you do with a fire when you are done with it?
Homework:
1. Work on your knots.
2. Refresh your memory about Fire Safety.
Week 4
Requirements to be fulfilled:
6. Help cook your own lunch or supper outdoors with your parents or another grown-up. Clean up afterwards.
Discussion :
1. Drill on Fire Safety.
2. This meeting should be held at the Leader's home, in the backyard, where you will make a meal. Foil dinners go over very well with both the Scouts and adults. You can provide all the fixing's or you can ask the Scouts to bring it. Have two scouts each bring potatoes, onions, carrots, pound of hamburger. Have the barbecue ready early. Have the Scouts cut up the potatoes and onions. BE VERY CAREFUL AND WATCH THEM CLOSELY. If it looks like one of the Scouts is about to cut off a finger, help him or take over that task. Give them foil and show them how to make the dinners. Liberally season with salt, pepper, garlic, steak sauce, etc.
You may want to have other things available for this meal to. Perhaps make pudding for desert, and have something to drink.
Heat water using the barbecue if hot enough or your Coleman stove to do the dishes. Prepare your wash water and rinse water, show them what to do, then have the Scouts do the cleanup.
Requirements not directly worked in this outline:
3. With your adult partner, take part in a Webelos over-nighter or camp overnight with a Boy Scout Troop.
4. Help with a campout of 2 nights away from home with your family. Or go on two campouts of one night with your family.
3. Visit your Boy Scout camp with your den.
Ideas to satisfy other requirements:
Requirements to be fulfilled:
5. With your family or Webelos den, plan and take part in an evening outdoor activity that includes a campfire.
Ways to satisfy this Requirement :
1. This requirement means to do more than just sit around a fire while out camping and talk. It means to plan a Campfire -- opening, songs, skits, etc., closing. With the assistance of the Den leader, resources and the campfire planning guide, this can be done easily. The Campfire can be part of a schedule Pack or Den campout. The Campfire could be take the place of a normal Pack meeting, also. This can actually be a lot of fun with the whole Pack, since most Pack meetings are held indoors. The Pack adult leaders need to be involved in the planning because there will need to be announcements, introductions, awards, etc. But the fun activities should be planned by the Webelos den. In fact, the Master of Ceremonies could be a Scout.
This Campfire activity can also be the first or second night of a Webelos or Pack Family Camp.
ARTIST
MENTAL SKILLS GROUP
Baltimore Area Council
Part of the Mental Skills group, the Artist Activity Badge is an excellent way for a Scout to express himself and an opportunity for him to try working in a new art media.
Objectives
To allow Webelos to experiment with different art media. To give boys a sense of pride and accomplishment in their work. To familiarize Webelos with the color wheel. To introduce Webelos to various supplies. The Artist activity badge will help Webelos Scouts better understand how the artist works and what he is trying to express. Boys will learn to be more aware of colors, tints, shades, and shapes. They will be more aware of color and design in nature. They will develop creativity as they learn to sculpt and make mobiles and constructions.
Where to Go and What to Do
- Invite a school art instructor or artist to den meetings. Visit an art gallery or museum, the art department of an advertising company, or an art school.
- Study a color wheel and experiment with combining colors for different shades of color.
- Do sand castings ( see Crafts, Cub Scout Leader How-To Book )
- Make models from homemade clay recipes
- Make nature drawings while on a hike.
- Have the boys construct kites and paint original designs on them.
- Do sand paintings ( spices can be used instead of sand for the different colors )
- Do string art design on corrugated cardboard or pieces of plywood
- Have the boys create their own comic strip characters
- While on a hike, have them look and see how many different shades of each color there are in the trees, grass, plants and animals
- Visit museums or local galleries.
- Reproduce a pattern using a grid technique and make a project.
Games and Activities
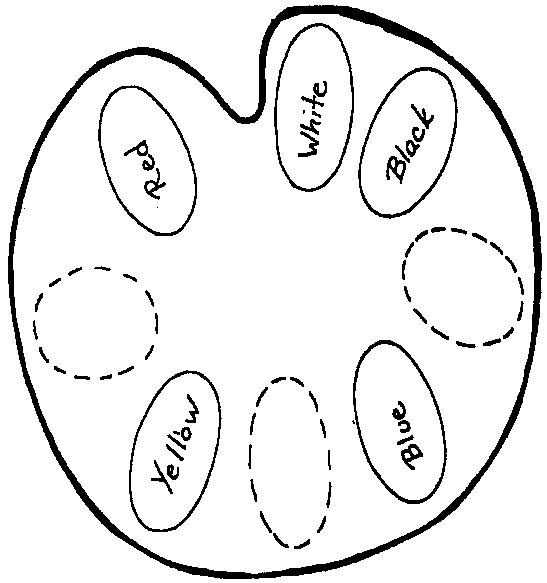
Color Palette
Have the boys make full size palettes (about 11 inches high) like this on cardstock and have the boys use finger paints or acrylic paints to fill in primary colors (red, blue and yellow). Then, have them mix those colors to get the secondary colors in dotted lines. By adding white or black to each color, a lighter or darker shade will result. You could also let the boys decorate cookies and use frosting to create colors.
Zoo Game
Equipment: Sheet of plain wrapping paper for each team. Divide den into two teams.
Game: Teams line up in relay fashion. On a signal, the first boy on each team runs to a leader who gives him the name of an animal. The boy goes to the paper and draws his subject. When his team recognizes what he as drawn, the next boy tells the leader. If correct, his is told what to draw until his team guesses it. The game continues until all have drawn an animal. First team through wins.
Draw the Clown Face
Each boy is blindfolded and asked to draw a picture of a clown. After each boy has finished, the boys try to find their own drawing. You may have many winners, and you may not have a winner at all. Have the boys make frames for these pictures and display them at a pack meeting. See if the parents can locate their son’s drawing.
Make a Brush Holder
Use spring-type clothespins to hold brushes, use a tuna can for your brush cleaner. Your designs can vary, use your imagination. After using the cleaning liquid or rinse in the tuna can, let the brush hand and drip dry, clamp them in clothespins. By hanging the brush, the shape of the brush will be maintained and not get damaged. This is especially important for your fine detail brushes.
Make Your Own Chalk and Pastels
Materials: Plaster, food coloring or powdered tempera, 1 (1 lb.) plastic margarine tub for each color.
- Fill margarine tub 1/3 full of water. Sprinkle plaster on water until it looks like no more plaster can be absorbed. Then add a little more plaster and stir.
- Add enough food coloring or powdered tempera to get desired color.
- Let plaster harden for about 30 minutes. Then, with a kitchen knife, slice colored plaster into 1” strips.
- Let it dry in the tub for another hour. Then run knife around edges of plaster to separate it from tub. Chalk with come out easily.
- Spread chalk on waxed paper and let it dry overnight.
Art Consequences
Give each boy a pencil and paper and have him draw the head of a man, woman, or child. After he draws the head, he folds the paper so that only the neck shows. Each paper is passed onto the next player, who draws the shoulders, folds the paper, and passes it on. This continues, with others adding the waist, hips, legs, and fret. When the drawings are finished, they are opened and passed around so all can see.
Crayon Kookies
Materials needed: old crayons, broken into small pieces, paper muffin cups, and muffin pan.
Put broken crayon pieces in the bottom of paper muffin cups and place the muffin cups in a muffin pan. Bake at 400 degrees, just until the crayons begin to melt. This takes about five minutes. Remove from the oven and cool completely. Remove the paper cup. These are great for leaf rubbing and scratch boards.
Line Designs
Using manuscript or cursive writing, write your name on a large sheet of paper. Use crayons or markers to trace around the shape of the name. Continue drawing the shape until the paper is filled. For variations, try using a color scheme, such as complementary colors, primary colors, rainbow colors, etc. You may choose to vary the thickness of the lines or incorporate other shapes into the drawing.
Creating Critters
Preparation: 8 or more people in small groups, scissors, construction paper, glue. Divide the players into small groups and give each group a pair of scissors, glue and a variety of colors of construction paper. Within a given time limit (15 minutes to half an hour) each group designs and constructs a new species of animal. They must decide on a name for their critter, where it lives and what it eats. When all groups are finished, a spokesman for each group introduces their critter to everyone.
No Mess Plaster or Clay Sculpture
Materials needed: 1 plastic bag (grocery or freezer are ideal), 5 cups of plaster of Paris or clay of your choice, medium size mixing bowl, plastic knife, 2 cups of water, twist tie, scissors, and measuring cup.
Before making your sculpture, decide if you want it to be a “representational” sculpture, meaning it looks like an object or figure, or if you want it to be an “abstract” sculpture, which is based on the real thing but does not look exactly like it.
Set your bag in the plastic bowl and pour 2 cups of water into it. Slowly add Plaster of Paris. Hold the top of the bag closed with one hand while squishing and squeezing the bag with your other hand until all the lumps of plaster are mixed with the water. Then squeeze out all the air and use a twist tie to close the bag.
Lay the bag down on a smooth surface. At this point, the mixture will seem to be runny and won’t hold a shape. Suddenly it will begin to harden and feel warm. Quickly form your sculpture by pulling and pressing the mixture inside the bag. Important -as you work, keep pulling the bag up from the plaster so it doesn’t become stuck in the plaster. Let your finished sculpture dry for 30 minutes. Carefully cut the plastic bag open and peel it away from the plaster sculpture you have made. If you wish, you can use a plastic knife to draw lines or other designs on your sculpture. Let harden for 24 hours. Use sandpaper to smooth any rough spots. If you wish to paint the sculpture, you will need to seal it with a clear acrylic spray first or the paint will not adhere well. Instead of painting, you can glue on leaves, seeds, shells or other natural objects. Use you imagination!
Crayon Copier
Materials needed: paper, crayons, pencil, and tape. Scribble with a crayon until the paper is covered completely with a solid color. Don’t get too concerned if there are small gaps of white space; the main thing is to provide a consistent coat of color that will transfer to another sheet of paper. Place the paper, colored side down, onto a clean sheet of paper of the same size or slightly larger. You may need to tape the sheets in place, if the papers shift while the boy is drawing. On the clean side of the colored upon paper, have the boys draw a picture. When done, lift the paper up and the drawing will have transferred to the clean sheet.
Helpful Hints
Glue
The best glue for plastic (such as bleach bottles and milk cartons) is clear silicone. Scotch contact cement is good for bonding robber or plastic to wood. Egg whites make a bond adhesive to glue the paper of egg cartons. Tacky white glue works best on Styrofoam. Wallpaper paste is good for paper-maché because it doesn’t mold.
Sand Painting
You can color salt with food coloring or tempera to use as a substitute for sand.
Coloring Fireplace Logs and Chips
Soak logs and chips in a solution of water and salt and you get yellow flames when the wood is burning; soaking in borax and water produces green flames. Try throwing salt or borax into your next campfire and see the flames change colors -don’t throw in the whole box, ½ cup will get you started.
Costume Makeup
Combine liquid skin cleanser with powdered sugar for thickness and add food coloring. This wipes right off.
Holes in Plastic
To make holes in plastic, use the heated tip of your hot glue gun. It is easier and safer than using a heated nail and pliers.
Antiquing Effects
Apply a liberal amount of black or brown paste shoe polish to an object to be “antiqued”. Wipe off excess polish before it dries. This gives an especially good effect when used with tin foil.
Sand Painting
On a piece of cardboard, draw a design. Since the American Indians are the foremost exponents of sand painting, an Indian scene or design could be used. Indicate on the design the colors that are to be used. Cover the area that is to be painted with white glue and pour the proper color of sand on the area. Shake off the excess sand. Work with only one color at a time. If the area is large, do it in several pourings. Or you might want to try a freehand sand painting. Cover the entire cardboard with white glue. Add colored sand in a random manner, forming an abstract design. The cardboard should be small enough so that the glue won’t be dry before you are through. This is an interesting technique and can bring out some unusual designs.
Sand Casting
Sand casting is also fun and fits in with sculpture. Boys sculpt a design in damp sand, using hands, tools and any shapes available such as plastic animals, letters, cars, etc. Then pour plaster into the mold. Casting will have sand sticking to the plaster. Mount on a velvet, burlap or varnished board.
Salt Scenes
- Pour salt (or white sand) on paper or in jars with lids to mix.
- Add colored chalk or powdered tempera and mix.
- Pour salt in bottle or jars in layers to make design.
- Use a toothpick or an object with a sharp point to poke holes in layers to make design.
- Seal with wax.
Color Basics
Identify to which group each color belongs.
Colors |
Primary |
Secondary |
Neutral |
Green |
|
|
|
Grey |
|
|
|
Orange |
|
|
|
Purple |
|
|
|
Red |
|
|
|
White |
|
|
|
Yellow |
|
|
|
Black |
|
|
|
Artist Quiz
Match the answers on the right to the clues on the left.
1. A primary paint color a. Violet
2. Genius Kit b. Design
3. Pleasing arrangement of shapes or Lines c. White
4. A secondary paint color d. Blue
5. Mixture of blue and yellow e. Construction
6. Hanging shape f. Green
7. Mixture of blue and red g. Orange
8. Add this color to make a hue lighter h. Mobile
Rubbings
All you need is typing paper or tissue paper and a pencil or crayon to create simple projects with fascinating results.
To make a rubbing, just place a piece of paper over any hard raised surface and color over it. Whenever it is possible, use masking tape to hold the paper in place while rubbing.
Slippery Fingers Painting
Put on OLD clothes and cover your worktable well with old newspapers when you try this colorful project.
Materials
- 1 envelope of flavored gelatin small bowl
- ½ cup cornstarch large spoon
- 2 cups hot water stove
- Powdered or liquid clothing dye (if liquid dye is used increase the cornstarch to ¾ cup)
- ½ cup cold water
- ¾ cup cold water
- ½ cup mild soap flakes or detergent medium size saucepan
- Heavy paper to paint on* *You might also use old bowls or jars
Directions
- In a small bowl, soak gelatin in ½ cup cold water. In saucepan, combine cornstarch and ¾ cup cold water. Stir 2 cups hot water into starch mixture and cook over medium heat, stirring constantly till mixture comes to a boil.
- When mixture becomes smooth and creamy-looking, remove from heat. Blend in softened gelatin. Add soap flakes or detergent and stir till mixture is thoroughly dissolved.
- If you want different colors of paint, divide mixture into portions in jars or bowls before you add the dyes.
- Stir in about a teaspoon of powdered dye or a tablespoon of liquid dye for each cup of mixture. Paint should be cooled before you use it.
- Rub, smudge or blend the paint on paper. To keep paper from curling, weigh edges down while paint dries.
- Another rubbing technique is done with aluminum foil. Just place the foil over the particular object and press and mold the foil with your hand.
Some objects that you can use for this technique are:
- Wrought iron trivets
- Shells
- Coins
- Jewelry
- Silverware
- Leaves (especially evergreens)
- License plate
- Baskets
Regardless of which technique you decide to use (you may even want to experiment with both kinds), you will have fun.
Wire Sculpture Action Figures
Your boys will love this intricate and engrossing art project. They can fill the hours spent inside on a rainy day creating a wire sculpture of a favorite sports figure or memorializing a treasured family member.
Materials
- Old magazines
- Telephone wire or any flexible wire
- Cardboard base
- Stapler
- Look through the magazines for pictures of people in action.
- Choose a picture to use as a model for a wire sculpture
- Form the head, body and legs with long lengths of telephone wire using groups of two to four strands. Add arms and props such as a tennis racquet, bat or baby.
- Staple the figure onto the cardboard base.
Five Dots
Give each boy a piece of paper and have him place five dots on it wherever he pleases. He then passes it to another boy and has him try to fit on the paper a drawing of a person using the five dots as the head, hands, and feet.
Outlines or Wiggles
Give everyone a pencil and paper and have him draw a wavy or zigzag line. Then tell the boys to exchange papers and make their line into a picture. The one with the funniest or the best picture is the winner.
Den T-Shirts
Use wax crayons to transfer a design to fabric. Maybe the boys would like to design and personalize their own den T-shirts.
Make the design first on paper and the use a mirror to draw the design. Then draw the design with wax crayon on thin paper. Lay the paper on an ironing board with the design facing up. Then lay the fabric face down on the top of the paper. Be careful to place the fabric over the design so it will appear where you want it to be. Remember this will print a mirror image so be sure that the design is drawn backwards from what you want it to look like on the finished product. Place a damp cloth over the fabric and iron with a hot iron.
Northern Star Council
The Artist Activity Badge is recommended to be presented in a one month format, as outlined in the Webelos Program Helps booklet. This example outline presents the Badge in four weekly meetings. Every requirement is covered in the outline in four meetings. Each Scout who attends all meetings will satisfy all of the requirements.
BRING LOTS OF NEWSPAPER TO PUT UNDER THE ARTIST'S PROJECTS.
Two projects can be done at home, and you should encourage the Scouts to do some work at home. These projects are the Mobile and the Construction.
Use the Webelos book in the meeting. Have the Scouts read sections from the book. Use all the resources you have available. Make sure you sign off their books each meeting.
Week 1
Requirements to be fulfilled:
DO FIVE OF THESE:
1. Draw or paint an original picture. Use watercolors, crayons, or acrylic paints. Frame it for your room or home.
2. List the primary and secondary colors. Tell how to combine colors.
Discussion :
1. Read the introduction and requirements on pages 47 and 48 Discuss the requirements and how they will be worked on in and outside the Den. Make sure the Scouts know about the activities that will be done at home.
2. Read pages 48 - 52 on painting. Bring materials into the Den meeting to accomplish the first requirement. If paints would be too messy in your environment, use markers or colored pencils, perhaps colored chalk. Use the correct kind of paper for the project. Create an original picture in the Den meeting.
3. Read pages 52 and 53 on the Color Wheel. Get a color wheel to show the scouts. Show them primary and secondary colors. They have probably had this in school and probably memorized it already. Show them how to combine colors.
Homework:
1. What kind of art projects have you done in School. Bring in some examples to show the Den.
Week 2
Requirements to be fulfilled:
3. Make six designs using straight lines, curved lines, or both.
4. Make a profile of a member of your family.
Discussion and Demonstration:
1. Read pages 54 - 56 on Design. Get out the paper and colored pencils or markers again and have the scouts make six designs using straight and colored lines.
2. Read page 57 on Drawing profiles. Bring some butcher paper or other wide paper into the Den meeting. Tape the paper on the wall and point a light at it. Have each Scout take a turn being the model and making one of the profiles, until everyone is done.
Homework:
1. Decide on what you will do for a mobile. Either make it at home or bring the materials into the next Den meeting. [Leader send home a reminder to the parents that the Scouts should be acquiring the materials to make their Mobile and also their construction the following week.]
Week 3
Requirements to be fulfilled:
5. Use plastic or clay and sculpture a simple object.
6. Make a mobile.
Discussion and Demonstration:
1. Read pages 57 - 60 on Sculpting. Get some acrylic modeling clay. Put down lots of newspaper. Have the Scouts sculpt a head. Show them how to make the egg shape and stand, then have them make any head figure they want. Take the models home and fire them in your oven to harden them.
2. Read pages 61 - 62 on Mobiles. Bring in thin dowels and/or coat hangers. Bring in string and some small objects. The Scouts should bring in their Mobiles or materials to make their mobiles
Homework:
1. Decide on what you want to do for a construction. Choose your materials. Work on the construction at home and bring it into the next Den meeting. Or, at least being the materials into the meeting.
Week 4
Requirements to be fulfilled:
7. Make a construction. Use your choice of materials. Examples are dowels, screen wire, cellophane, and string.
Discussion and Demonstration:
1. Finish up any remaining stuff from the previous week.
2. Read pages 62 - 63 on Constructions. The Scouts should arrive at this meeting with either a construction or the materials they want to use to make one. Bring in craft sticks and glue for those that didn't bring in materials. PUT DOWN LOTS OF NEWSPAPERS. Make the constructions.
Bring all the projects to the nest Pack Meeting to show the parents and other Scouts.
Materials found in Baloo's Bugle may be used by Scouters for Scouting activities provided that Baloo's Bugle and the original contributors are cited as the source of the material.
Materials found at the U. S. Scouting Service Project, Inc. Website ©1997-2006 may be reproduced and used locally by Scouting volunteers for training purposes consistent with the programs of the Boy Scouts of America (BSA) or other Scouting and Guiding Organizations. No material found here may be used or reproduced for electronic redistribution or for commercial or other non-Scouting purposes without the express permission of the U. S. Scouting Service Project, Inc. (USSSP) or other copyright holders. USSSP is not affiliated with BSA and does not speak on behalf of BSA. Opinions expressed on these web pages are those of the web authors.
|
|