November 2006 Cub Scout Roundtable Issue |
Volume 13, Issue 4
December 2006 Theme |
Theme: Cub Scout Stars
Webelos:
Craftsman & Scientist
Tiger Cub Activities |
PACK AND DEN ACTIVITIES
Advancement opportunities
Sam Houston Area Council
Tiger Activities
Go and See it to the Houston Museum of Natural Science planetarium
Wolf Achievements and Electives
Elective 9 – Let’s Have a Party
Elective 11 – Sing Along
Bear Achievements and Electives
Elective 1 – Space
Elective 6 – Aircraft
Places to Go
Go to an observatory or planetarium. Many colleges have planetariums. Rowan University near me has a beautiful one and it is FREE to youth groups. Big city natural history and science museums (e.g. The Franklin Institute in Philadelphia) have planetariums. Check out your area. I remember seeing a show in the Hayden Planetarium in New York City when I was growing up where they tracked stars back to the birth of Christ and showed how the models projected that there was an exceptionally bright star in the heavens at that time.
Schedule an after dark meeting in a filed or park. Line up a local astronomy club (They love to show off) and have an evening of stargazing. We invited two Astronomy Clubs to set up at Webelos Resident Camp this summer and they brought out all the big scopes and such. The boys were really impressed. Make arrangements to use a local ball field or something. The middle of a big lake (frozen, of course) is great. My best stargazing nights when I was a Scoutmaster was from the middle of Sand Pond at Camp No-Be-Bo-Sco by the Delaware Water Gap. (By the way No-Be-Bo-Sco is an old Indian word meaning – North Bergen Boy Scouts back from when North Bergen County Council existed. I worked staff there in 1965 and 1967). Finish the night off with hot cocoa and goodies.
HOW TO FIND THE NORTH STAR AND CASSIOPEIA
Grand Canyon Council
To locate the constellation Cassiopeia, you must look into the Northern section of the night sky. If you don't know someone who can point this area out to you, use a compass to find north.
Next, try to find the Big Dipper in this part of the sky. It will be near the northern horizon and is quite large. On winter evenings it will be standing on its handle, just to the right of due North. During summer evenings the Big Dipper will be to the left of due North and standing on the dipper part.
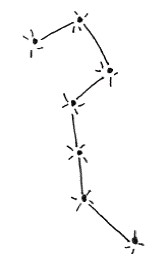
Regardless of the position of the Big Dipper, you can use it to find the North Star and Cassiopeia. The two stars that make the front edge of the dipper part are called the "pointers", and point to the North Star, which is about four times as far away from the Dipper as the pointers are apart.

Don’t stop after locating the North Star. Continue along in the same direction, going an equal distance on the other side of the star until you see a group of stars that form a large zigzag W. This is the constellation Cassiopeia. It may not be right side up and may look more like an M.
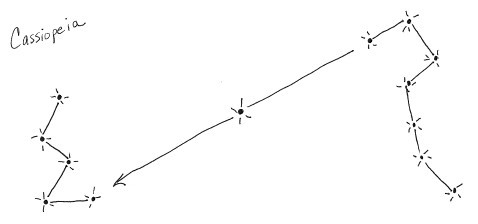
You will not be able to find Cassiopeia in the evening sky from May through August, because it will be below the northern horizon. However, on clear evenings during the winter months, you will be able to see this constellation as it arcs across the northern sky.
Easy Star Gazing
Commissioner Dave
I earned my Astronomy Merit Badge from Mr. Jacobsen in February in Hillsdale in Northern Jersey. It was cold. And as a result, I love the winter sky and get lost in the summer sky. Mainly because in the winter I can find Orion and from there find a lot of other stuff. Here are two basic keys to navigating the winter sky.
The Winter Triangle
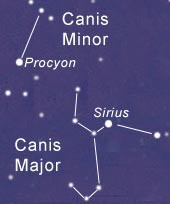
This consists of three (duh) constellations and three bright stars. The constellations are Orion, the hunter, and Cannis Major and Cannis Minor, two of his dogs.
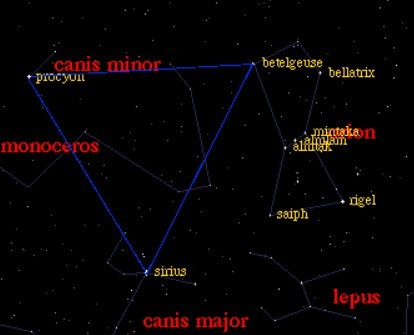
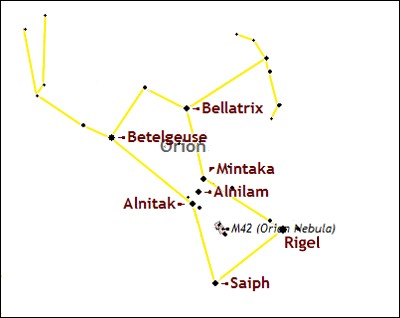
Look Up high in the heavens to locate the three stars making up the belt of Orion.
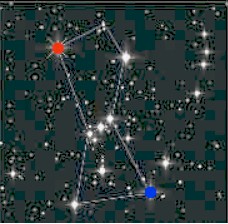
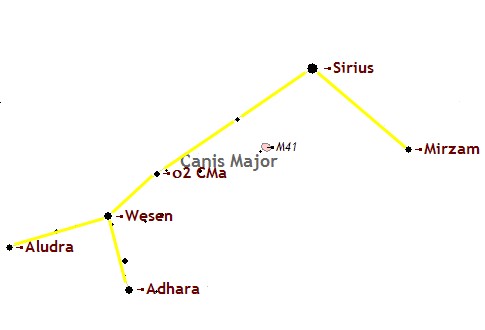
If you focus on the three stars in the Belt of Orion and follow them southeast (down and to the left), you will find they point to the brightest star in the heavens, Sirius. If you draw your focus out from the middle star of Orion’s Belt you will find that it points to the reddish star Betelgeuse in one direction (Betelgeuse is top left in the box of four stars surrounding the belt) and to a bluish star, Rigel, in the other direction. (Rigel is bottom right in the box of four stars surrounding the belt). Locating Sirius and Betelgeuse gives you two of the three points of the Winter Triangle. The third point, Procyon, is located well to the upper left of Sirius.
Here’s a Winter Triangle fun fact from Sky and Telescope:
One reason Sirius and Procyon look so bright is that they are among the closest of all the stars. Sirius lies 8.6 light-years, and Procyon 11.4 light-years, away from Earth. If you show them to kids whose ages are about 9 and 11 you can describe them as their birthday stars—the light they see tonight left Sirius and Procyon around the time these children were being born."
Procyon is in Canis Minor which is basically two stars, Procyon and one other.
If you connect Sirius, Procyon and Betelgeuse, you have the Winter triangle. And you have found three constellations – Orion, Canis Major and Canis Minor.
Ready for more???
The Winter Hexagon
Now we are going to do six constellations and add in a seventh for fun!!
The constellations are
Orion, the Hunter
Cannis Major, the Big Dog
Cannis Minor, the Little Dog
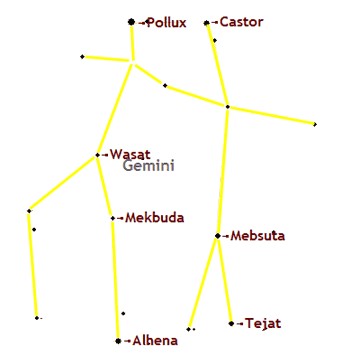
Gemini, The Twins
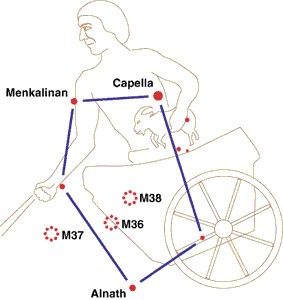
Auriga, The Charioteer
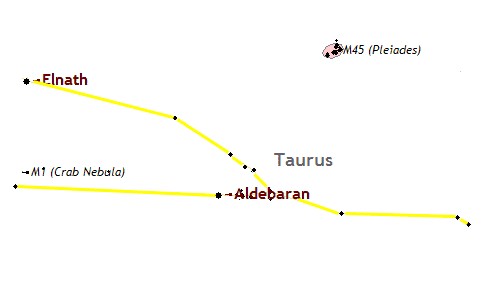
Taurus, the Bull
After locating and becoming familiar with the Winter Trianglecomposed of Betelegeuse, Sirius and Procyon, we're now ready to discover the Great Winter Hexagon,another divine design in the winter skies.
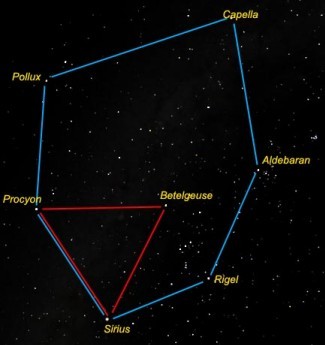
This heavenly hexagon houses the Winter Triangle with the stars Sirius and Procyon forming points in both of these geometric wonders. The six stars of the Great Winter Hexagon are Sirius (in Canis Major), Rigel (In Orion), Aldebaran (in Taurus), Capella (in Auriga) , Pollux (in Gemini) and Procyon (in Canis Minor).
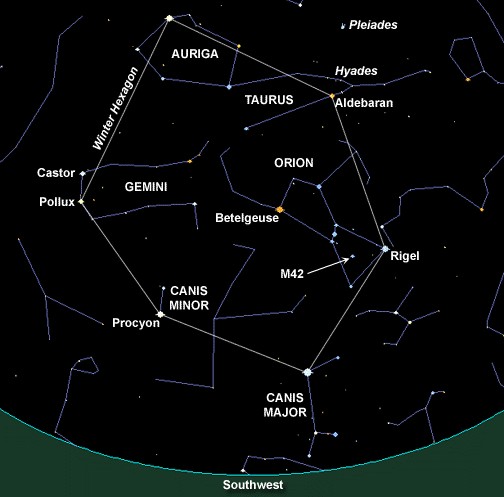
Locating the Winter Hexagon
Begin your star search on a clear winter night between 8:00 and 10:00 pm, look from overhead toward the south.
First find the three stars of Orion's belt and follow them southeast (down and to the left), you will find they point to the brightest star in the heavens, Sirius, and the first star in our hexagon. Sirius is also in the Winter Triangle. Go back to Orion's Belt, if you draw your focus out from the middle star of Orion’s Belt you will find that it points to the reddish star, Betelgeuse, in one direction and to a bluish star, Rigel in the other. Find the bluish star in the leg of Orion and imagine a line connecting Sirius to it. Once again follow the three stars in Orion's belt in the direction opposite of Sirius and you will find the bright red star of enlightenment, Aldebaran. Draw a line from Rigel to Aldebaran. Now head for the next closest brightest star Capella, the Charioteer's eye, which is directly opposite Sirius in our hexagon. As you connect Aldebaran and Capella the hexagon is now half imagined! Just east of Sirius is the brightest star of Canis Minor, Procyon, which also forms a point of the Winter Triangle. Between Procyon and Capella is another bright star Pollux of Gemini, the Twins. Connect Sirius to Procyon to Pollux to Capella and the Winter Hexagon is complete in your mind's eye!
Ponder on This
Sirius is known as the Christ Star or the God Star.
Rigel has been known as the mariners' star.
Aldebaran is the star of enlightenment.
Capella is the Charioteer's eye. The Charioteer is the heavenly Santa Claus.
Pollux and his twin Castor have been immortalized for brotherly love and their help has been invoked in war and storm. It is said that Pollux represents the Soul and Castor the personality.
Procyon is the brightest of the two stars that make up Canis Minor, the little dog, which now stands on the back of the Unicorn and has been associated with the Egyptian dogheaded God, Anubis, the guide of souls.
Now for a bonus –
Just to the right of Aldebaran in Taurus, you will see a small cluster of stars looking like a tiny dipper. That is the Pleiades, the seven sisters or seven boys (depending on which legend you read). There is a story about the Pleiades in Baloo this month!
For a cool site to play with for the winter hexagon -
http://canopus.physik.uni-potsdam.de/~axm/images/winter_hexagon.html
A great site for your Cubs –
http://www.dustbunny.com/afk/
(AFK – astronomy for kids)
This article was adapted from information I found at many web sites after I searched “Winter Hexagon” on Google.
http://homepage.mac.com/kvmagruder/bcp/aster/constellations/win6.htm
http://antwrp.gsfc.nasa.gov/apod/ap021106.html
http://www.souledout.org/nightsky/winterhexagon/winterhexagon.html
http://www.answers.com/topic/winter-hexagon
http://www.daviddarling.info/encyclopedia/W/Winter_Hexagon.html
TELLING TIME BY THE STARS
Grand Canyon Council
While the ancient Egyptians built sundials to keep track of daylight hours, during the night they measured the movement of the stars across certain portions of the sky.
They associated their goddess Isis, "the lady of all the elements, the beginning of all time" with the brightest star in the night sky, Sirius.
They built temples facing the point on the eastern horizon where Sirius first appeared before sunrise. Ancient Egyptian astronomers, tracking Sirius for their calendar, started a new year at the first new moon following the appearance of Sirius and all awaited the annual floods that irrigated the land.
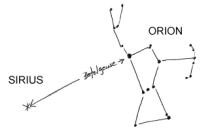
In the Northern Hemisphere, a February evening is a good time to look for Sirius to the side and a little below the group of stars knows as Orion the Hunter. Face south at about 9 pm. Orion is high in the winter sky but not visible in northern skies during the summer. Using the line of Orion's belt as a guide, look southeast for the Dog Star. (Find Orion by looking for his belt which has 3 stars in a row)
Tin Can Constellations
Sam Houston Area Council
Materials:
- Empty “tin cans” washed, filled with water and frozen
- Hammer
- Nails, an ice pick or awl for punching holes
Directions
- First freeze water in the cans, before you try to hammer nails into them.
- By having ice in the cans, the bottoms of the cans will not bend as easily and you can make more accurate patterns.
- Enlarge one pf the patterns to fit the end of the can that is still attached
- Tape the pattern piece to the can or draw the constellation on the can using the pattern as a stencil
- Punch holes in the can where the stars are
- After punching the holes, let the ice melt and pour out the water.
- Shine bright flashlights through the cans toward a ceiling in a dark room.
Tin Can Constellation Patterns
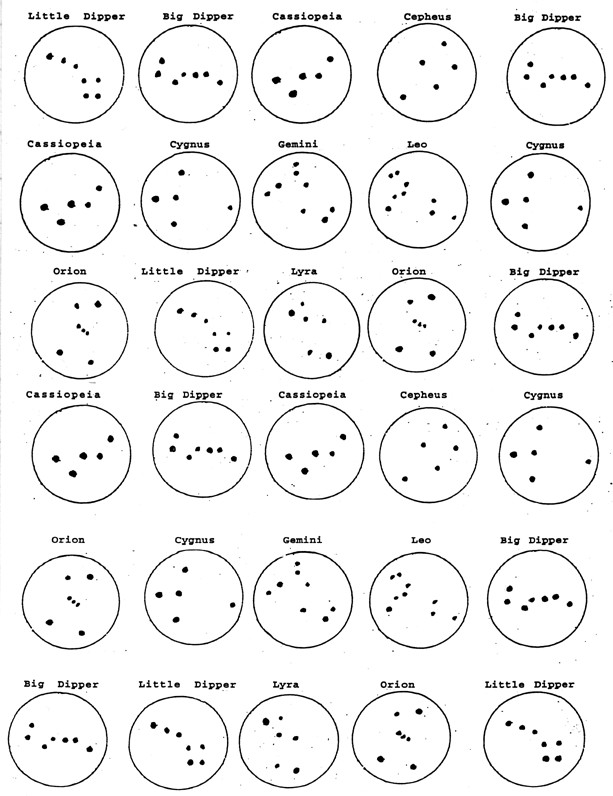
The full size version of this is at the end of Baloo.
I guess there are several of each constellation because the pattern can only be used once. Perhaps they, also, use it for a BINGO type game. If you can invent a game that uses the board, send it to me, please. CD
Identifying Constellations:
Sam Houston Area Council
After making the tin can constellations, shine sets of five on the ceiling and have a contest to identify them.
Once the boys have a good mastery of knowing the constellations, take them out on a dark, clear winter evening and have them identify as many constellations as they can.
Cereal Box Planetarium
Grand Canyon Council
Materials:
Round box (the kind that oatmeal or raisins are packaged in), tracing paper, pencil, glue, small nail, and flashlight.
What to do:
- Make a circle of tracing paper to fit the bottom of the box
- Then trace the illustration of the Big Dipper, the North Star, and Cassiopeia (found elsewhere in Baloo) onto the thin piece of paper.
- Glue the paper to the bottom of the box.
- With the nail punch holes through the box at each star.
- Take your planetarium into a dark room and stand facing one of the walls.
- At the open end of the box tilt a flashlight so that it shines against the side.
- Turn the box slowly.
What happens?
You get an enlarged image on the wall.
When you turn the box, you will see the various positions of the stars, as they seem to revolve.
Why:
The Earth rotates on its axis, so the constellations appear to circle around the North Star, which remains at the same place in the sky.
Therefore, you see these constellations in all positions - on their sides or even upside down. The "W" shape of Cassiopeia becomes an “M”depending on when it appears above the North Star.
You can, also, do this with tin cans of various sizes but be careful of the sharp metal edges. Freeze water in the cans first to keep them from collapsing as you hammer the nails.
THE SKY AS A COMPASS
Grand Canyon Council
If you are ever lost in a forest at night,
you can use the sky to find your way.
- Find the North Star, which is the brightest star in the northern sky. (Directions are in Baloo) When you face it you are looking north.
- Now turn halfway around (180 degrees, as they say) and look across the sky to the horizon. That is south.
- East is a quarter-turn (90 degrees) to the right when facing north.
- West is a quarter-turn (90 degrees) to the left when facing north.
- Can't find the North Star?
If it is Winter, look for the distinctive Orion constellation. It is in the South. Now, do you know how to find North?
Cut a 5-Pointed Star in One Snip
George Washington's original pencil sketch for the flag indicated 6-pointed stars, a form he apparently preferred.
Betsy Ross, however, recommended a 5-pointed star. When the committee protested that it was too difficult to make, she took a piece of paper, folded it deftly, and with a single snip of her scissors, produced a symmetrical five-pointed star. This seeming feat of magic so impressed her audience that they readily agreed to her suggestion.
To you we pass along the secret...
AS found on the Betsy Ross Website –
http://www.ushistory.org/betsy/flagstar.html
Take a thin piece of paper 8-1/2" x 10" NOT 8 ½ by 11(or an exact proportion thereof), fold it as indicated and cut yourself a perfect 5-pointed star.
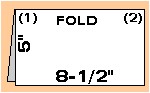
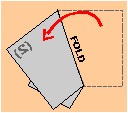
Step #1:
Fold an 8-1/2" x 10" piece of paper in half. |
|
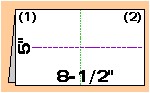
Step #2:
Fold and unfold in half both ways to form creased center lines. (Note: be sure paper is still folded in half.) |
|
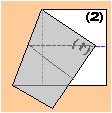
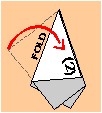
Step #3:
Bring corner (1) right to meet the center line. Be sure to fold from the vertical crease line. |
|
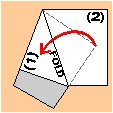
Step #4:
Bring corner (1) left till edges coincide, then make the fold |
|
Step #5:
Bring corner (2) left and fold. |
|
Step #6:
Bring corner (2) right until edges coincide. Then fold. |
|
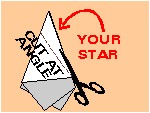
Step #7:
Cut on the angle as shown in the picture.
Then unfold the small piece |
|
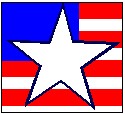
Step #8:
Marvel at your perfect (we hope!) 5-pointed star!
If your star is not perfect, take a fresh piece of paper (8-1/2" x 10" — not 8-1/2" x 11") and return to Step 1
. |
|
Star Pinwheel:
Sam Houston Area Council
Materials:
- unsharpened pencil with eraser
- Colored construction paper,
- Small plastic bead,
- 1” straight pin with a spherical end,
- Wooden bead ½” wide,
- Ruler, scissors, white glue, pencil
Directions:
- Cut the construction paper into a 5” square.
- Use the ruler to draw lines from opposite corners, so that they intersect at the very center of the 5” square.
- Draw a 1” diameter circle in the very center of the square.
- Cut the square from the tip of each corner straight to the edge of the circle in the center.
- Put a drop of glue in the center and carefully fold over one corner to be slightly over the center.
- Hold the paper on the glue (without creasing it) until it sticks.
- Now repeat this gluing, folding and sticking as you move clockwise around the square.
- Push the pin through the center of the folded and glued paper, so that the spherical end helps to hold it all together.
- Thread the sharp end through the small wooden bead and stick the pin into the pencil eraser.
- Decorate the pinwheel with stars, etc.
The pinwheel is now ready to spin, and
the boys can carry them around the room.
Pocket Sundial
Grand Canyon Council
The sundial is the oldest scientific instrument still in use. Long before mechanical clocks and watches were invented, people used sundials to tell time. As the sun moves across the sky, the shadows it casts change their position. Ancient peoples learned to mark where shadows fell on a sundial to tell the time of day.
This particular sundial is called a cylinder, or shepherd's dial. It was widely used hundreds of years ago because it was inexpensive, simple to make and easy to carry. Some sundials were more elaborate. George Washington carried a silver sundial in his pocket.
What You’ll Need
- 1 - wooden dowel - 1 inch thick (a piece of broomstick will do)
- 1 - nail or an awl
- 1 - screw eye
- 1 - wire nail 1 inch long
- A saw.
- A hammer
What to Do
- Cut a 4” long piece of dowel
- With the nail or awl, make a small hole in the top of the dowel.
- Screw the screw eye into the hole. The screw eye must be in the center of the dowel end.
- Hammer the wire nail lightly into the dowel about 1/2 inch from the top (the end with the screw eye). Drive the nail in only far enough to hold it firmly. Be sure the nail sticks straight out.
- Use a photocopy machine to copy the sundial graph, and carefully cut it out along the dotted lines.
(You may have to adjust size of graph as you copy it. CD)
- Wrap the graph around the dowel, with the top touching the nail.
- Overlap the ends of the graph, and tape it with cellophane tape. Don't let the tape touch the dial. Leave the graph a little loose so it can turn freely on the dowel.
- Push the graph up until it touches the nail, and place a thumbtack at the bottom of the graph to keep it from sliding back down. Don’t put the tack through the graph (the graph must turn).
- Tie a short piece of string to the screw eye.
How To Use Your Sundial
- The letters at the bottom of the graph, represent the months of the year. Turn the graph on the dowel until the letter for the current month is directly below the nail.
- Stand with your back to the sun and hold your dial up by the string. (The sun mist be shining for the dial to work)
- Slowly rotate the entire dial until the shadow of the nail points straight down
- The shadow of the head of the nail will indicate the time on the graph. Notice where this nailhead shadow falls on the graph.
- Each curved line on the graph stands for two different hours. For example, 9 am and 3 pm share the same line. If the shadow falls here it is either 9 am or 3 pm. You must decide which time it really is.
- During Daylight Savings Time you will have to add one hour to the reading to get the correct time.
Important: Until you adjust the dial for your location it will not read correctly.
How To Adjust Your Sundial
- Hold the dial up in the sunlight and see where the nailhead shadow falls. Read the time on the graph.
- Now, read the time on a normal clock or watch. You must adjust the length of the nail until your dial reads the same time as the clock. You can do this by slowly hammering the nail in until the dial reads correctly, or you may cut the nail off until it is correct.
Important: If you are doing this during Daylight Savings Time (and use Daylight Savings Time) you must adjust the nail to read one hour less than what the clock reads.
Later, when using the sundial, you must add one hour to the reading to get the correct time.
Nocturne Night Dial
Grand Canyon Council
With this colorful dial you can tell time by the stars. Just turn the large outer dial so the current date is at the top, and look through the center hole at the North Star. Turn the pointer to the center star in Cassiopeia, and read the time in the slot. (During Daylight Savings Time, you'll have to add one hour to the time that appears in the slot.)
What You’ll Need
- Scissors
- White glue
- Posterboard
- A grommet
Directions:
- Copy the drawings of both dials-the round one and the pointed one on a photocopy machine. Drawings are at the end of this issue of Baloo.
- Cut out the photocopied dials
- Glue each one onto a piece of posterboard.
- Trim the posterboard to fit.
- Color both dials with anything you like--crayons, Sharpie markers, watercolors, and magic markers.
- Cut out the slot at the top of the pointed dial.
- Lay the pointed dial on top of the round one, so that the cutout slot is over the circle of times.
- Cut a hole through the center of both dials.
- Attach the two dials in the center with a grommet. Grommets have two important characteristics:
- They're hollow in the center, so you can sight through the center of the dial:
- They'll allow the pointed dial to rotate. A grommet is installed with an inexpensive metal tool.
- If you don't want to use a grommet, look for something else that might do the same job. For example, an audio intake valve-the kind used to attach an electric guitar to an amplifier would also work.
Dial patterns are at the end of Baloo
Slide Materials
San Gabriel Valley, Long Beach & Verdugo Hills Councils
This list is passed on to you from a leader in Long Beach Area Council, CA
As you go through the list of slides below, you will notice many different materials.
- I have found that for the loops, the best things are pipe cleaners (chenille stems), loops of leather, and my new favorite, clear flexible PVC (also known as Tygon tubing at the aquarium shop). You can get this hose material at the hardware store, it is very cheap (20-35 cents per foot) and you can cut it with a good, heavy scissors. Plus it is invisible!
- For leather, look to old purses, old leather coats (fur ones, too), leather belts, etc. Check the Goodwill or Salvation Army.
- Any leather or felt pattern can be duplicated easily using a material called Fun Foam. It comes in brilliant colors plus shades, can be cut with a scissors, and is so easy to use and very inexpensive if you watch for it on sale. Check your local craft store.
- A good leather substitute is vinyl (naughahyde) fabric. Go to an upholsterer's shop and ask for scraps. Also ask for scraps of trim, lacing, leather, and other materials.
- Plastic milk cartons have a very nice plastic that cuts easily for bases, loops, or cut-out slides.
- Paint-stirring sticks are great sources of free, good wood for slides and other projects.
- Check Clearance sales after Christmas and other holidays for wooden ornaments. I have some exquisite hand-carved cowboys and birds that were originally intended for a Christmas tree.
- Pins and large earrings also make good slides.
- Laminated Countertop samples make great backings for slides and also mini clipboards. Look in the cabinet section of the local Home Depot/Lowes/Do-It-Yourself Centers.
- Milk/orange juice jug caps make great 'frames' for plaster, cotton balls, cardboard circles covered with felt or pictures, etc.
- Refrigerator Magnets are a great, cheap resource. Hot glue a ring on the back. Check the "Dollar" stores for some real deals! Some even light up and make noises!
- Key chains, same as refrigerator magnets. I found one that is a miniature Coleman Lantern that really lights up. Drove my Scouter friends wild the first time they saw it.
- My best finds are in the hardware store. Go cruising, and use your imagination.
- The Butcher shop will give you leg bones cut into slices. Try scrimshawing them (older Scouts, only).
- Your local Pet Store will have rawhide dog chews that can be soaked, stretched, and made into various Indian styles of slides, such as drums, stretched hides, tiny shields, etc.
- Check Wal-Mart, Woolworth's, and the Dollar type stores for plastic frogs, insects, snakes, etc. They look great crawling across a neckerchief. Hot glue a clear PVC ring to them. Nature stores have these small model animals, too, but you should never pay more that 25-50 cents each for them. Puns abound with these (Don't get bugged about it, Hop to it, etc.).
Rocket Slides
San Gabriel Valley, Long Beach & Verdugo Hills Councils
Version 1
Materials: Standard slide materials, 3/8" X 1-1/4" dowel pieces, Bits of heavy paper, Decorating materials (paints, glitter glue, etc.)
Directions:
Have boys cut out and glue fins onto bottom of rocket and make a cone for the top. Decorate rocket and slide backing (1-1/4" paneling disk) as desired. Glue rocket onto backing. Glue slide ring onto back of slide.
Version 2
Materials: Art Foam, Tulip paint, glue, pipe cleaner
Cut rocket out of art foam. Decorate with paint. Glue pipe cleaner on back.
Quick Slides
San Gabriel Valley, Long Beach & Verdugo Hills Councils
This list is passed on to you from a leader in Long Beach Area Council, CA
Can't find your slide? Try these fast answers:
- Most costume jewelry rings or inexpensive rings make interesting, but rather small slides.
- Key chains can be interesting slides if they are the right size and have interesting things that hang down right. Those with tabs usually work the best.
- Pieces of clean tubing, such as plumbing pipe, conduit, chromed tubing, etc., can be used if smooth and de-burred.
- Napkin rings usually make good slides. Look for exotic slides at import shops.
- Some of the big 'conchos' with two big slots in them make good slides. Thread the neckerchief up from behind the top slot, then back down into the bottom slot.
- Hair barrettes (especially for tying back long hair)
- Decorative Pins (clay art ones and Indian design ones)
- Scarf holders and T-shirt loops (flat pieces of wood or plastic with 2 holes to gather your extra long T-shirts at the hem for that sporty, fashionable look. I have one that is a ceramic fish that is super!)
Here are some non-theme-related projects that would make great Holiday presents
Emergency Road Signal
Sam Houston Area Council
For safety purposes, keep an emergency road signal in your car.
Materials
- Two – 1” hinges and screws
- Two – small screw eyes
- 12” plumber’s chain or wire
- Glass reflectors or reflector tape
- Two – 4” X 24” X 3/4” boards
- Sandpaper, Screwdriver, Hammer
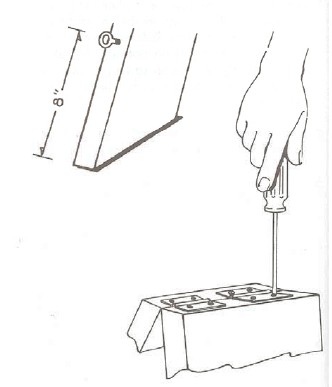
Procedure
- Cut the boards to length and sand edges smooth
- Nail the reflectors to one side of each board or apply reflector tape in several strips on each board
- Using the screwdriver, screw the hinges to the top of both boards
- Measure 8” from the bottom of each board
- Screw in a screw eye at that point
- Attach the plumber’s chain or wire to the screw eyes
If your car breaks down at night, place the emergency signal on the highway a reasonable distance back from your car
Golf Tee Game:
Sam Houston Area Council
Materials:
- 2x6 board (a 3’ board makes seven games)
- 14 wooden golf tees per game
- 3/16” drill bit
- Hand Drills (Brace and bit) for Cubs
- Hand saw if Cubs cut boards
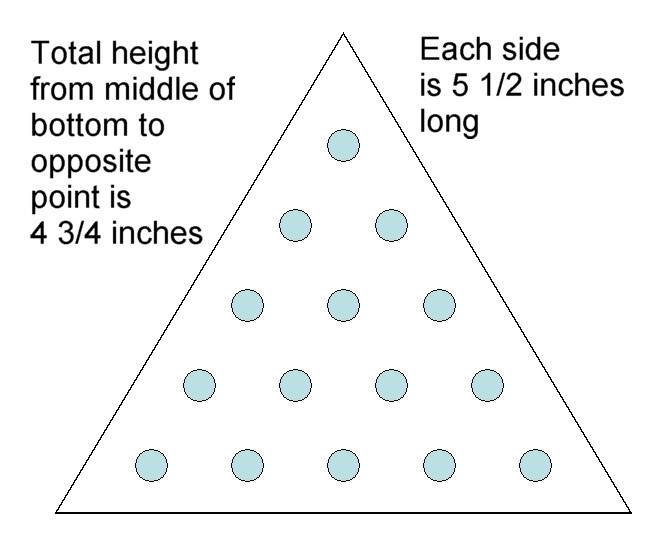
Directions
- Saw the 2x6 board into 4¾” lengths.
- Saw these lengths into equilateral triangles that are 5 ½ inches on a side.
- Drill fourteen 3/16” holes, in the pattern shown, straight down.
- Drill holes about 1¼” deep.
- Sand it well and round the corners.
- Stain the wood and let dry.
- Cover the bottom with felt.
When we made these, one dad made a template of the 14 holes. The boys could then put the template over their piece and start all 14 holes through the template.
How to play the game -
- Place the 14 tees in any of the 15 holes to start the game.
One of the tricks is to figure out how best to position them for the start.
- Tees can only be moved by jumping another tee that is in the same row and into an open hole.
- Every tee is a member of two (or sometimes three) rows.
- Once a tee is jumped over, then you take the tee that got jumped, off of the board.
- The object is to leave only one tee standing on the board at the end of the game.
- If you have left two or more tees that are not next to each other in a row, and thus can’t be jumped, then you start all over again.
There are several solutions to the game, but it can take a while to figure them all out.
Clatter Blocks
Sam Houston Area Council
Materials
- One – 24” long strip of wood 3” wide by ¼” thick
- 36” long pieces of 3/8” cloth tape or heavy ribbon (for six blocks)
- Stapler with staples or small tacks
- Sandpaper
Procedure
- Cut the strip into 8 – 3” long pieces to make the blocks. You will need six or seven, so this gives you some extras.
- Sand all the edges.
- Lay six or seven blocks end to end with about ¼” gap between blocks.
- Next weave the two outer tapes around the blocks, stapling the tape to the top end of each block as shown
 - Then weave in the center tape through the line of blocks in reverse direction and staple to the bottom end of each block as shown.
To Work:
- Hold one end block by its edges between thumb and fingertips.
- Start action by alternately dipping or raising the wrist and watch the amazing blocks perform.
To explain what this does is difficult, but the effect is very interesting.
As you twist the top block to touch the second block the blocks all seem to cascade downward.
An amazing trick and an excellent gift
Heavy ribbon works best, and be sure not to weave it too tightly.
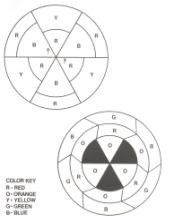
Spinning Color Wheel:
Sam Houston Area Council
Materials:
- Two pieces of string, each 28” long
- Large needle
- Scissors
- Paints
- Piece of Cardboard
- Two large buttons
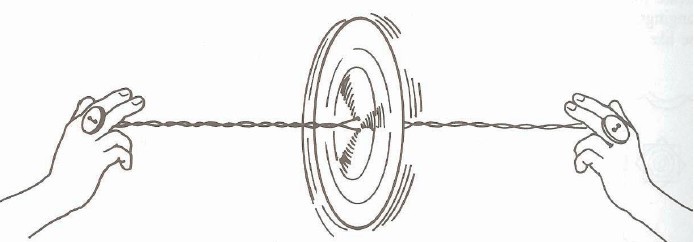
Directions:
- Cut the cardboard into 4½” circles.
- Paint each side of the disks with one of the patterns shown below.
- Thread the string through where the X’s are shown and tie through buttons at both ends.
- To make it spin, first roll it back, so that the string is twisted,
- Then pull outward on the string until it is straight.
- Let it keep spinning and twist up again, before you pull it again.
- Keep going as long as you want it to keep spinning.
Materials found in Baloo's Bugle may be used by Scouters for Scouting activities provided that Baloo's Bugle and the original contributors are cited as the source of the material.
Materials found at the U. S. Scouting Service Project, Inc. Website ©1997-2006 may be reproduced and used locally by Scouting volunteers for training purposes consistent with the programs of the Boy Scouts of America (BSA) or other Scouting and Guiding Organizations. No material found here may be used or reproduced for electronic redistribution or for commercial or other non-Scouting purposes without the express permission of the U. S. Scouting Service Project, Inc. (USSSP) or other copyright holders. USSSP is not affiliated with BSA and does not speak on behalf of BSA. Opinions expressed on these web pages are those of the web authors.
|
|