May 2007 Cub Scout Roundtable Issue |
Volume 13, Issue 10
June 2007 Theme |
Theme: Wheel Into Summer
Webelos:
Traveler & Handyman
Tiger Cub Activities |
PACK & DEN ACTIVITIES
Pack Summertime Activities
Santa Clara County Council
Rally Night Preparations and Training
Pack Pool Party: See Webelos Aquanaut section for ideas.
Pack Campout
Campfire Program
Advancements:
Alice, CS RT Commissioner
Pioneer District, Golden Empire Council
Tiger Achievements:
#2F While using a community map, find safe “wheels” routes
#2G Visit a Police Station: get information on “wheels” and bike safety
#4G Visit a radio or TV station – share with them some PSA ideas from web site:
Tiger Electives:
#25 use one of the Cub Grub ideas
#35 use one of the bicycle Game ideas
#37 Bicycle Ride
#38 Bicycle Repair and Maintenance
Wolf Achievements:
#5e – Make a bike rack (see plans in packet)
#9d – Practice good rules of street and road safety
#9e – Know the rules of bike safety
Wolf Electives:
#2 if your den puts on a skit about “Wheels” for the Pack Meeting
#3a if you make something useful, like a key holder or hanger for bike helmet, pads
#8b, cif you study and use some other useful “wheels”
#12f if you make a poster about “wheel” safety or to advertise a Pack Bike Rodeo
#18b with an adult, help plan and run a bike outing, bike rodeo, or helmet event
#20f know skating safety rules and demonstrate the required skating skills
#20o (partial credit) participate in an outdoor physical fitness activity involving “wheels”, such as a bike rodeo or bike ride
#21b write a report, using a computer, about bike safety or helmet use
Bear Achievements:
#3f or 3h – if the den participates in a flag ceremony for the Pack Meeting or a “wheels” event
#10a use “wheels” for a day or evening trip
#12d, e if you have an outdoor activity related to bikes, scooters, skates or skateboards
#14a through g Ride Right! – all about bikes
#17d use a computer to get information about wheels, wheel safety or to plan out a good route for safe “wheel” activities
#18d, e Write an invitation to a “wheels” activity, or a thank you for helping
#18f, g if you write about a family or den activity involving “wheels”
#20c if you use at least two of the tools to make a repair to your “wheels”
Bear Electives:
#7a With an adult’s help, make a scooter
**#7b or #7c if you make a windmill or water wheel
#18d help plan and lay out an obstacle race – use the ideas for a scooter course, or use ideas from the bicycle games and courses to lay out a bicycle course
#20e outdoor skating or inline skating
#23d make a map from your home to school or your den meeting – show safe routes for “wheels” such as a bike, skates, a scooter
Webelos Activity Badges:
Traveler make sure parents understand how this can be worked on while on Family Summer vacations and travel
Artist consider using “wheels” as your subject, or use scenes you see while on “wheels” as your subject
Athlete: #8 – Do a one mile bike ride, improving your time over a month’s time
Citizen: #14 – Laws of bike safety
Handyman:#6, #7, #8, #9 – Bike, skateboard maintenance and repair
Readyman: #9, #10 – Bike and “wheel sport” safety
Things To Do
Alice, CS RT Commissioner
Pioneer District, Golden Empire Council
- Visit a Bike Shop, Skateboard shop, or Sports Shop that handles scooters and skates. Call ahead to make sure they know you want the boys to learn about safety
- Invite a Bicycle Police Officer to come and talk to the den or pack.
- Check online or with your librarian for bicycling or wheel sports clubs – they may be able to help with a Rodeo or Safety Check Event
- Sponsor a bike, or skateboard, or scooter check – have tools and experts available to make sure “wheels” are in good repair and adjusted properly for each boy.
- Have a demonstration of how to maintain and repair bikes – let each boy try every skill so he can take care of his own bike.
- Go on a Den or Pack Cub/Parent Bike Ride – safety check gear first!
- Sponsor a Bike Rodeo at your sponsoring organization of nearby school or church. Check with AAA, police department or local bike clubs for help.
- Share facts about wheel safety with parents, including online games that will help develop safety awareness.
- Have each boy and his parents sign a contract that helmets and other gear will ALWAYS be worn and rules of safety observed.
- Check for local helmet sources – often, there are low-cost or even free helmets available
- Have a Helmet Safety contest – use plastic or real eggs (Real ones are better), various packaging materials, and each boy builds a “helmet” - have a contest to see if any of them keep the egg from breaking when dropped from adult shoulder height. Just think – that egg could be your brain in a “wheels” accident! More details at http://www.classroom.com
- Have a service project to clean up a local trail so it will be safer for “Wheels”
- Make a brochure of favorite places to ride “wheels”, with map directions, phone numbers, contact information – share it with others at Roundtable
- Have a Bike Rodeo on a String: See pg. “8 JUN 07” of Program Helps
(You could even do this several times during the month to help the boys develop skills - the various moves help boys to develop control of the bike while peddling or coasting, improve their balance, and learn how to make emergency stops and maneuvers – these are skills they need to have ingrained so they can use them without hesitation when needed)
- Lay out an obstacle course for scooters, or bicycles to use. If it’s a Pack activity, let each den have a certain portion of the course to lay out. Adult judges make sure of safety before everyone takes a turn going around the whole course.
- Learn about kids who always ride on wheels – in wheelchairs – or share a great website with a “wheeling” friend: http://www.wowusa.com go to kidsonline
- Want a great service project? Check out local groups who repair and paint bikes for kids who can’t afford them. Host a one-time event or turn it into a once a year, every year great Scouting Service Project! Go to kidswithoutwheels@bikesters.com or http://www.bikes.msu.edu/advocacy/index.html or just google “bikes for needy kids”
More Things To Do
Santa Clara County Council
Speakers –
- Invite a bicycle mechanic to come and talk with your den or pack. Or arrange to go visit with him or her.
- Arrange for a local mechanic to visit your den or visit his garage, perhaps he can show your den the safe way to change a tire, light bulb and to check the oil and transmission fluid.
- Invite someone from a bicycle club to review safety procedures
Field Trips
- Visit a local bicycle shop and talk with the mechanic to see if he will show you how to do a safety check upon your bike and perform minor adjustments.
- Visit an auto or truck dealership.
- Arrange a visit to a service station. Have the attendant explain the use of different types of equipment (jack, torque wrench, etc.). If possible have the attendant show them how to check oil level, check fluids and belts, check tire pressure, and change light bulbs. Organize a bike rodeo.
- Visit a train station
- Go to a roller rink
Activities
- Put on a bicycle rodeo for your pack or den.
- Have a clinic on the care and repair of bicycles. Set it up like a shop and have each boy bring his bike and do repairs, etc.
Scooter Safety
Consumer Product Safety Council
http://www.cpsc.gov/
Last year, over 40,000 people were taken to hospital emergency rooms in the U.S. because of injuries from riding scooters. Most of the injuries were to kids under 15!
Do you have a Kash N'Gold Racer, a Kent Kickin' Mini-Scooter, or an Excite Super Speeder II or Viper? If so, click on the website to get information about making your scooter safer.
For more info on Scooters and Skateboards –
Scooter and Skateboard Safety
Check out the Riley Hospital, Indianapolis, IN website for an excellent paper on Skateboard and Scooter Safety
http://www.rileyhospital.org/
Staying Safe on your Bike
Alice, CS RT Commissioner
Pioneer District, Golden Empire Council
- Always wear your helmet!!!
- Check with your mom and dad – how far can you go? Are you supposed to stay on the sidewalk?
- Watch out for cars – even on the sidewalk, cars pull into and out of driveways!
- Walk your bike across the street – Use the Crosswalk!
- Don’t ride alone, if possible.
- Use a bike path if you can – but remember to watch out for people walking, pushing strollers, other bikes – and call out when you’re coming close to them.
- Watch out for puddles, bumps or rough surfaces, storm grates, gravel - these are things that can make you lose control
Helmets and Clothing
From: www.cpsc.gov
Do you know the correct way to wear a helmet?
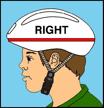
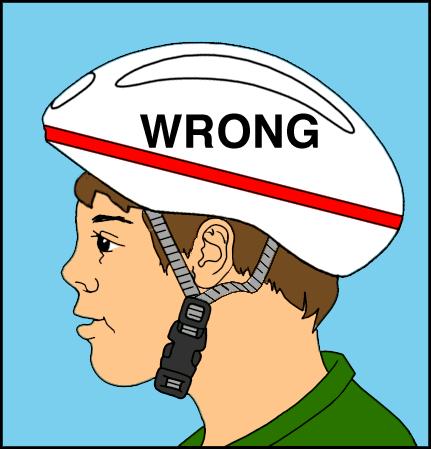
Wear the helmet flat atop your head, not tilted back at an angle!
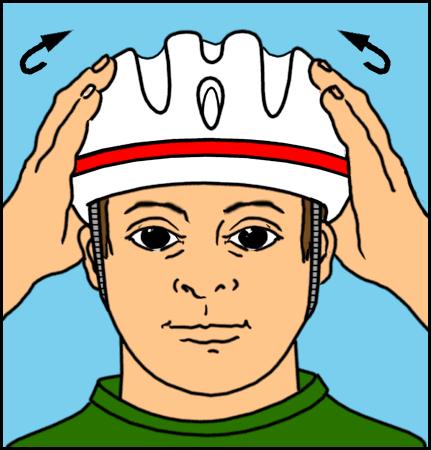
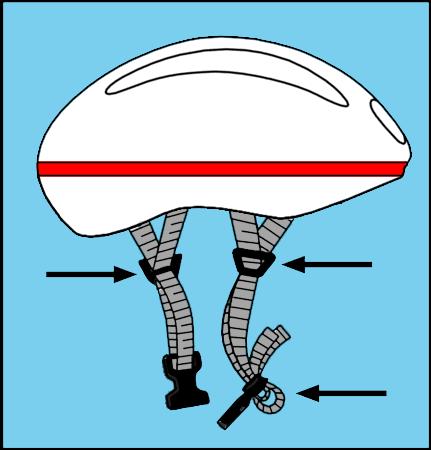
Make sure the helmet fits snugly and does not obstruct your field of vision. Make
sure the chin strap fits securely and that the buckle stays fastened.
Check our recall link to make sure your bicycle helmet has not been recalled.
It makes sense to wear something brightly colored when you’re biking.
Choose a color that makes you easy to see. If you’re biking in the forest, don’t wear green!
- Fluorescent green, yellow or orange are all great choices. If you’re wearing these colors, other bikers, motorists and pedestrians will be able to see you better.
- Look for fabrics that are cool and lightweight. (You can really work up a sweat biking!) If it’s cool outside, dress in layers. You can peel off clothing as you start to get warmer.
- For riding at night (which we don’t recommend for anyone) you’ll need clothing with retro-reflective materials sewn onto it. You’ll also need one light source, like a headlamp.
- Make sure the straps of your bookbag, loose clothing or anything else isn’t going to catch in the wheels of the bike, and cause you to lose control.
- Last but not least -- don't forget to wear your helmet!
What not to wear while you're biking.
- Headphones are a no-no! You won’t be able to hear what’s going on around you.
- Clothing that’s too loose.
- Inappropriate shoes. (High-heels, Slippers, Bowling Shoes)
- Dark Clothes
The Melon Drop
Alice, CS RT Commissioner
Pioneer District, Golden Empire Council
Looking for a dramatic demo for your next group talk to kids? So was Dr. Hal Fenner of the Snell Foundation. He has tested various melons for dropping to the floor, one in a helmet and the other bare. Hal has concluded that the best melon is a not-too-ripe honeydew. Pumpkins can be better, but finding head-sized ones is difficult.
Take your helmets to the grocery to find the right size honeydew. Shaking the melon tells you which is ripe--you can hear the seeds rattle in a ripe honeydew, so avoid the noisy ones.
Draw smiley faces, or one smiley and one pffffft face on the melons. Hold the helmeted and unhelmeted melons out to your sides, one in each hand, and tip your hands toward the audience to drop them in unison. The unhelmeted honeydew will smash. Whee. The helmet on the other melon will last for three drops, then split on the fourth one, still preventing the melon from smashing.
Hal reports that the kids are impressed, and you have their attention right away.
Light Bulb Drop
Trapper Trails
To illustrate the effectiveness of a bicycle helmet, do the following:
Wrap a light bulb in plastic wrap and tape it in an old bicycle helmet. Drop the helmet from above your head onto a hard flat surface (such as a driveway or sidewalk). The light bulb will not break.
Next, take the light bulb out of the helmet and drop it on the sidewalk without the protection of the helmet. The bulb will shatter (the plastic wrap will prevent the glass from scattering everywhere).
Discuss with your child how the light bulb represents a head and how the helmet protects it from injury.
Do not use this helmet again for riding, although with only a light bulb inside it should last indefinitely for more demos. Be sure it is marked "demo only - not for riding.” Do not use the shattered light bulb either! This demo was developed by Dane Luhrsen, founder of the now-defunct Ride Safe.
Summer Bike Safety
www.helmets.org
I'm going out for my first ride of the summer. Is there anything I need to do with my bicycle before I start?
Yes, and it will only take about ten minutes.
- First, clean the dust off of it. That helps you get back in touch with it, and remember anything you meant to do over the winter. While you are dusting, check for loose parts like saddle or handlebars. If your bike has quick release levers on the wheels, make sure they are snugly closed. Check the tires for wear or dry rot.
- You always need to inflate your tires. Inflate them to the pressure molded into the side wall. Soft tires make the bike harder to pedal, and you'll have more flats.
- Lube the chain. Squeaky chains actually will break from excess internal friction. In the meantime, they rob you of some pedaling energy.
- Adjust your saddle if necessary. Saddle adjustment can be important for comfort and to avoid pressure in the wrong places, particularly on the first rides of summer.
What about equipment? What do I need for safety? A helmet, of course.
The helmet is the most important, yes. Make sure it is well adjusted, fits level, and won't slip around too much. In addition to that:
- Gloves protect your hands from chafing, and keep the skin intact if you crash.
- Bike shoes are good because they have rigid soles and spread the pedal pressure evenly. More of your energy gets to the pedal. Running shoes are fine for shorter rides.
- The top that you wear should have a close-fitting neckline. The ones that flop open or hang down are called "bee-catchers."
Anything special to do if I'm taking a child with me?
If you have children, review the basic safety rules with them while you are checking over their bike.
So we're all set to go. Any advice for that first ride?
Ride around the block to be sure your bike is ready. Plan an easy first outing to avoid dragging in to the office on Monday with sore muscles. If the weather is hot, drink plenty of water and take it easy for the first few rides until your body is acclimated to the heat. And use sunscreen to prevent burning.
Summer riding is great fun. It is one of the four best seasons to ride a bicycle.
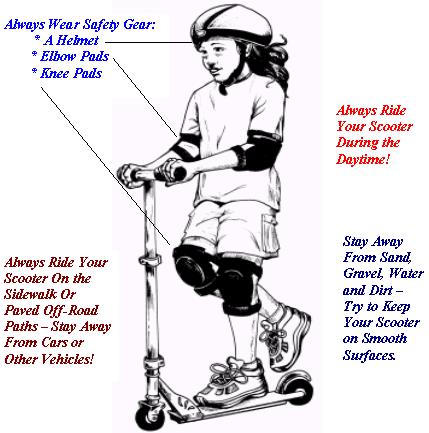
Skating & Scooter Safety
http://www.iisa.org/
In-line skating, skateboarding and scootering are great exercise for children -- and a lot of fun. However, as with any sport, there are ways for a child to get hurt. To help prevent injuries, have your child take lessons before playing on his own. Children need to know how to stop, slow down and avoid collisions. The International In-Line Skating Association offers the following helpful guidelines:
- Before skateboarding, skating or riding a scooter, parents should check equipment thoroughly for hazards such as loose, broken or cracked parts, slippery top surfaces and wheels with nicks and cracks.
- Always wear appropriate safety gear including a helmet, wrist guards, and elbow and knee pads. If wrist guards interfere with your child’s ability to safely steer the scooter, he may want to leave one or both wrist guards off.
- Be sure protective gear fits properly and does not interfere with your child’s movement, vision or hearing.
- Never ride in the street. Ride on smooth, paved surfaces free of traffic. Avoid streets or surfaces with water, sand, gravel or dirt.
- Do not skateboard, skate or ride a scooter at night.
- Limit skateboard, skate or scooter use to one person at a time.
- Never hitch a ride from a car, bus, truck, bicycle, etc.
- If a move seems risky, do not try it.
- Do complicated moves only in designated areas.
- Children ages 8 and younger should not use bikes, skateboards, skates or scooters without close adult supervision.
- Use caution when skateboarding, skating or riding a scooter downhill. If the hill is steep, step off and walk to the bottom of the hill.
- Use all of the protective equipment and pads appropriate for the activity.
Terrain Test
Trapper Trails
- Rough, uneven, or slick surfaces can cause many wheel activity accidents. To determine the best—and safest—surface to travel on, have students use the scientific method for this experiment.
- Spread aquarium gravel on the bottom of a large, flat tray to represent a rocky terrain.
- Give children a toy car and ask them to predict what will happen when it is rolled over the gravel.
- Have them write their observations.
- Repeat the experiment simulating a variety of terrain with materials such as sand, small sticks, and leaves.
- Finally, have children wipe the tray clean and roll the car across its smooth surface (representing pavement).
- Compare and discuss the results.
- Which type of terrain provides the best surface? Why?
Hands-On Signals
Trapper Trails
- Hand signals are used by bike-riders to communicate the intention to change direction or stop.
- Show children how to make these easy-to-learn signals with their left arms, as shown.
- Then have them practice using the signals as they move around your meeting room, your yard, or a local playground.
- You might even plan silent mystery walks to different locations, using only the signals to give directions to students along the way.
Signs For Safety
Trapper Trails
Help children recognize and comprehend safety words and symbols. Display and review common safety signs such as “Stop,” “Do Not Enter,” “One Way,” “Yield,” “Caution,” “Exit Only,” “Enter,” and the symbols for a traffic light, pedestrian crossing, railroad crossing, bike, roller blades, and skateboard. Also include the symbol for “No” (a circle divided by a diagonal bar). Have each of several small groups create a few of the reviewed signs. Have children glue craft sticks to the back of their signs for portability. Then tape paths on the floor of a large open area to create roads that intersect, merge, and end. Station children with the appropriate signs at different locations along the roads. Invite the remaining students to take turns pretending to ride bikes on the roads. As they wheel along, ask them to read and obey the safety signs on their route. Rotate student roles so that each child has a turn holding a sign and walking the route.
Personal Bike Rack
Santa Clara County Council
Materials:
- One 14" x 18" piece of 1/2" plywood;
- One 1" x 2" x 2'; one 2" x 8" x 18"
- No. 6 flathead screws (1-1 / 4" long);
- Six-penny nails;
- Varnish or paint;
- White glue or powdered resin glue.
Directions:
- Cut plywood triangles. Drill holes as show with a 5(32" drill bit. Paint or varnish the inside of plywood at this time. It will be difficult to do after rack is assembled.
- Cut the 1" x 2" pieces. Nail the two longest pieces at right angles.
- Cut the 2" x 8" piece. Attach the nailed 1"x2" with screws. Paint or varnish the 1" x 2" now. (Note the right angle is fastened to the 2" x 8" with screws from inside.)
- Fasten the plywood triangles in place with screws through pre-drilled holes. Don't forget the small piece of 1" x 2" that joins the tips of the triangle.
- Sand and complete paint or varnishing the piece.
Three Bike Rack
Alice, CS RT Commissioner
Pioneer District, Golden Empire Council
Materials
- 2” by 2” lumber
- 3/8” carriage bolts
Directions
- Cut 2x2’s using measurements given on picture:
- 2 pieces 53” long, and 12 pieces 21” long for a 3 bike rack, or
- Half the length and 8 cross pieces for a 2 bike rack.
- Glue the crosspieces in place on the side pieces for stability,
- Make sure cross pieces and side pieces are square.
- They should be a tire width plus 1/8 inch apart.
- Then bolt the crosspieces thru the side pieces as shown, using carriage bolts. (Pre-drilling a starter hole to prevent splitting the wood is recommended)
- If rack will be on ground (dirt) bolts may protrude to help anchor rack
- If rack will be on pavement, make bolts flush on bottom.
Helmet Design Challenge
Trapper Trails
To set students’ critical and creative thinking in motion, challenge them to design and draw a safety helmet for their preferred wheel activities.
Next, ask them to write about the safety features of their helmets and then share these ideas with the class.
Boo-Boo Graph
Trapper Trails
No matter how safe children are while they are wheeling around, cuts and bruises may still happen.
Create a graph with the headings “Bicycle,” “Roller Blades,” “Skateboard,” and “Scooter.” Poll your Cubs to find out how many have experienced a tumble or two from these activities.
Have them affix an adhesive bandage in the column for each scrape received for each activity.
Then use the graph to compare the number of boo-boos per activity to determine which one involved the most mishaps, and to find the average number of boo-boos for all of the wheel activities.
Conclude by reviewing the basic care for minor injuries, such as cleaning cuts with soap and water, applying first-aid cream, and protecting them with an adhesive bandage.
Pinewood Car Slide
Trapper Trails
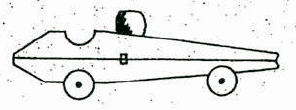
- Take apart a spring type clothespin
- Glue the flat sides together
- Cur two ¼” thick slices off a ½” diameter dowel for wheels
- Glue wheels on side toward front and back
- Glue on a colored round bead for helmeted driver’s head
- Attach ring on back – 1” length of ¾” PVC pipe works well but choice is yours
This slide can be used for several Wolf and Bear Achievements
Racing Flag Slide
Trapper Trails
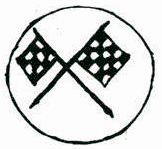
- Find some small (cupcake topper size) racing flags or make some from cardstock and attach to toothpicks
- Cut a tree cookie of appropriate diameter for your flags
- Hot glue the flags in place on the tree cookie
- Attach ring on back – 1” length of ¾” PVC pipe works well but choice is yours
Macaroni Wheel Slide
Trapper Trails
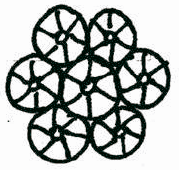
- Using wheel shaped macaroni –
- Glue wheels together to forma bigger wheel
- Spray paint
- Attach ring on back – 1” length of ¾” PVC pipe works well but choice is yours
Bicycle Safety Quiz
Santa Clara County Council
See how well you know your bicycle safety facts by taking this quiz. Circle the letter for the answer you choose.
- When approaching a stop sign, I should:
- Look left and right and ride through the intersection without slowing down.
- Slow down and then proceed through the intersection.
- Come to a complete stop, check both directions and then proceed when it is safe.
- When approaching an intersection with no stop sign or light, the best thing to do is:
- Ride through quickly.
- Slow down, look to the left and right, and watch for tuning vehicles.
- Stop in the middle of the road to see what’s coming.
- When making a turn or stopping on the road, I should use hand signals:
- When a big steamroller is approaching.
- If Mom is watching.
- Every time I turn or stop.
- On two-way city streets as well as country roads, I should ride on the _____ side of the street.
- Left – against traffic
- Right – with traffic
- Left or right, whichever is more convenient
- When is it okay to carry another person on my bicycle?
- Never.
- If there’s not much traffic.
- If I stay on the sidewalk.
- If I am late starting home after dark and my light doesn’t work, I should
- Walk my bike home on the sidewalk.
- Ride on the left side of the street to see cars coming.
- Ride on the right-hand side of the street.
- Good ways to be seen at night are by:
- Wearing light-colored clothing and reflective tape.
- Using bright reflectors, red to the rearm white or amber to the side, and white to the front.
- Both A and B.
- The safest way to carry books or other gear on my bicycle is:
- In pack on my back.
- In a special carrier rack or basket.
- In a bag in my hand.
- Leaves on the roadway and painted center lines can be hazardous to cyclists because:
- They distract your attention.
- They become slippery when wet.
- They may both be yellow-colored.
- A good rule when riding in traffic is:
- To listen as well as watch for cars.
- To weave in and out of parked cars.
- To yell at motorists who are in your way.
- If I approach a crosswalk when riding my bike, I should:
- Yell so pedestrians will get out of my way.
- Stop so that pedestrians may cross.
- Ride my bike up the curb to avoid hitting anybody.
- When bicycling with a friend, we should always ride:
- Single file.
- Two abreast.
- In no particular pattern.
- When riding with a group it is best to:
- Tie a rope to the first rider and hang on.
- Ride a little to one side of the rider ahead and overlap wheels.
- Ride a safe distance behind the rider ahead in a single file.
Answers -
1c, 2b, 3c, 4b, 5a, 6a, 7c, 8b, 9b, 10a, 11b, 12a, 13c
True or False Safe Driving Quiz
Santa Clara County Council
- A bicycle should be driven on the right-hand side of a street or highway.
- Bicycle drivers should obey all traffic signs and signals.
- Stop signs are round in shape.
- Pedestrians have the right-of-way on sidewalks and crosswalks.
- Bicycles should be “walked” across busy streets.
- The signal for a right turn is stretching the right arm straight out.
- Driving a bicycle at night without a front light or rear reflector is unsafe.
- It’s safe for a bicycle driver to carry a passenger.
- You don’t have to stop at an intersection if there is no traffic.
- Hitching a ride on another vehicle is safe if the driver is careful.
- Bicycle drivers should give a hand signal before making a turn or stopping on the street.
- It’s safe to drive a bicycle that is in poor condition if you are a good driver.
- If you’re driving bicycles with friends, you should go single file.
- Your chain should be loose enough to slip off easily.
- It’s okay to drive a bind in either direction on a one-way street.
- If you live in the country, it’s okay to drive on either side of the road.
- Even a good driver should “walk” his bicycle through heavy traffic.
- The faster you drive, the safer it is.
- Bicycle drivers should stay at least three feet away from parked cars.
- If you don’t ride on busy streets, you don’t need a horn or bell.
Answers –
1. True 2. True 3. False (See note) 4. True
5. True 6. False (See note) 7. True 8. False
9. False 10. False 11. True 12. False 13. True
14. False 15. False 16. False 17. True 18. False
19. True 20. False
#3 – Stop signs have 8 sides.
Railroad crossing signs are round.
#6 – For a right turn, it’s extending the left arm with forearm raised and the palm of the hand facing forward.
Materials found in Baloo's Bugle may be used by Scouters for Scouting activities provided that Baloo's Bugle and the original contributors are cited as the source of the material.
Materials found at the U. S. Scouting Service Project, Inc. Website ©1997-2007 may be reproduced and used locally by Scouting volunteers for training purposes consistent with the programs of the Boy Scouts of America (BSA) or other Scouting and Guiding Organizations. No material found here may be used or reproduced for electronic redistribution or for commercial or other non-Scouting purposes without the express permission of the U. S. Scouting Service Project, Inc. (USSSP) or other copyright holders. USSSP is not affiliated with BSA and does not speak on behalf of BSA. Opinions expressed on these web pages are those of the web authors.
|
|