October 2006 Cub Scout Roundtable Issue |
Volume 13, Issue 3
November 2006 Theme |
Theme: Cubs in Shining Armor
Webelos:
Craftsman & Scientist
Tiger Cub Activities |
WEBELOS
CRAFTSMAN
TECHNOLOGY GROUP
Sam Houston Area Council
The requirements for the Craftsman activity badge include projects in wood, leather, and tin. This activity helps the boys develop confidence in their abilities by encouraging them to use their talents and skills for more advanced handicraft projects, or perhaps to develop a hobby in one of these mediums.
SUGGESTED PATROL ACTIVITIES:
- List tools needed to complete badge.
- Make a tool chest or bench hook for sawing.
- Visit furniture factory, lumber mill or lumberyard.
- Select projects to work on.
- Have a birdhouse building contest
- Invite someone to give a demonstration on the safe use of tools.
- Discuss finishing methods for wood projects: Sanding, filling holes and scratches, the various types of finishes, such as shellac, stain, lacquer, varnish and enamel.
SUGGESTED PACK ACTIVITIES:
- Exhibit tools.
- Show wood, leather, and tin craft projects done by the boys.
- Demonstrate the proper use of wood tools, leather tools, and metal working tools.
BOARD SAWING CONTEST
Give each boy a small handsaw, pencil, ruler, and a 2”x4” board (any length). On the word go, each boy is to mark and saw his board in half. Note: Judge the contests on skill and speed.
Safety first: Used safety goggles when using tools
BLANK-OUT GAME
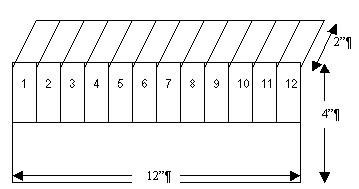
Materials:
- Cut a 12” x 4” piece of ¼” plywood
- Cut twelve 1” x 2” pieces of ¼” plywood
- Cut twelve ¾” by 3” strips of thin leather
Assembly Directions
- Sand the edges very well, so that there are no sharp edges.
- Mark 1” x 2” rectangles across the top half of the 4”x12” board with a fine- tipped sharpie marker.
- Use rub-on numbers to put the numbers 1 through 12 into the twelve drawn boxes.
- Brush-on a light colored lacquer stain over all of the wooden pieces.
- When dry, place the twelve 1”x 2” pieces over the twelve drawn boxes and
- Glue the leather strips so that they form hinges and allow the small pieces of wood to all neatly uncover and also cover.
Game Directions
- The game starts with all of the numbers uncovered,
- The goal is to cover all of the numbers.
- On each roll of the dice, your dice tell you what number(s) you can cover up. E.g. a roll of 1 and 3, would allow you to either cover 1 and 3 or just cover 4.
- If all dice numbers rolled are already covered, you must start all over.
WATER ROCKET LAUNCHER
Materials:
- 3 each - ¾” PVC Cap
- One - ¾” PVC Tee joint
- One - ¾” x ½” threaded Tee joint
- 5’ of ¾” PVC schedule 40 pipe
- One - ½” x 8” threaded riser pipe
- One - ¾” 90 degree ell (“L) joint
- 1’ electrical tape
- One tire inner tube valve
- PVC pipe cement or epoxy
Important: use protective gloves and goggles when gluing!!!
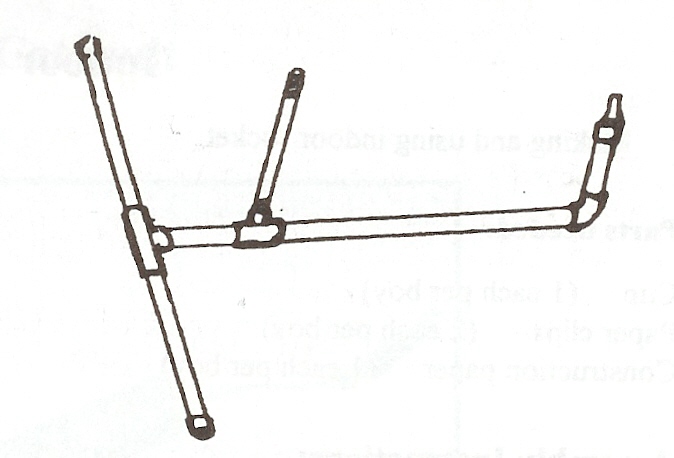
Assembly Instructions:
- With a hack saw, cut the 5’ PVC pipe into
- Two - 6”,
- two - 12” and
- one - 8” length.
- Drill a ½” hole in the middle of one ¾” Cap.
- Push the valve stem into this hole and trim the rubber so that it will have a tight seal.
- Glue this cap to one 6” pipe, being careful to have the pipe end push the rubber to be tightly sealed against the cap.
- Assemble the rest of the launcher as shown, and glue the joints.
- Wrap the threaded riser pipe where it joins the threaded Tee, so that there is a tapered, water-tight connection when a 2 liter bottle, with a few cups of water in it, is pushed onto it.
PVC RECORDER
Materials:
- 14” long - ½” PVC pipe,
- ½” diameter dowel,
- craft glue, hand drill
Assembly Instructions:
- A recorder is a flute-like instrument where you blow into the end to create sounds as the air whistles over the holes that you cut.
- Cut a ½” PVC pipe to just under 14” in length.
- Before inserting the plug, the 1” long dowel needs to be shaved off squarely on one side, about 1/16th inch, so that air can pass through when it plugs the end.
- Plug one end of the pipe tightly with the inch-long dowel and glue it in place with craft glue.
- The shaved side of the plug directs air over the first small hole that makes the whistling sound. Make holes as shown below:
- 3/8” square hole 1” from the mouthpiece end (drill 3/8” and square it with a knife)
- 3/16” round hole 7.5” from the mouthpiece end
- 7/16” round hole 8.5” from the mouthpiece end
- ¼” round hole 9.5” from the mouthpiece end
- 3/16” round hole 10.5” from the mouthpiece end
- ¼” round hole 11.5” from the mouthpiece end
- ¼” round hole 12.75” from the mouthpiece end
SLIDE WHISTLE
Similar to the recorder shown above, use a 12” long piece of 1” PVC pipe and make a similar plug and first hole. Do not cut the fingering holes. Cut a 10” length of ½” PCV pipe and drill a small hole in the end, and attach a small piece of wire. Wrap a few turns of electrician’s tape around the end of the slide. Slide that smaller pipe into the open end of the whistle and listen to how the pitch changes when you blow on the whistle and move the slide in and out.
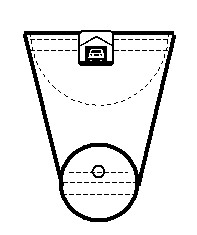
DRIVING YOU CRAZY
Materials:
- One 4’x 8’ piece of ¼” plywood
- One 8’ 2x4 pine lumber
- Ten 1.5” wood screws
- Small box of 6 penny nails
- One large ball bearing
- Elmer’s Glue
Assembly Instructions:
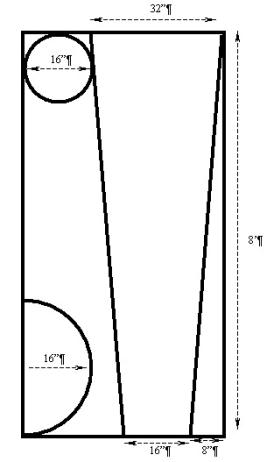
- Cut the plywood into the shapes shown at bottom right of this page. Drill a hold large enough to put the ball bearing through, two inches above the center of the 16” disk.
- Cut the 2x4 into 28” and 13” lengths.
- Sand and paint the 16” disk to look like a steering wheel.
- Sand and paint the long trapezoid to look like roadways and green scenery.
- Sand and point the 16” radius half circle black.
- Nail through the top of the roadway sheet of plywood into the 2” side of the 13” long 2x4, centered under the short end of the trapezoid and flush with the end of the plywood. Nail through the top of the roadway sheet of plywood into the 2” side of the 28” long 2x4, centered under the long end of the trapezoid and flush with the end of the plywood.
- Center the “steering wheel” to the top surface of the roadway sheet of plywood, and drill tap holes for the screws to go into the 2x4. Affix the steering wheel with four screws.
- Align the top of the rocker half circle to the top surface of the roadway sheet of plywood, and drill tap holes for the screws to go into the 2x4. Affix the rocker with six screws.
Decide on a destination for the ball bearing near the large end and drill a hole or build a “garage” to “drive to” and “park” the ball bearing in. Add obstacles as desired. Pop the ball bearing through the hole in the steering wheel and drive it by turning the steering wheel and lifting or lowering the wheel.
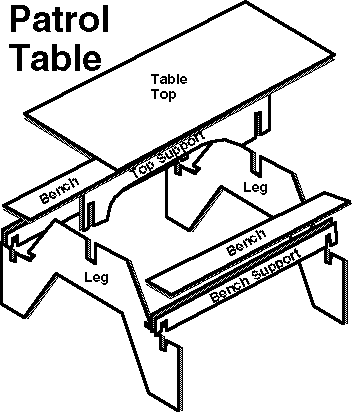
Patrol Table Plans
Note: the materials list shows how to cut all of the pieces out of one 4' x 8' sheet of 5/8" plywood. The plywood should be exterior grade with one smooth sanded surface. All cut edges need to be sanded. The cleats should be fastened with waterproof glue and rust resistant screws. A good penetrating oil finish will further prevent splinters and improve the life of the table.
Materials:
- 4'x8' sheet of 5/8" exterior plywood with one smooth sanded surface.
- Exterior penetrating finish
- 1" Rust resistant screws
- Waterproof glue
Notes:
- When cutting top support you may use an 8 inch radius for the curved section.
- Bench Supports have a 2"x5/8" slot for legs centered 2 11/16'" from each end.
- Legs have a 2"x5/8" slot for bench supports centered 2 11/16" from each end.
- Legs have a 5"x5/8" slot for the top support centered in top.
- Top support has 7"x5/8" slot for legs centered 2 11/16" from each end.
- Legs have a 1"x5/8" notches to lock the benches in place.
- The cleats are positioned to keep benches and top from sliding.
- Fasten the cleats in place with rust-resistant screws and water-proof glue.
- Finish with a nontoxic penetrating exterior finish.

Make Your Own Leathercraft Mallet:
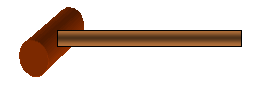 When you are tooling or stamping imprints into leather, you need a wooden mallet to hammer on the metal tools. You could buy a mallet, but what fun is that? When you are tooling or stamping imprints into leather, you need a wooden mallet to hammer on the metal tools. You could buy a mallet, but what fun is that?
Materials for each mallet:
- 10” long piece of 7/8ths inch diameter dowel (oak is best)
- 2 inch diameter limb, approved to be pruned from someone’s yard
- Hand saw
- sharp knife
- Drill with 7/8ths inch bit
- Carpenter’s wood glue or Elmer’s Glue
Assembly Instructions:
- Cut the 2” diameter limb into 4” to 5” lengths.
- Sand the faces if the cut wasn’t straight.
- Hand drill a little over halfway into the exact center of the mallet head.
- With your knife, slightly carve the tip of the dowel, so that it will go more smoothly into the hole. Don’t carve off too much; just enough not to “catch”.
- Coat the inside of the hole with wood glue.
- Hammer the dowel into the mallet head that you made until it goes all the way in. Do not use a metal hammer directly onto the wood of the dowel. Place a scrap piece of 2x4 over the end of the dowel, put the mallet head on the ground and hammer the dowel in as far as it will go.
Leathercraft Lacing
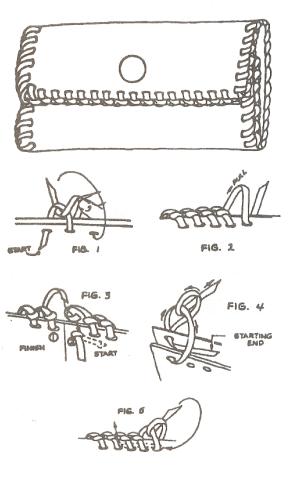 Many fun leather projects are available, and some of the most useful required lacing together pieces of leather. Billfolds, coin purses, etc. are good examples. Simple lacing is OK, but it looks a lot better if you do a more professional stitch, and these boys are capable. A leather lacing needle makes it easier. Many fun leather projects are available, and some of the most useful required lacing together pieces of leather. Billfolds, coin purses, etc. are good examples. Simple lacing is OK, but it looks a lot better if you do a more professional stitch, and these boys are capable. A leather lacing needle makes it easier.
To lace an item that will finish lacing at the same place where you start: Push the lacing through the first hole and pull all but 1” through the hole. Bring the lace over the edge (without a twist) and go into the next hole, leaving a small loop. Go through the loop front to back, then tighten the stitch from the back, removing the loop. Continue lacing in this manner. When you get back to the start, pull the original lacing out of the starter hole and add one more stitch through that hole. Remove the starting lace from the next loop and thread the needle down through this loop. Pull both ends through hole 2 to the inside and cement in place.
SCIENTIST
TECHNOLOGY GROUP
Sam Houston Area Council
Scientists do what Webelos Scouts do best – ask questions and find out more about how things work. The Scientist Activity Badge allows Webelos to see a glimpse of the things that confront scientists every day, and ask “why did that happen?” In earning this badge they will be exposed to the notion of experimenting as a way of answering scientific questions. They will learn that they are the next generation of experimenters, and will learn about famous scientist and their experiments. They will learn that the universe is full of magical things waiting patiently for our wits to grow sharper.
SUGGESTED PATROL ACTIVITIES
- Invite a weather expert to talk to the patrol or visit a weather station to learn about weather and air pressure.
- Discuss the various branches of science and how they differ.
- Make an optical illusion from the Webelos handbook and show how the eyes converge. Visit an eye specialist and learn how the eyes work.
- Use Magnifying lenses, prisms to see how light moves through glass.
- Visit an airport and ask an expert to explain flight principles.
- Have a slow-motion bicycle-riding contest to illustrate balancing skills.
- Do the Inertia experiments in the Webelos Scouts book.
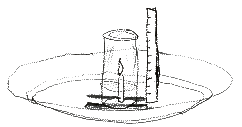
PASCAL’s LAW OXYGEN METER
Materials:
- Tall drinking glass
- Pie Pan
- Plastic wrap
- Votive Candle
- Two pencils
- Masking tape
 Assembly Directions Assembly Directions
- Place a votive candle in the middle of a pie pan.
- Add about ¾ inch of water in the pie pan.
- Put two pencils in the bottom of the pan, one on each side of the candle.
- Place a strip of masking tape up the side of a tall glass (actually made of glass).
- You will use this apparatus to test the relative amount of oxygen in the air.
- After collecting an air sample, cover the opening of the glass with plastic wrap until it is time to measure. A glass with a smaller width works best.
- To measure the oxygen content, light the candle,
- Remove the plastic wrap and quickly place the glass upside down over the candle and into the pan, resting the rim upon the pencils.
- As the candle burns up the oxygen supply, the water level inside the glass will rise, due to the drop in air pressure inside the glass.
- When the water inside stops rising, mark the masking tape.
- Take air samples at various places and repeat the experiment to see how the oxygen content differs.
- Examples of places to take air samples: In a forested area; in your backyard; near the exhaust pipe of a running car; in your bedroom , near a highway.
BERNOULLI’s VACUUM
Materials:
- 3’ x 4’ piece of 3/8” plywood (very flat)
- One 3/8” x 3” carriage bolt
- Two 3/8” x 1” carriage bolts
- Three 3/8” nuts
- Three 3/8” flat washers
- Three 3/8” split washers
- 1 foot length of 1” wide flat braided rope or strap
- One 8’ long 2x2 pine board (straight)
- Small box of 6 penny nails
Assembly Directions
- Cut the 3’x 4’ plywood into one 3’x 2’ rectangle and one 2’x 2’ rectangle.
- Cut a 20 inch circle in the center of the 3’x 2’ piece of plywood, and drill a 3/8” inch hole at the very center of the disk that you cut. Through this hole run a 3 inch long 3/8” carriage bolt. Attach the bolt firmly with a wide flat washer, a split washer and a nut. Sand the disk well.
- Cut a 16” round hole out of the center of the 2’x 2’ piece of plywood. Cut and make a 2’x 2’ frame with the 2x2. Center the frame on the 3’x 2’ pieces of plywood (6” on each side), and complete the sandwich of the frame with the 2’x 2” piece of plywood. Use two saw horses and clamp the plywood to the saw horse with the 18” hole side up. This frame is for safety.
- Cut a 10” disk out of the 16” round disk, and sand this 10” disk well. Drill two 3/8” holes, 6” apart on the 10” disk. Counter-sink the holes on one side of the disk with a ½” bit, so that the carriage bolt heads will not be higher than the surface of the disk. Poke two holes near the ends of the braided rope, large enough for the 3/8” bolts to pass through (try not to fray the rope). Pass the bolts through the holes and through the braided rope, and secure with flat washers, split washers and nuts. The secured rope should make a handle that your hand can grasp.
Chuck the bolt of the 20” disk into a hand drill and have an adult reach under the frame and raise the disk through the 20” hole. Spin up the disk and push it against the 16” round hole (Bernoulli may help a little in keeping it in place). Have a boy wearing goggles and gloves approach the flat spinning surface with the flat side of the 10” disk. They will first notice that the moving air cushion makes it difficult to push the disk all the way to the surface of the spinning plywood. As they try to pull the disk away, they will notice that the Bernoulli effect makes it harder to do.
NEWTON’s CRADLE OF MARBLES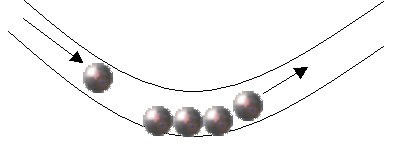
Materials:
- Two feet of 1” diameter clear plastic tubing
- 7 ball bearings (or marbles)
Directions
- Place 4 marbles in the plastic tube touching each other.
- Have one Scout hold the tube in a U shape.
Roll one marble in one end and when it hits, one marble from the other end will jump.
- When it calms down, try rolling in two marbles.
MAKE A MAGNET
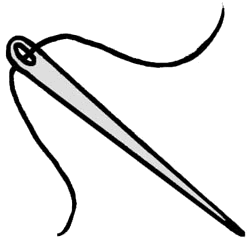 You can make your own magnet with a needle. Needles are made of steel, and steel has a lot of iron in it. You can make your own magnet with a needle. Needles are made of steel, and steel has a lot of iron in it.
- Hold the needle at the end that has the eye, while wearing gloves. Gloves are for safety and so that you don’t ground the needle.
- With a bar magnet, stroke the needle from the eye toward the sharp end.
- Remove the bar magnet from touching the needle and stroke it again in same manner.
- Do this over and over again at least thirty times to assure that you have magnetized the needle.
- If you touch the needle to a metal paperclip now, you should be able to pick it up.
- Move the south pole of the bar magnet near the needle and see which end of the needle is magnetized as a north pole magnet.
GIVE ME SOME STATIC (ELECTRICITY)
- Charge a plastic comb with static electricity by rubbing it with wool, nylon or fur to ionize the comb.
- Dip the comb into some Rice Krispies. They will be attracted to the comb.
- But watch closely – one by one the bits will shoot off, as if shot from a gun. The same molecules that attracted one another are now opposing each other.
- Recharge the comb and touch a loose fluorescent bulb. Watch the static electrical field excite and light the bulb where you touch it.
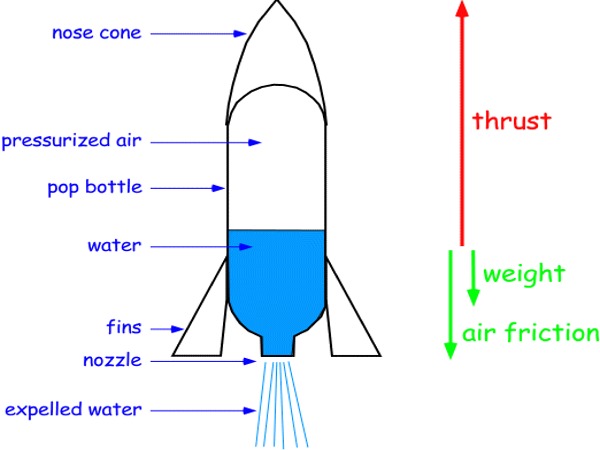
WATER ROCKETS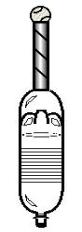
Materials:
- 2-liter soft drink bottle(s)
- Construction paper
- Fishing line
- Ping pong ball
- Toilet paper roll tube
- Clear packaging tape
- Scissors
- Surveyors ribbon
Science shows us why water rockets work. Newton’s Third Law of Motion tells us that at the moment the water rocket leaves the launch pad, the force on the plastic bottle upward is equal to the force that the air pressure pushes against the water to move it out the bottom of the bottle’s spout. Since the weight (mass) of the bottle is so much lighter than the weight (mass) of the water, the bottle accelerates upward much faster than the speed of the water shooting out of the spout (if you don’t fill the bottle very full of water).
Decorate your 2-liter soft drink bottles. 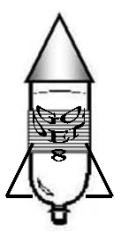
A nose cone and tail fins can help with aerodynamics.
A parachute would help it float in the air.
Awards can be given for highest flight, longest hang time.
Let the boys come up with ideas for how to decorate their rockets.
The plans for a Water Rocket Launcher are in the Craftsman section.
Only pour a few inches of water into the bottles.
CENTRIFUGAL AND CENTRIPETAL FORCES
I bet that you can put a bucket of water over your head UPSIDE DOWN and not get wet.
Take your bucket of water, and begin to swing it back and forth.
When you are moving it fast enough not to slosh, swing it in a circle up over your head and down again.
You won’t get wet unless you stop suddenly.
This works because of the centrifugal force that pushes the water away from the center of any circle it is spinning around. The faster you spin, the more centrifugal force it has.
Renowned golf coach, Harvey Penick, had his students practice their golf swings by taking a bucket of driving range balls and swinging it like they would swing a golf club. If the balls fell out of the bucket, then they were not swinging correctly.
So, what is centripetal force? Centripetal forces are those forces that keep a rotating object from flying off into space.
For an orbiting satellite, its centripetal force is the earth’s gravitational pull.
For Mr. Penick’s bucket of golf balls, the centripetal force is caused by the bones and muscles in your arm and hands that prevent the bucket from flying through the air and onto the putting green.
ARISTOTLE’s BALANCE
Materials:
- Broomstick (without a broom)
- One 8’ 4x4 piece of lumber
- Tennis racquet
To the Greek philosopher Aristotle, happiness is achieved through living life in moderation and in balance. The world is stable when it is in balance, and many of the scientific laws used in this Scientist Activity Badge are based on equal, balanced forces.
For this activity the object that the boys will balance is themselves. Place the 4x4 piece of lumber on the floor, with plenty of space around it. First, line up the boys at one end and see if they can walk across the board without falling off. Next, have them walk across carrying a broomstick for help with balance.
Follow this by having them do these two things blindfolded with their neckerchiefs.
Finally, have them cross the board backwards and blindfolded.
Have them see if holding other safe objects in their hand, like a tennis racquet, help them with their balance.
And for those that really do well on this, have them try to do it while carrying a heavier box in their arms or items of different weight in each hand.
Once they have mastered this balance beam, hang various safe objects (e.g. a tennis racquet) on one end of the broomstick. Let them discover where they must place their finger under the broomstick, so that it all balances. Then walk across the balance beam again without dropping it.
OPTICAL ILLUSIONS
Perceptions can be wrong:
Be sure to gather up a big collection of optical illusions. The Webelos will really enjoy this
QUESTIONS THAT MAKE YOU WANT TO EXPERIMENT
Here are several scientific situations that will make you want to try them to see if what you think should happen, is actually correct.
HOSES
Situation: Wind up a hose into a circle, so that water has to go around and around before it shoots out the end.
When the water exits the hose, does it leave following a curving path like the hose it just left, or does it come out in a straight line?
Answer: Water comes out initially in a straight line, regardless of the shape of the hose.
BIG AND LITTLE FALLING ROCKS
Situation: Hold two rocks of different weight, so that the under sides of the rocks are exactly the same height off of the ground.
Drop them both at the same time. Which one will hit the ground first?
Answer: both rocks should hit the ground at the same time, unless one is much more aerodynamic than the other, since gravity accelerates them both equally.
MAGNETIC ATTRACTION
We all know that two magnets of opposite poles will attract each other. Attach one bar magnet to a toy car.
Hold a second magnet on the ground near the car. Will the car move toward the other magnet?
Yes, the car should move.
Now, firmly attach both magnets to the same car, with opposite poles close, but not touching each other.
Will the magnetic attraction of the magnets cause the car to move?
No. The only thing that might happen is that the glue holding the magnets to the car may give way from the stress of the magnetic attraction.
GYROSCOPIC BATTLING TOPS 
Study the rotational inertia of gyroscopes by having the boys spin tops. Draw a chalk circle and have two boys spin their tops into the circle. The last top left standing in the circle is the winner as they bump each other and wobble around the circle.
Materials found in Baloo's Bugle may be used by Scouters for Scouting activities provided that Baloo's Bugle and the original contributors are cited as the source of the material.
Materials found at the U. S. Scouting Service Project, Inc. Website ©1997-2006 may be reproduced and used locally by Scouting volunteers for training purposes consistent with the programs of the Boy Scouts of America (BSA) or other Scouting and Guiding Organizations. No material found here may be used or reproduced for electronic redistribution or for commercial or other non-Scouting purposes without the express permission of the U. S. Scouting Service Project, Inc. (USSSP) or other copyright holders. USSSP is not affiliated with BSA and does not speak on behalf of BSA. Opinions expressed on these web pages are those of the web authors.
|
|