October 2007 Cub Scout Roundtable Issue |
Volume 14, Issue
3
November 2007 Theme |
Theme:
Indian Nations
Webelos:
Craftsman & Readyman
Tiger Cub
Requirement 5 |
WEBELOS
The Scout Law in
Song
Heres the best way I know to
teach a WEBELOS the Scout Law, a song called Trusty Tommy CD
The tune is
Yankee Doodle
It s found at
http://usscouts.org/usscouts/songs/songbk1a.asp
Trusty Tommy
TRUSTY Tommy
was a Scout,
LOYAL to his
mother,
HELPFUL to
the folks about, and
FRIENDLY to
his brother.
COURTEOUS to the girls he knew,
KIND unto his
rabbit,
OBEDIENT to
his father too, and
CHEERFUL in
his habits.
THRIFTY saving for a need,
BRAVE, but
not a faker,
CLEAN in
thought and word and deed, and
REVERENT to
his Maker.
There is midi file for the tune at
http://www.boyscouttrail.com/content/song/song-502.asp
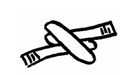
Clove Hitch
Neckerchief Slide
Norm
ü
Here is a slide from
my friend Norm that may work to help your Webelos learn to tie the Clove Hitch.
ü
Cut a 12 inch long
piece of piece of ¼ rope
ü
Whip both ends
ü
Twist the rope and
make two loops like so
ü
Place one end over
the other, then over a 5/8 rod or dowel
ü
Pull tight
ü
Then remove it and
tie it at the arrows
ü
Add glue to the
inside and let it dry
ü
When dry, remove the
tie strings
ü
It should look like
this
Have you contacted a local
Boy Scout troop yet?? Made all your arrangements for your outdoor adventure
with them? Please dont wait until January (unless you are in Hawaii or
Florida) and then try and get it in before Blue & Gold?
CRAFTSMAN
TECHNOLOGY GROUP
Timucua District, North Florida
Council
Purpose:
Learn how to work with
tools
Challenges:
Wide range of abilities, obtaining adequate supervision, making a mess,
inexpensive materials,
Solutions:
This badge will be a
favorite, but requires a lot of preparation. Some projects, like leather work
and cardboard, can be held at your regular meeting place. Others, like
woodworking, should be held in a shop or garage where the sawdust can be
contained easier. Because every Cub wants to do something, you'll need a large
supply of hammers or set up cutting, sanding, nailing, and gluing stations.
Have small groups rotate around as the work progresses. If everybody is
starting fresh, you may need a second project to keep all boys busy. An adult
helper or guide with each group or an adult supervisor at each station are both
good methods. Remember, everyone is included in the clean-up.
Resources:
Collection of materials
will be a challenge. Check with local companies for wood scraps. Plywood is
usable for most projects, but solid lumber such as pine is better for some
cutouts. Hardwoods like oak, ash, and walnut are too hard for most Cubs to cut
and shape; they may get frustrated. When hardwoods are needed, precut and rough
sand them in advance, leaving the finishing work to the Cub.
For leather crafts, check with companies for scraps that the boys can cut and
tool. 6" square or round pieces of Masonite make good work surfaces for cutting
and stamping operations.
First projects should be simple. Key chains are easy and make good gifts.
Clay projects are good for gifts and puppet heads that can be used for work in
the Showman badge.
Try a ceramic shop for advice and possible help with glazing and firing.
Planning:
The Craftsman is a multi-meeting project, and the Cubs may also do a lot of work
at home. The Cubs require a lot of supervision and help on most projects. Plan
one adult for every two or three Cubs. Remember that tools used correctly are
safe, but the incorrect use of tools can have serious consequences!
Activities:
The activities included in the
Craftsman section of the Webelos book help the boys grasp a basic understanding
of using hand tools while building something from scratch. As a Webelos den
leader this leaves you with a lot of flexibility in helping the kids come up
with ideas for FUN projects to build.
The key word here is FUN.
If the project is not fun the kids will not participate and you will likely
never finish. and remember these kids are 4th and 5th graders and do not yet
have the skill level or attention span necessary to build a work of art.
They will require a lot of one on
one attention during these activities. The best advise for you is to BE PREPARED
for each den meeting and have a lot of help. If you decide to build these
projects during the den meeting I suggest that you have everything set up and
ready before the boys show up. Most project will take a minimum of 1 hour to
complete.
The Webelos Scout Helps set a side
both November and December for the Craftsman activity badge. Your best friends
during this time are the boys parents. Who can resist a trip down to the local
hardware store to get just the right tool for the job. Remember also that these
projects are just in time for Christmas.
There are a lot of suggestions in
the Webelos book for easy to medium hard projects. Experience has shown that
boys this age are very eager to start cutting, hammering and gluing but don't
know how to use the tools properly. Most of these young men have never used a
coping saw or hammer before. Begin by explaining how to safely use the tools
that you will need to do the project. Next demonstrate on a scrap piece of wood
or plastic how to properly use each one. You will be very surprised to see how
hard it really is to use a coping saw, if not properly done. This demonstration
will save you a lot of time later on when the boys begin cutting on their
projects. Let each boy try it on the scrap wood.
More
Activities
Visit furniture factory, lumber
mill or lumberyard.
Some local home centers offer
special weekend classes for Webelos age children.
Invite someone to give a
demonstration on the safe use of tools.
Visit a construction site or find
out about helping with a Habitat for Humanity project.
Visit a tannery or leather goods
manufacturer.
Invite someone to give a
demonstration of leather craft and explain how to use leather tools.
Invite someone to give a
demonstration of metal work, using tin snips and a vise.
Have a nail driving contest.
Build a bridge for pack crossover
ceremonies; tie it into the Engineering pin.
Tie in with the Scholar pin and
discuss how education helps when doing crafts and working in the technology
field.
Pedro Doorstop
Timucua District, North Florida
Council
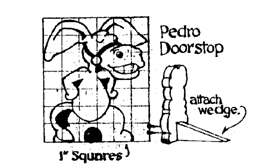
Use grid
method to enlarge Pedro pattern to about 7-by-6 inches.
Trace on 1/2
inch plywood or scrap and
Cut with
coping saw.
Paint as
desired.
Name that Tool
Timucua District, North Florida
Council
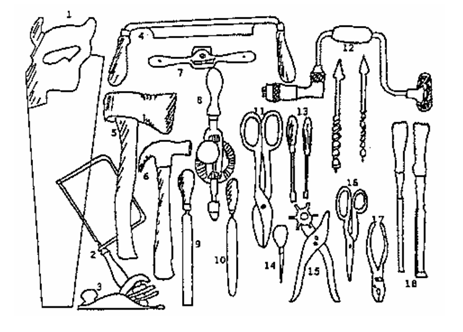
Pictured above are some basic
tools Webelos Scouts may use when working with wood, leather, or tin. Place the
appropriate number next to the named tool.
_____ Awl
_____ Ax (hand)
_____ Brace & Bits
_____ Chisels
_____ Coping Saw
_____ Drawknife
_____ File
_____ Half-round File
_____ Hammer (claw)
_____ Hand Drill
_____ Leather Punch
_____ Plane
_____ Pliers (slip-joint)
_____ Saw
_____ Screwdrivers
_____ Shears
_____ Spokeshave
_____ Tin Snips
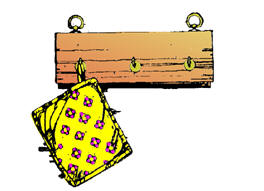
Potholder Hanger
Timucua District, North Florida
Council
Use scrap wood about 1-by-4-by-12
inches, L-shaped cup hooks, and picture hooks.
SCIENTIST
TECHNOLOGY GROUP
Timucua District, North Florida
Council
Remember
the Scientist Activity
Badge is a "doing" badge, not a "watching" badge.
For best results, follow this procedure:
1.
Demonstrate the
experiment.
2.
Explain the
experiment.
3.
Ask questions to
test understanding.
4.
Allow Webelos to do
tile experiment.
5.
Have each boy log
the experiment.
6.
Have each boy
explain tile experiment.
7.
Ask again for
questions
What does a scientist do?
A scientist studies things to
learn how they behave and why.
Scientists try to find out the
laws of nature about the things they study. People can use these rules or laws
in making things.
While working on this activity badge, you will learn a few of the main ideas in
physics. Physics is a science with several branches.
One of these branches will be
weather. You can learn a little about weather in these activity badge
requirements.
Another branch of physics is
called optics. You will have a chance to learn something about sight and find
out how your eyes work.
Scientists learn a lot by
experimenting or trying things out. Try things for yourself.
Scientists take nothing for
granted.
They may be sure an idea is true,
but they always test it, if possible, to make certain they are right.
Scientists
And Engineers
Aren't they the same thing?
Not quite. Though they use many of the same ideas and methods, scientists and
engineers are somewhat different.
What do
scientists want?
Scientists want to know how the universe works. They may see it as an enormous
jigsaw puzzle to solve for its own sake. Some things they find are useful right
away, others not (though much of what scientists have found in the past has
turned out to be useful in some way). Though they certainly want to help people,
their major goal is understanding, not usefulness.
What about
engineers? Engineers
try to use the facts of science and math to do things that are useful to people.
Many engineers are designers -- designing the many products that we use in the
world, from computers to cars to camera lenses.
What do
they have in common?
Quite a few things, actually. Scientists and engineers both use the facts and
methods of science, and both often use MATH and COMPUTERS in their work.
PENDULUM PHENOMENON, An Optical
Illusion
Fasten a
white disc, 3/4-in diameter on a 3 foot piece of white thread. Have someone
hold the thread so the disc can swing like a pendulum. Start the disc swinging
in a perfectly straight line and view it from a distance of three feet against a
plain wall. Notice how the disc swings in a line like a pendulum. Hold a
sunglass lens over one eye. Observe the path of the swinging object again. The
movement will no longer be in line but in a circle. If you switch the lens to
the other eye, the movement will appear to be in the opposite direction.
Principle demonstrated: Shows how important it is for the eyes to receive
similar images.
HYDROMETER
This measures
the density of a liquid. An object can float in a liquid only if it is less
dense than the liquid. Prove this by placing a fresh egg in a glass of water.
The egg will sink. Then add 1 tablespoon of salt to the water and the egg will
float. Try sticking a thumbtack into a pencil eraser and place the pencil in
water, point up. Mark the waterline on the pencil. Add salt to the water. The
pencil will ride higher in the water.
WHY? BECAUSE SALT WATER IS MORE DENSE!
PASCAL'S LAW
"The pressure of a liquid or a gas
like air is the same in every direction if the liquid is in a closed container.
If you put more pressure on the top of the liquid' or gas. the increased
pressure will spread all over the container."
A good experiment to demonstrate air pressure is to take two plumber's force
cups (plumber's friend) and force them firmly against each other so that some of
the air is forced out from between them. Then have the boys try to pull them
apart.
When you drink something with a straw, do you suck up the liquid? No! What
happens is that the air pressure inside the straw is reduced, so that the air
outside the straw forces the liquid up the straw. To prove this fill a pop
bottle with water, put a straw into the bottle, then seal the top of the bottle
with clay, taking care that the straw is not bent or crimped. Then let one of
the boys try to suck the water out of the bottle. They can't do it! Remove the
clay and have the boy put two straws into his mouth. Put one of the straws into
the bottle of water and the other on the outside. Again he'll have no luck in
sucking water out of the bottle. The second straw equalizes the air pressure
inside your mouth.
Place about 1/4 cup baking soda in
a coke bottle. Pour about 1/4 cup vinegar into a balloon. Fit the top of the
balloon over the top of the bottle, and flip the balloon so that the vinegar
goes into the bottle. The gas formed from the mixture will blow the balloon, up
so that it will stand upright on the bottle and begin to expand. The baking
soda and vinegar produce C02, which pushes equally in all directions. The
balloon that can expand in all directions with pressure, will do so as the gas
is pressured into it.
For this next experiment you will need: A medicine dropper, a tall jar, well
filled with water; a sheet of rubber that can be cut from a balloon; and a
rubber band. Dip the medicine dropper in the water and fill it partly. Test the
dropper in the jar - if it starts to sink, squeeze out a few drops until it
finally floats with the top of the bulb almost submerged. Now, cap the jar with
the sheet of rubber and fix the rubber band around the edges until the jar is
airtight. Push the rubber down with your finger and the upright dropper will
sink. Now relax your finger and the dropper will rise. You have prepared a
device known as a 'Cartesian Diver'. The downward pressure on the rubber forces
the water up into the bottom of the diver, compressing the air above it,
producing the effects of sinking, suspension and floating, according to the
degree of pressure applied.
DANCING RAISINS
Fill a 12 ounce glass three
fourths full of water. Add a tablespoon of baking soda and stir until clear.
Drop raisins into the glass. Pour vinegar into the glass. Use as much vinegar as
it takes to make the raisins come to the top of the water. Bubbles will appear,
and the raisins will "dance."
Mixing vinegar and baking soda
together forms a gas called carbon dioxide. Bubbles of carbon dioxide stick to
the sides of the raisins, act like air bags, and float the heavy raisins to the
surface. At the surface the bubbles break, the raisins sink again, and the
process starts all over.
CHARCOAL CRYSTAL GARDEN
This is the classic way I did it
when I was a wee lad. Colorful, small, delicate crystals grow on a charcoal or
brick surface. You can also use pieces of sponge, coal, or crumbled cork to grow
the crystals on. Crystals are formed because the porous materials they grow on
draw up the solution by capillary action. As the water evaporates on the
surface, deposits of solids are left behind, forming the crystals. As more
solution is drawn up, it passes through the crystals that have already formed,
depositing more solids on their surfaces, causing the crystals to grow.
FLOATING EGG SALTY MAGIC
The salt water of the seas is much
denser than the fresh water of rivers and lakes, and therefore it is easier to
float in the ocean. Show this by filling two glasses half full of water. In one
of them, mix in about 10 heaping teaspoons of salt.
Try floating an egg in each glass.
In which glass does the egg float?
Now take the eggs out of both
glasses. Carefully and slowly, pour the fresh water into the salt water glass.
Gently lower an egg Into the water. It should float (remain suspended) at the
salt water level
BERNOULLI'S PRINCIPLE
MATERIALS:
two Ping-Pong balls,
two feet of thread,
some mending tape and
a drinking straw.
PROCEDURE:
Tape each ball to an
end of the thread. Hold the center of the thread so that the balls dangle about
one foot below your fingers and about one or two inches apart. Have the boys
blow through a straw exactly between the balls, front a distance of a few
inches. Instead of being repelled, the balls will be attracted to each other.
EXPLANATION: The air
current directed between the Ping-Pong balls reduces the intervening air
pressure. Stronger pressure from the far sides pushes the balls together. The
strength of the air from the straw will determine how close the balls will come
FOAMING FOUNTAIN
Place two
teaspoonfuls of baking soda in the bottom of a quart glass bottle. Drop a
burning match into the bottle. It will continue to burn. Next pour four
teaspoonfuls of vinegar on top of the baking soda, being careful not to pour
directly onto the match. Watch what happens. The seething, foaming mass is
carbon dioxide, released from the soda by the vinegar.
What happens now to a lighted match? Why? Is carbon dioxide gas heavier than
air? Than oxygen? Tip bottle slowly over it lighted candle. What happens? The
heavy gas can even be poured so the flame flutters and may go out. This is the
principle behind some fire extinguishers.
BATTERY
Alessandro
Volta, an Italian physicist, produced electricity by chemical reaction in 1800.
He did this with a device that became known as a voltaic cell. It was the first
wet cell battery. Volta's battery was made with pairs of zinc and silver pieces.
The electric current ran from the zinc to the silver through pieces of board
soaked in salt water. You can make your own simple voltaic cell.
MATERIALS: copper wire , fresh lemon , paper clip.
PROCEDURE:
Straighten
out the paper clip and copper wire. They should be about the same length.
Thrust both wires deep into the lemon. They should be side by side, but not
touching.
Put the free ends of the wires to your tongue. The slight tingle and metallic
taste you feel is due to the passage of electrons through the saliva on your
tongue. The acid in the lemon acted as an electrolyte. An electrolyte is a
substance that is not metal that carries electricity. The chemical reaction
caused electrons to build up on one of the wires and decrease on the other wire.
CONCLUSION:
When you put
the free ends of the wires to your tongue, you closed the circuit between the
two wires. Electrons flowed from the wire with more electrons, through your
saliva that acted as a conductor, to the wire with fewer electrons. The entire
system of lemon, wires, and saliva is a simple battery. It is similar to the
first battery made by Alessandro Volta.
THE
BEAUFORT WIND SCALE
The Beaufort Wind Scale was originally devised by Sir Francis Beaufort to
describe wind speed in chart form. By watching the effect of wind on objects in
the neighborhood, it is possible to estimate its speed.
Copy the
scale on a large sheet of cardboard and hang it in your den meeting place.
|
#
0
1
2
3
4
5
6
7
8
9
10
11
12 |
Title Effect
of Wind
Calm Smoke rises vertically
Light Air Smoke drifts
Light Breeze Leaves rustle
Gentle Breeze Flags fly
Moderate Breeze Dust, loose paper
raised
Fresh Breeze Small trees sway
Strong Breeze Difficult to use umbrellas
Moderate Gale Difficult to walk
Fresh Gale Twigs break off trees
Strong Gale Slight damage to roofs
Whole Gale Trees uprooted
Storm Widespread damage
Hurricane Devastation |
MPH
< 1
1 - 3
4 - 7
8 - 12
13 - 18
19 - 24
25 - 31
32 - 38
39 - 46
47 - 54
55 - 63
64 - 75
Above 75 |
ATMOSPHERIC PRESSURE
We live under
a blanket of air called the earth's atmosphere. The air in the atmosphere
exerts pressure of almost fifteen pounds per inch on every surface of earth.
Hanging Water - Fill a glass to overflowing and lay a piece of cardboard atop
it. Support the card with one hand, turn the glass upside down, and remove your
hand from the card. The card does not fall. It remains on the glass and allows
no water to escape. Why? The air pressure from below the cardboard is greater
than the pressure of the water above and presses the card tightly against the
glass.
Materials found in Baloo's Bugle may be used by Scouters for Scouting activities provided that Baloo's Bugle and the original contributors are cited as the source of the material. |
|