November 2008 Cub Scout Roundtable Issue |
Volume
15, Issue
4
December 2008 Theme |
Theme:
Holiday Lights
Webelos:
Craftsman and Scientist
Tiger Cub
Achievement 4 |
WEBELOS
It's almost Graduation time!!! Be
Prepared!!!
CRAFTSMAN
TECHNOLOGY GROUP
This is the second month
for Craftsman. These ideas are intended to supplement last months. So if you
havent used all the ideas in last months issue, go on back to that issue as
well as looking here. CD
Southern NJ Council
The Craftsman activity pin will not be an easy one for
some of the boys to complete. Encourage the boys to put forth their best effort.
Give praise when praise is deserved, and give encouragement in other areas. Do
not encourage competition while working on Craftsman, this can cause boys to get
careless in their attempts to win and could cause injuries to occur.
Handsaws
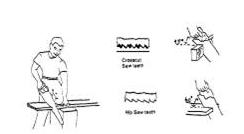
Handsaws have come a long way since the earliest Stone
Age man made his by chipping notches in a piece of stone or flint. Today's saws
are made of steel, with handles designed for a firm grip and with tow different
types of teeth. These two very important saws in a wood workers tool kit are a
rip and a crosscut saw. While both saws look alike in size and shape, a close
examination of the teeth will disclose several differences - the shape and
spacing of the teeth, and the way the teeth are filed. Rip-saw teeth are
designed to cut with the grain of the wood and so are straight-filed, each tooth
cutting as a small chisel. Crosscut saw teeth are designed to cut across the
grain and so are bevel-filed, each tooth cutting the wood fibers like a sharp
knife. Both saws have a set in the teeth ... that is, alternate teeth are bent
outward slightly, so the saw serf will be slightly wider than the thickness of
the blade to provide clearance and make cutting easier.
High quality saws are taper-ground for the same
reason. The most popular size of rip and crosscut saws is 26 inches, with five
or five and one-half teeth (point to the inch for rip saws and eight or ten
teeth to the inch for crosscut saws.)
To rip a board, hold at 45 to 60-degree angle. Take
long, easy strokes. Dont force saw To start a cut, use thumb as a guide for
blade. Extending your forefinger on handle, helps to steer saw in straight line.
For crosscutting, hold the saw at an angle of 45 degrees. Steady the board so it
does not vibrate.
Working with Plastics
Acrylic sheets are used for plastic projects. Almost
any plastic supplier has scrap acrylics which you can purchase from them for a
minimal price. (They may offer to donate the pieces.) You can also find sheets
of acrylic in many home improvement stores. You will need fairly thin acrylic
(1/8 thickness is plenty) for these projects. You can use clear or colored
sheets, depending on the project you choose.
It is important that you plan ahead. You will have to
do some of the work yourself. For example, an adult should oversee the use of
ovens or appliances. For simple thermoforming, a kitchen oven, electric hot
plate, heat gun, hair dryer or strip heater can be used. There are many
variables involved in heating and forming plastics, so experiment in advance
with scrap pieces so youll know what to expect at the meeting.
As a general rule, the plastic should be heated as
quickly and uniformly as possible. The plastic should be very pliable or rubbery
for good forming, when heated. When heating in an oven, set the temperature at
350 degrees.
General Procedures:
1.
Before you heat any plastic, be sure
to remove all masking paper and foreign matter from it.
2.
For simple bends, first cut to shape
the pieces to be formed.
3.
Finish the edges the way you want
them to appear in the final project.
4.
Wear soft cotton flannel gloves when
handling the heated plastic.
5.
Form all pieces a quickly as
possible, as the plastic cools quickly.
Working with Leather
Leather crafting is a fun hobby that many boys may
carry into adulthood with them. It is best to start with simple projects like
key chains and coasters. Then let the boys work their way up to more difficult
items such as wallets or belts.
Leather Tooling Tips
·
·
Dampen leather for ease of tooling, but
dont leave it dripping wet.
·
Have the boys draw a design on paper
before starting. Then they can trace the design onto their piece of leather with
an awl.
·
Let the boys practice with their tools
on scarp leather first.
·
Lather stains or acrylic paints can give
your projects an added dimension.
·
Put a scrap of wood under each boys
project.
Projects
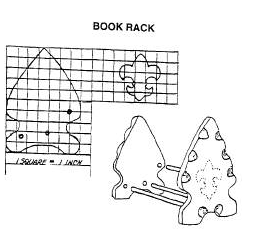
Book Rack:
Keeping your Scouting books, and other books that you
are reading, in this rack will help you find just the book you want quickly.
It also helps to keep your room in order. Making this
book rack is not difficult and is a good woodworking project. The end boards of
the rack are cut out in the shape of a huge Indian arrowhead. See template for
pattern. These are cut from one-half inch hardwood.
Sandpaper the edges off smooth and chip the edges
with a hall-round file. The chip grooves are made on the outside of the end
boards only. The inside surface is left smooth. Three, one-half inch dowels are
used for the spreaders. They are 12 inches long, and the ends are glued into
holes made in the end boards. These holes must stop short of going through. The
proper location of these holes can be determined from the pattern. When boring
the holes, be sure to make the ends right hand and left hand. Otherwise, you
will be in trouble.
A thin piece of plywood about 1/8 inch thick is used
for the Scout emblem. Make one for each end and glue them in place as indicated
in the illustration. The rack can be finished any way you desire. It can be
stained and lacquered, or finished natural. If you like bright colors, it can be
painted with enamel The emblem should be a contrasting color.
Weather Vane:
Materials:
20 Curtain Rod
Coat hanger Wire
Tin or Aluminum
Broomstick or dowel
Bolts, washers, screws
Glue
Enamel Paint
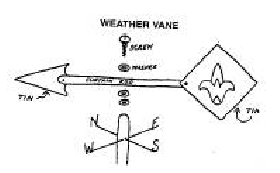
Construction:
1.
Using patterns enlarged from the
above illustrations, cut arrowhead, Webelos insignia and compass point initials
from tin. Roll edges so they will not be sharp and dangerous.
2.
Paint with enamel.
3.
Bolt arrowhead and Webelos insignia
ends to curtain rod.
4.
Drill small holes in 4 sides of
broomstick.
5.
Solder initials to wire. Glue ends
of wire in holes of broomstick.
6.
Punch hole in middle of curtain rod.
7.
Screw curtain rod to top of
broomstick, using washers, so arrow will swing freely when the wind blows.
8.
When installing vane, be sure that
the stationery compass directional initials point correctly, i.e. N is due
North, etc.
Drafting Word Search:

Accuracy
Acetate Arcs
Artist
Bars Beam
Blade
Block Board
Brush
Caliper Case
Chalk
Clip Copy
Curve
Desk Draft
Easel
Edge File
Graphics
Inks Linear
Matte
Paper Pencil
Plan
Render rule
Sheet
Stand Stylus
Tools Trace
Make a family Checker or Chess Game:
Alice, Golden
Empire Council
To make the board: Your
checkerboard will need 8 alternating rows of 4 black squares and 4 red squares,
each square 4cm x 4cm. Measure this out on a piece of cardboard, even if you
plan to make your board on good quality plywood. If you are using wood, you can
either paint or stain the squares. Then cover them with a finish, which could
even be as simple as several coats of white glue.
You could also use a contact
paper on a piece of heavy cardboard or foam core board. You will need to trace
and cut out 32 red contact paper squares and 32 black contact paper squares. Cut
them out carefully so the edges are straight and the squares are as perfect as
possible. Before removing the backing from the contact paper, lay out all the
squares on the table. Arrange them so the checker board is centered. If you make
a mistake, the contact paper will peel off easily, and you should be able to
reapply the square.
Once the entire checkerboard is
in place you will need to cover it with a protective sheet of clear contact
paper. Using the lines on the back of the contact paper, determine where to cut
the sheet so it will cover the entire checkerboard. Cut it out carefully, and
peel back only one corner. Apply that corner to the corresponding corner of the
checkerboard, and slowly and carefully peel back the rest of the backing as you
press the clear contact paper into place. Smooth out any air bubbles with your
fingers. Small air bubbles may be pricked with a pin and smoothed out if
necessary.
Make a set of 12 black
checkers and 12 red checkers using a dowel cut in ½ interval, then painted
or stained, half red and half black.
You can also purchase plastic
checkers, but its more fun to make your own. You could also use clay, using a
round mold of appropriate size to form the checkers. You might be able to find a
bottle cap that is the right size to use as a cookie cutter. Embellish the
checkers by making impressions using coins, buttons, or other objects if
desired. You can also make serrated edges on the checkers using a small knife if
you wish. Bake the polymer clay checkers according to package directions.
Make a bag or box to hold
the checkers.
Another option: For a unique checkerboard game, use an old card table to
attach your Contac paper squares. This simple project is a great way to recycle
a table that would have otherwise been discarded. Your checkerboard game table,
complete with homemade checkers, will more than likely be passed down and
enjoyed by future generations.
SCIENTIST
TECHNOLOGY GROUP
Explore Chromatography with M&Ms!
Alice, Golden
Empire Council
Chromatography is a method of analyzing complex mixtures by
separating them into the chemicals they contain. In police work, drugs from
narcotics to aspirin can be identified in urine or blood samples. But Webelos
can also use chromatography to separate out the different colors in a black
permanent marker (they arent just black) - or for more fun, the actual colors
in M&Ms! Go to
for specific instructions and great diagrams to test the
permanent marker. Heres how to do the M&M test:
ü
Open a bag of M&Ms choose about 5-6 of different colors.
ü
Put them in a small amount of water in a glass or cup and stir
around until the color comes off. Note that the water will be all one color
remove the M&Ms and stir till colors are all dissolved into one color usually
something grayish.
ü
Point out that the colors seem to have all blended together the
bright colors seem to have disappeared.
ü
Now take a coffee filter, or even a paper towel, and cut a strip
long enough to reach down into the water you could even staple the top edge to
make a loop that you can hang from a pencil. But make sure the paper reaches
down to touch the water.
ü
Now leave it overnight, or till your next den meeting the
various colors will separate out on the paper, showing that they really didnt
disappear into a single color.
ü
To take this a step further, separate out a bag of M&Ms by
color. Then make a graph to show how many of each color are in a bag of M&Ms.
If each boy has his own bag, they can eat their experiment. (One of my
boys was so intrigued that he went home and created several kinds of graphs on
his computer to show the composition of his bag-Alice)
Heres the science behind it: Because molecules in ink or
even the colored coating on M&Ms have different characteristics, such as size
and solubility, they travel at different speeds when pulled along a piece of
paper by a solvent (the water). For example, the grayish water color, (or even
black ink) contain several colors. The water soluble colors behave differently
due to their molecules, and separate into a sort of rainbow of colors. Go to
the website and try using the black permanent marker your boys can practice
some CSI techniques try the secret note challenge!
Riddles about Science and Scientists:
Alice, Golden
Empire Council
Some famous scientists were invited to a
party. Can you guess what they studied by reading their responses?
Response:
Ampere was worried he was not up to "current" norms of the party.
Answer:
Discovered electric current produced fields.
You may also be
surprised to see how often a discovery was named for the scientist.
For some fun
riddles about science and scientists, go to:
You can also click on
a fun song about inventions, called Mother Necessity.
Trapper Trails Council
The Scientist Activity Badge is
recommended to be presented in a two month format, as outlined in the Webelos
Program Helps booklet. This outline presents the Badge in eight weekly
meetings. Every requirement is covered in the outline. Each Scout who attends
all meetings will satisfy all requirements, even though only six of the nine
electives are required.
The Scientist badge lends
itself to many different demonstrations, with which the Scouts will have a lot
of fun. As the Webelos Den Leader you should read the book ahead of time and be
prepared with your demonstration materials. Make sure you try out your
demonstrations BEFORE the meeting. Examples are given here, but use your
imagination -- you can think up very good demonstrations too! Use the Program
Helps and the Webelos Activities book. Lists of materials needed are not given
here for demonstrations taken from the Webelos book.
Use the Webelos book in the
meeting. Have the Scouts read sections from the book. Then give them hands-on
experience doing the demonstrations. Use all your other resources, like the
Webelos Resource Book -- there are a lot of demonstrations in the Webelos
Resource Book.
Plan one or more outings to
show first hand one or more of the principles discussed in the Den meetings.
Examples: Visit an airport and observe wing shapes, observe planes taking off,
go flying.
Requirement 4 of Scientist has the Webelos Scout earn
the Science Belt Loop.
The requirements are:
Complete these three requirements:
1.
Explain the scientific method to your adult partner.
2.
Use the scientific method in a simple science project Explain the
results to an adult.
3.
Visit a museum, a laboratory, an observatory, a zoo, an aquarium, or
other facility that employs scientists. Talk to a scientist about his or her
work.
Week 1
Requirements to be fulfilled:
Do These:
2. Read Pascal's Law. Show how it works.
3. Show in three different ways how inertia works.
4 Begin work on Science Belt Loop
Discussion and Demonstration:
1. Read the introduction and requirements. Discuss the requirements and how
they will be worked on in and outside the Den. Make sure you alert the Scouts
and the parents about any field trips that will be planned. Also, make sure you
telephone the parents a few days before the field trip -- it helps attendance.
2. Read pages on Pascal's Law. "Pressure of a gas or liquid is equal on all
sides of a sealed container." Use a balloon as an example.
Demonstration: You will need a soda bottle, 1/4 cup of vinegar
and 1/4 cup of baking soda. Put the vinegar in the balloon, and the baking soda
in the soda bottle. Put the balloon tightly over the mouth of the soda bottle
and tip up the balloon to make the vinegar go into the bottle. The balloon will
begin to expand as the CO2 is
generated from the reaction. The point is that the pressure in the bottle and
balloon increases as the gas is produced. The bottle cannot expand so the
balloon does in all directions.
The Cartesian Diver demonstration: You will need a glass jar, a
sheet of rubber such as cut from a balloon, a medicine dropper and a rubber
band. Fill up the jar nearly to the top with water. Suck a water into the
medicine dropper until it just floats at the top of the water in the jar. Place
the rubber sheet over the mouth of the jar and fix it to the top with the rubber
band. Now press on the rubber to increase the pressure in the bottle. The
"diver" will submerge and go toward the bottom of the jar. Release the rubber
and the "diver" goes back up to the top. What has happened is that when you
push on the rubber, the pressure in the jar increases, forcing more water into
the dropper, causing it to be heavier than the lift provided by the air in the
dropper -- it submerges.
3. Read pages on inertia. "A body in motion stays in motion unless acted on
by some outside force. A body at rest stays at rest unless acted upon by an
outside force." Demonstrate inertia using a coin on a card over a bottle as
shown in the book. Demonstrate using glass of water and strip of paper. These
are "at rest" demonstrations. Demonstrate "in motion" inertia using a rolling
ball hit by another rolling ball.
Extra credit: How is inertia
expressed? Inertia is Mass times velocity. Mass can be expressed as pounds.
Velocity can be expressed as feet per second. So inertia is expressed as
pound-feet per second. If a 1 pound ball travels due North at 1 foot per second
and is hit head on by a 1 pound ball traveling at 2 feet per second due South,
what might happen.
Additional Pascal's Law Demonstration:
ü
Place a glass in water, turn it upside down and lift it slowly.
What happens when the bottom of the glass rises above the surface of the water.
The water stays in the glass and is raised with it. But as the top of the glass
breaks the surface of the water, the water in the glass falls out. This happens
due to the fact that the air is pushing down on the water outside the glass and
when the glass breaks the surface, air can rush in. The air no longer supports
the water so the water falls out according to Pascal's Law.
Additional Inertia Demonstrations:
ü
Place a doll in the middle of the back of a pickup type truck. The
pickup bed needs to be large enough for the doll to slide in. Move the truck
rapidly forward and then make it turn a curve sharply. The doll will slide to
the side of the truck since it will keep wanting to go in a straight line
accordingly to the principle of inertia.
ü
Place several books on a smooth table. Push them toward a stick or
another book you are holding as an obstacle. When the bottom book is stopped by
the obstacle, the books on top continue due to the law of inertia.
ü
Place a bucket on the floor, drop a ball into it. Easy, it drops
right in. Now while walking past the bucket try to drop the ball in when your
hand is positioned exactly above it. You miss. This especially shows up if you
try to do this while running past the bucket. Since the ball has acquired your
moment of inertia it tends to keep going forward after you have dropped it; thus
it misses the bucket.
ü
Put a marble, golf ball, or ping pong ball into a glass or jar
that is laying on its side. Move the glass forward quickly, then stop it. Due to
Newton's First Law (Inertia), the ball continues forward though the glass is
stopped.
Homework:
ü
Look for examples of Pascal's Law or inertia around your home and
school, to tell the Den next week.
Week 2
Requirements to be fulfilled:
1. Read Bernoulli's Principle. Show how it works.
Do Six of These:
5. Show the effects of atmospheric pressure.
Discussion and Demonstration:
1. Read pages on Bernoulli's Principle. "When air moves quickly,
pressure is low." Demonstrate Bernoulli's Principle with card and thread
spool. Demonstrate by blowing over a strip of paper. Demonstrate by blowing
over a straw in a glass of water.
Extra credit: Aircraft wings are curved on top to reduce the air
pressure, but paper or balsa wood gliders have flat wings. Why do they climb?
Discuss angle of attack.
2. Read pages on Atmospheric Pressure. "We live in a blanket of
air. That air exerts 15 pounds per square inch pressure on all surfaces at sea
level." Demonstrate with candle in a bottle turned upside down in a bowl of
water. Demonstrate with crush the can. Demonstrate with a can filled with
water and holes in lid and side. Demonstrate with the cork boat, glass and
water.
Another demonstration: Float a ball in the air flow from a fan.
The ball stays in place because the pressure is lower in the flow -- the higher
pressure outside the flow forces it to stay put.
Extra credit: What is a vacuum? The absence of air or anything
else. It is hard to create a vacuum on earth. Why? Because you have to
overcome the 15 pounds per square inch atmospheric pressure. Suppose we want to
create a vacuum inside a 12-inch cube. Do you know how to calculate the surface
area of a 12 inch cube? The mathematical formula is 6*L*L, where L is the
length of a side or 12 inches, and 6 is the number of sides. L*L is 144, so
6*L*L is 864 square inches. So the pressure on the cube is 864 square inches *
15 Pounds per square inch, or 12,960 Pounds of pressure! That's a lot of
pressure to overcome in order to make a vacuum!
Additional Bernoulli's Principle Demonstrations:
ü
Cut a soda straw about 2/3 thirds through about the midpoint of
the straw. Fold the straw back so that it forms a 90 degree angle. Pour colored
water into the a glass or cup and have the scouts blow hard into the opposite
end of the straw. Air moving rapidly across the top of the straw will cause the
air pressure to lower within the straw causing the water to rise in the straw
and go down in the glass.
ü
Place two ping-pong balls on the table about two inches apart.
With a straw blow a steady stream of air between the two balls. As you blow the
balls will come together until they hit the stream of rushing air and bounce
back apart.
ü
Cut a long thin strip of paper and make a fold 1/8 from each end.
Try and blow under the beneath the bridge formed to try and blow it over. The
more you blow the more it will bend toward the surface it is sitting on. Air
pressure is higher above the paper bridge then below, so the paper is bent
toward the surface.
ü
Make an airfoil section (section of an airplane wing) by gluing a
strip of paper around a straw, pencil or small stick. Hold the stick in front of
you and blow a stream of air over the leading edge of the airfoil. The airfoil
should rise.
Homework:
ü
1. Look for examples of Bernoulli's Principle, and atmospheric
pressure at work around your home and school, to tell the Den next week.
Week 3
Requirements to be fulfilled:
6. Show the effects of air pressure.
7. Show the effects of water pressure.
Discussion and Demonstration:
1.
Read pages on Air Pressure. "If we compress air -- increase the air pressure --
we can put it to work for us. Example of compressed air: Blow hard into a
bottle. A balloon. Demonstrate air pressure with the newspaper ball and soda
bottle. Demonstrate with the hot water bottle lifting books). Demonstrate with
the balloon lifting a glass.
2.
Read pages on Air and Water Pressure. "Air pressure keeps water out of a diving
bell." Demonstrate with a glass and pan of water -- push down on the glass, the
water is displaced. Float a bottle cap and push down on the glass to push the
bottle cap to the bottom.
Other Air & Water Pressure Demonstrations:
ü
Hold a glass over a dishpan and fill to the brim with water. Cover
the top with a piece of cardboard. Press on the cardboard with one hand, turn
the glass upside down and let go of the hand touching the cardboard. The
cardboard will stay stuck to the glass.
ü
Stick a clear straw in a glass of colored water (for clarity),
suck up the water until the straw is full. Putting your tongue or a finger over
the straw lift it out of the water. The water will stay in the straw until you
let go.
ü
Fill a glass with colored water, place the short end of a bendable
straw in the glass and bending the straw so that the long end will be below the
surface of the water in the glass. Place a second shorter glass next to the
first. Suck on the long end until water starts to move up the straw. Point the
long end in the second glass and let the water flow out. The water will continue
to flow until the water reaches the same level in both containers.
ü
Fill a dishpan with water. Poke several holes in the bottom of a
detergent bottle using a small pick or cork screw. Place the bottle in the water
and fill with water. Bring the bottle out and the water will run out the bottom.
Put a finger over the hole in the lid of the bottle and the water will stop
running. The bottle can be used for a shower when outside.
Homework:
ü
Look for examples of air pressure, and air and water pressure at
work around your home and school, to tell the Den next week. [Bicycle tires, car
tires, tire pumps, aerosol cans, etc.]
Week 4
Requirements to be fulfilled:
9.
Explain what causes fog.
Discussion and Demonstration:
1.
Read pages 295-297 on Fog. "Did you know that air has water in it?"
Demonstrate making fog with the hot water in a bottle and place an ice cube at
the top of the bottle (page 296). Demonstrate with cold water in the bottle and
light a wooden match, drop into bottle (pages 296-297).
Homework:
ü
Have you walked in a cloud? Have you played games at school out
in the field when it was so foggy you could not see your friends? What does fog
smell and taste like?
Week 5
Requirements to be fulfilled:
10. Show how crystals are formed. Make some.
Discussion and Demonstration:
1.
Read pages on Crystals. "When many liquids cool, they make geometric shapes
called crystals. All crystals of one material are identical." Bring examples
to show. If a microscope is available bring salt, sugar, and any other
crystalline materials you have available to view under the microscope.
Demonstrate crystal making by with sugar crystals.
Homework:
ü
With your parents, try making sugar crystals at home. Bring your
experiment to the next Den meeting. You need to protect you experiment from
mold, so cover it up. What did you learn? How easy is it to dissolve the sugar
in the water? Why do you have to heat the water?
Week 6
Requirements to be fulfilled:
11. Define balance. Show three different
balancing tricks.
12. Show in three different ways how your two eyes
work together.
Discussion and Demonstration:
1.
Read pages on Balance. "Balance is when the center of gravity (or center
of mass) is exactly over a pivot point (of fulcrum)." Show examples of balance,
using a ruler or yard stick balanced on your finger, a mobile, a teeter-totter.
Bring a weeble and show how the center of mass is so low that it returns to
equilibrium on its own. (What's a weeble? A weeble is one of those very
annoying standup toys that you can hit at the top, it falls over and then comes
back up to right itself automatically.]
Balancing Tricks from the book -- have all Scouts try all of these: Back
up to a wall and try to pick up a paper at your feet. Chair lift leaning
against the wall. Stand sideways to a wall; try to bring the outside foot up to
the one next to the wall.
2.
Read pages on How Your Two Eyes Work Together. "Binocular vision means
two eyes. Your two eyes work together to give you depth perception -- because
your brain can put the two images together, the brain can figure out how far
away things are."
Demonstrate with the paper tube trick, making it appear as though you
have a hole in your hand . Have all Scouts do this. This shows how the brain
puts the two images together.
Demonstrate by holding two pencils at arms length, and changing focus to
beyond the pencils. This shows how the brain makes the eyes refocus to perform
depth perception.
Demonstrate the "finger sausage". This shows how your brain can play
tricks.
Question: Your eyes are wonderful sensing
instruments, but where is all the work being done?
Homework:
ü
Look for examples of balance at work around your home and school,
to tell the Den next week. Do you have a weeble? Bring it to the Den meeting.
Why is it so hard to knock over a weeble?
ü
Can you find other ways your eyes work together and share that
with the Den next meeting?
Week 7
Requirements to be fulfilled:
12. Show what is meant by an optical illusion.
Discussion and Demonstration:
1.
Read about Optical Illusions - "An optical illusion is when our eyes tell us
something that isn't really true." Demonstrate with the optical illusions in
the book.
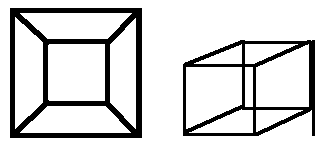
Is the Inner square closer or Are you looking down on this box or
farther away? looking up at this box?
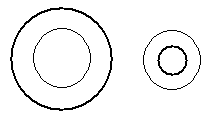
Which dotted circle is smaller?
2.
Obtain copies of a pamphlet on eye care from the local optometrist. Give a copy
to each Scout. Skim over the pamphlet in the meeting.
Additional Optical Illusion Demonstrations:
ü
1. Make a frame out of construction paper or cardboard and
attach a piece of cellophane. Draw a picture (i.e. a house) on a
piece of white paper using a marker the same color as the cellophane. Look at
the picture through the cellophane and the picture disappears.
ü
Fill a drinking transparent glass with water. Set a nickel in the
palm of your hand and hold the glass over the coin. If you look down into the
glass you will see the coin without any trouble. Cover the top of the glass with
your other hand and look at the coin through the side of the glass and you will
notice that it seems to disappear. The reason for this illusion is that first
you looked straight down at the coin. The second time you looked through the
side of the glass. When looking through the side of the glass the light rays are
bent as they pass through the water and you couldn't see the coin. This is known
as refraction.
Homework:
ü
Do you know who M.C. Escher was? He was a famous artist that
specialized in optical illusions. Do you any optical illusions around your
home? If so, bring something in to show the Den next week.
ü
Read an eye care pamphlet at home. How can be take better care of
our eyes?
Week 8
Requirements to be fulfilled:
ü
Makeup week.
ü
Review all requirements, dwell on anything missed, sign off books.
ü
Take Field Trip for Belt Loop if not already done
Discussion and Demonstration:
1.
Who can tell us what Bernoulli's Principle is? Do you remember a
demonstration of it?
2.
Who can tell us what Pascal's Law is? Do you remember a demonstration
of it?
3.
Who can tell us what inertia is? Do you remember a demonstration of
it?
4.
Who can tell us what atmospheric pressure is? Do you remember a
demonstration of it?
5.
Who can tell us what air pressure is? Do you remember a demonstration
of it?
6.
Who can tell us what the effects of air and water pressure are? Do
you remember a demonstration of it?
7.
Who can tell us what causes fog? Do you remember a demonstration of
it?
8.
Who can tell us how crystals are formed? Do you remember a
demonstration of it?
9.
Who can define balance? Do you remember a demonstration of it?
10.
Who can tell us different ways how your two eyes work together? Do
you remember a demonstration of it?
11.
Who can tell us what is meant by an optical illusion.
12.
What did we learn from the book on eye care?
Materials found in Baloo's Bugle may be used by Scouters for Scouting activities provided that Baloo's Bugle and the original contributors are cited as the source of the material. |
|