June 2006 Cub Scout Roundtable Issue |
Volume 12, Issue 11
July 2006 Theme |
Theme: Red, White and Baloo
Webelos:
Aquanaut & Geologist
Tiger Cub Activities |
PACK & DEN ACTIVITIES
Sam Houston Area Council
Wolf Achievements and Electives
Achievement 2 – Your Flag
Elective 11b – learn and sing national anthem
Elective 18f – Outdoor Adventures
Bear Achievements and Electives
Achievement 3 – What Makes America Special?
Webelos Activity Badges
Aquanaut Activity Badge
Geologist Activity Badge
Cut 5-Pointed Stars in One Snip
Alapaha Area Council
Cub Scouts really love MAGIC. And here’s a magical way to get their attention. Read on -
George Washington's original pencil sketch for the flag indicated 6-pointed stars, a form he apparently preferred.
Betsy Ross, however, recommended a 5-pointed star. When the committee protested that it was too difficult to make, she took a piece of paper, folded it deftly, and with a single snip of her scissors, produced a symmetrical five-pointed star. This seeming feat of magic so impressed her audience that they readily agreed to her suggestion.
To you we pass along the secret...
Take a thin piece of paper 8-1/2" x 10" (or an exact proportion thereof) (NOT 8 ½ by 11), and go to –
http://www.ushistory.org/betsy/flagstar.html
More information is available at
http://www.betsyrosshouse.org/
I found lots of instructions on how to do this on the web but most referenced back the www.ushistory.org site. Their instructions are great and by referencing them versus copying I am hoping you will take time to look at some of the other stuff there both about the flag and Betsy and history. CD
Safety Pin Flag
Materials:
- 9 safety pins, 1 ½ inches long
- Red, white, and blue plastic beads, 4 mm diameter
or
- 9 safety pins, 7/8 inches long
- Red, white and blue seed beads
Directions
- String a pin with 4 red and 4 white beads. Start with white and alternate colors. You will end with a red bead.
- String 3 more pins the same way.
- String a pin with four blue beads, then , with a white, red, white and red bead.
- String three more pins the same way.
- Use a butter knife or pliers to bend open the non-fastening side of the pin. String the eight pins on this non-fastening side.
- Put the four red and white pins on first. Then put on the four red, white and blue pins.
- Pinch the pin closed.
This Is essentially the same project, but explained slightly different. I thought I would run both versions to try and help everyone out. CD
Flag Seed Bead Pins
Alapaha Area Council
To make these pins, all you need are safety pins and seed beads. It would be handy to have needle-nose pliers and a small flat-head screwdriver. For these patterns, you will need 13 safety pins, one large safety pin, and red, white and blue seed beads.
Basic instructions
Open a safety pin and slip on seed beads according to the column on the pattern. Once all of the beads are in place, close the safety pin. You may want to pinch the end of the safety pin with the pliers so it will not pop open later. Repeat this for each column of the pattern.

- Open the large safety pin. Use the screwdriver to gently pry apart the coils at the end of the pin.

- Slip the loop of the first beaded pin onto the larger one. Pull it down to the coils of the larger one, all the way around, and up to the head of the pin. Do the same for the rest of the pins, being careful to keep them in the correct order!

- Once all the beaded pins are on the large safety pin, squeeze the coils closed again with the pliers. It is now ready to be pinned on to whatever you wish.
Flag Seed Bead Patterns
B = Blue Bead
R = Red Bead
Plain = White Bead
USA Banner
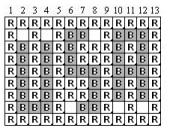
American Flag
Lifesavers® Firecrackers
St. Louis Area Council
Materials:
- 1 package of Lifesavers
- Red masking tape
- Small foil stars
- 7”-8” Silver Pipe Cleaner
Directions
- Cover a roll of Lifesavers (except for the ends) with red tape and randomly glue on foil stars.
- Insert the pipe cleaner into the Lifesavers' holes, leaving at least 2" of the pipe cleaner “wick” exposed.
- Glue two foil stars together back to back at tip of wick.
Really Rock-It
St. Louis Area Council
Materials:
- 12” Pieces of 1” PVC pipe
- 6 ½” of ¾” predrilled wooden dowel
- 3” X 4” wooden base
- Round piece of leather
- Screws
- Tape
- Stars or holiday stickers
- 1” cork
- 10” Length of metallic string
- Large metallic confetti (optional)
Directions
- Paint wooden base and pre-drill hole for a screw.
- Screw predrilled dowel into base.
- Cut a piece of leather into a 1" round and screw or tack into top of dowel piece.
- Decorate PVC pipe with tape, stars, flag stickers, etc.
- Using cork for top of the rocket, thread string through the cork, knot end, and tape other end to PVC pipe.(Leave 6" to 7" of string to "catch" the cork as it pops off the end.)
- Pull up the pipe and push it down and the cork will pop off, creating a rocket effect. For a colorful explosion pour metallic confetti into the PVC pipe beforehand.
Firecracker Neckerchief Slide
St. Louis Area Council
Materials:
- 1 Piece of ¾” x 3” dowel rod
- 4 Strips of ¼” x 3” red pipe cleaner
- 1 Piece of ¾” x 3” blue construction paper
- 1 Silver or Gold stick-on star
- 1 Piece of PVC pipe, 1/4” x 1”
- 1 Piece of red pipe cleaner, 1” long
Directions
- Sand the dowel road and paint it white, let it dry.
- Next, glue the red pipe cleaner pieces on at spaced intervals so it looks somewhat like the drawing below.
- Glue the blue construction paper at the top, going around the dowel rod.
- Bend the bottom of the 1" piece of red pipe cleaner about 1/4" and glue it on the top (at the center) so it appears to be the fuse for the firecracker.
- Glue the star in the front at the top of the firecracker, on the blue ribbon.
- Glue the piece of PVC pipe on the back for the neckerchief to slide into.
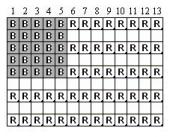
Bead Flag Pin
Alapaha Area Council
Our dens always had a great time with these beads. The big unsorted jugs are usually very reasonable but then they do require time to sort. The boys especially liked making picture frames at Christmas time and mounting their pictures in them to give to parents. There are lots of other patterns available at http://www.perlerbeads.com/ CD
Materials
Small Hexagon pegboard for Perler (fusible) beads
Red, White and Blue Beads
Pin Backing
Glue to attach pin to fused beads

Follow the pattern to make your pin. White beads have an X, The plain white circles are empty,
Iron it according to the instructions that come with the beads. Boys can help with the ironing, but please don’t let them iron on their own.

Next, glue on the pin backing with one of the types of glue listed above.
Allow to dry. The pin is ready to wear!
Baseball Game
Baltimore Area Council
There is nothing more “American” than Baseball. So why not have your Cubs build a baseball game for their own amusement?
Glue green construction paper to a piece of cardboard. Trace around a see-thru plastic lid from a vegetable or meat tray to determine the size of the playing area. Make the diamond and bases with felt tip markers as shown in the illustration. Punch round holes in each base with the tip of your scissors. The holes should be a bit smaller than the beads you are using as “players.” Place the beads in the center and glue the plastic lid in place. Then its... PLAY BALL!!!!! All bases must be covered with a bead to score a home run.
FIRECRACKER SNAPPER
Sam Houston Area Council
This is something which Granddad will remember, an old-time paper popgun made of cardboard folded over in an “L” shape. The pop is made by a triangular piece of light-weight typing paper glued to the muzzle and folded inward. Grab the handle loosely, raise it over your head and bring it down swiftly, so that the air movement makes the paper pop out and make a popping sound.
CANDLE-MAKING:
Sam Houston Area Council
- Melt paraffin wax in a clean smaller coffee can that is set into a larger coffee can that has water boiling in it.
- Add a scent like peppermint oil or vanilla, to the wax.
- Add coloring to the wax: Food coloring, inks or candle dyes.
- Make wicks. You can purchase wicks or you can make your own by dipping cords or heavy string into warm wax and allowing them to dry on a sheet of wax paper.
- Attach a wick to a stick (or pencil) and let the wick droop evenly on both sides of the stick, separated by about 4 inches.
- Dip the two wicks into the wax repeatedly. The wax will build up and form two candles.
CAUTIONS
- Never leave melting wax unattended.
- Always use a double boiler or the coffee cup in a can method to heat wax. Never place wax directly into a saucepan or heating device on its own.
- Never put water on a wax fire.
- Never overheat wax. Fumes from overheated wax can cause severe illness.
- As an added rule of safety, be certain to use a thermometer when working with wax. Flashpoint is the temperature at which wax will combust. The Flashpoint is the absolute maximum that a given wax can be heated to. If you're using Paraffin, the Flashpoint is 375ºF.
PATRIOTIC PARACHUTES:
Sam Houston Area Council
Materials: 15” squares, one ach of red, white, and blue fabric, 5” square of blue fabric, scissors, 4 pieces of 15” long string, rubber band, 1” diameter stone
What Fourth of July celebration is complete without at least one parachutist flying down from the sky. Cubs can make their own parachute and fill the air with flying men.
1” in from each corner of the large square, nip a small hole, and thread one string in each hole,
Tie each string to the fabric with a square knot.
Keep the loop through the fabric loose, as you tighten the knot about an inch from the fabric.
Lay the free ends of the four strings over the 5” piece of fabric and cover with the stone.
Wrap up the fabric tightly around the stone and strings, and secure the bag by wrapping the rubber band around it several times.
Roll the parachute loosely from the top of the chute, toward the bag.
Now toss it as high in the sky as you can. It should parachute lightly to the ground.
Neckerchief Slide
Baltimore Area Council

Materials: One postage stamp, one piece of lightweight wood, one piece of 2-by-2-inch PVC pipe, paint, glue
Choose a new or canceled postage stamp. Cut a piece of thin wood (about 2 inches larger in diameter than the stamp). Paint the wood a color that will look nice with the stamp.
Glue the stamp to the front of the wood. When dry, paint over the stamp with white glue to give it a shiny effect and to protect it. Attach the PVC pipe to the wood.
Parade Wavers
Baltimore Area Council

Fold a red paper plate in half. Glue one large blue and one large white star cut from construction paper onto the front and the back of the folded plate. Glue about 2 feet of red, white, and blue crepe paper streamers to the inside of the folded plate, alternating colors. These streamers should be glued near the center of the inside fold so that they remain secure while waving. Staple or glue the unfolded edges of the plate together. Attach a tongue depressor or paint stick for a handle by gluing one end of the stick to the backside of the plate.
Uncle Sam Windsock
Baltimore Area Council
Curve the ends of a half sheet of white poster board back until they overlap slightly. Staple the ends in place. Paint or draw vertical stripes in red around the top half. Glue a dark blue paper strip around the middle of the cylinder, covering the ends of the red stripes.
Draw a face on the bottom half of the cylinder. Red, white, and blue streamers can be glued to the inside of the bottom of the cylinder. For the hat rim, cut a blue circle larger than the cylinder’s diameter. Center the cylinder atop the circle, draw the outline of the cylinder’s diameter onto the blue circle, and then cut that outline from the interior of the blue circle. Slide the resulting blue “loop” onto the cylinder and tape in place.
The Firecracker Neckerchief Slide (M-80 style)
Baltimore Area Council
Make this bang-up slide for Independence Day.
- Obtain a dowel rod ¾ or 7/8 of an inch in diameter
- Cut a piece to measure 2¼ inches.
- Prepare to drill three holes with a 1/16 inch drill bit.
- To make a hole for the fuse, drill the center of the length of the dowel about halfway through.
- Rotate the dowel one-quarter turn and draw a pencil line across the length of the dowel.
- To make holes for the back loop, drill two holes along the line a half-inch from each end.
- Lightly sand all surfaces with medium to medium-fine sandpaper. Smooth the edges of each end until slightly rounded.
- Paint the dowel red with either spray enamel or enamel model paint. Use several light coats rather than one heavy coat, allowing each coat to dry.
- For a fuse, cut a piece of candlewick or heavy cord about 1½ inches.
- Paint the fuse royal blue. After it has dried, glue the fuse into the center hole
- For the back loop, use a 2½ inch strand of 12-gage housing wire with plastic coating. Remove 3/8 of an inch of plastic from each end. Bend the ends at right angles so that the middle section matches the distance between the holes. Check to make sure the ends will fit before gluing in place.
Materials found in Baloo's Bugle may be used by Scouters for Scouting activities provided that Baloo's Bugle and the original contributors are cited as the source of the material.
Materials found at the U. S. Scouting Service Project, Inc. Website ©1997-2006 may be reproduced and used locally by Scouting volunteers for training purposes consistent with the programs of the Boy Scouts of America (BSA) or other Scouting and Guiding Organizations. No material found here may be used or reproduced for electronic redistribution or for commercial or other non-Scouting purposes without the express permission of the U. S. Scouting Service Project, Inc. (USSSP) or other copyright holders. USSSP is not affiliated with BSA and does not speak on behalf of BSA. Opinions expressed on these web pages are those of the web authors.
|
|