PACK & DEN ACTIVITIES
Greater St. Louis Area Council
Boys love to build things. This month have the dens work with tools and wood. Learn about different kinds of wood and where it comes from. Makeg ifts for your family or bird or bathouses for the community. Work with your family to make repairs around your home. Visit the local hardware store or home-improvement store and see all the different tools. Get permission to visit a local construction site. Since the best gifts are often homemade, make handcrafted awards to present at the pack meeting.
Sam Houston Area Council
March Tiger Activities
- Elective 5 – Make a family mobile
- Elective 17 - Make a model
- Elective 25 - Snack time
March Wolf Achievements and Electives
- Achievement 5 – Tools for Fixing and Building
- Elective 3 – Make it yourself
- Elective 5 – Spare time fun
- Elective 10d&e – American Indian Lore
- Elective 13e – make a birdbath or birdfeeder
March Bear Achievements and Electives
- Achievement 5b – build a bird feeder or bird house and hang it
- Achievement 9a - Make oatmeal cookies for den
- Achievement 10b – make a bootjack or bulletin board
- Achievement 20 – Sawdust and nails
- Achievement 21 – build a model
- Achievement 22 – tying it all up
- Elective 2a-b&c – make thermometer box, weather vane and rain gauge
- Elective 6d – build model wooden airplane
- Elective 7 – Things that go. Build pushmobile, windmill, waterwheel, etc.
- Elective 9a – Art. Make a mobile with dowels.
- Elective 14d – Landscaping. Build a greenhouse.
- Elective 18 – Build an outdoor gym
- Elective 22 – Collecting. Build a collection display case/box/frame
- Elective 24c – Build a model of an American Indian dwelling.
Pack Pushmobile Championship
Sam Houston Area Council
SHAC recommends you hold a Pack Pushmobile Championship in a parking lot or playground near the Pack Meeting. You can find plans in the Bear Book or several places on-line. When using plans on-line, have a few engineering parents check them out to make sure the plans are all there and they are safe. With Webelos working on Engineer this month, they should have a blast building one of these.
Clothespin Airplane:
Sam Houston Area Council
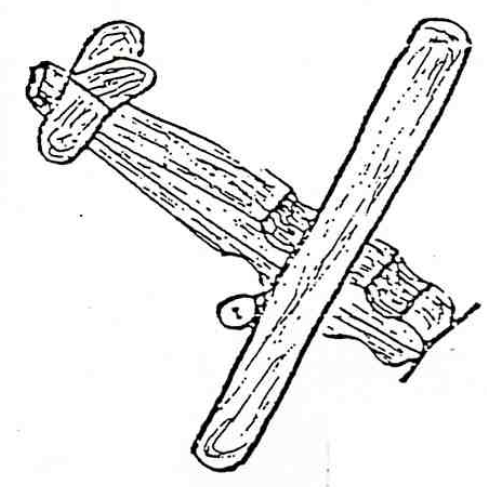
Materials:
- Spring type clothespin
- Ice cream sticks
- Toothpicks
- Buttons
- Paints
- Pipe cleaners (optional)
Tools:
- Brushes
- White glue
- Electrical wire cutters
- Markers
Construction:
- Remove the spring from a spring clothespin.
- Lay the two sticks back to back and glue them together. (Fig. 1).
- Glue on one ice cream stick for the wings as shown in Fig. 2,
or glue on 2 ice cream sticks to make a biplane as in Fig. 3.
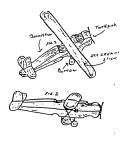
- A short piece of toothpick can be glued into place for the propeller.
- The tail and rudder are made of pieces of ice cream sticks cut to size with a pocketknife or a pair of wire cutters then glued into place.
- Wheels are buttons mounted on toothpicks that have been bent to shape but not broken.
You may use pipe cleaners instead. (Soak toothpicks in warm water for a few minutes and they will bend more easily.)
- Finish by painting with markers.
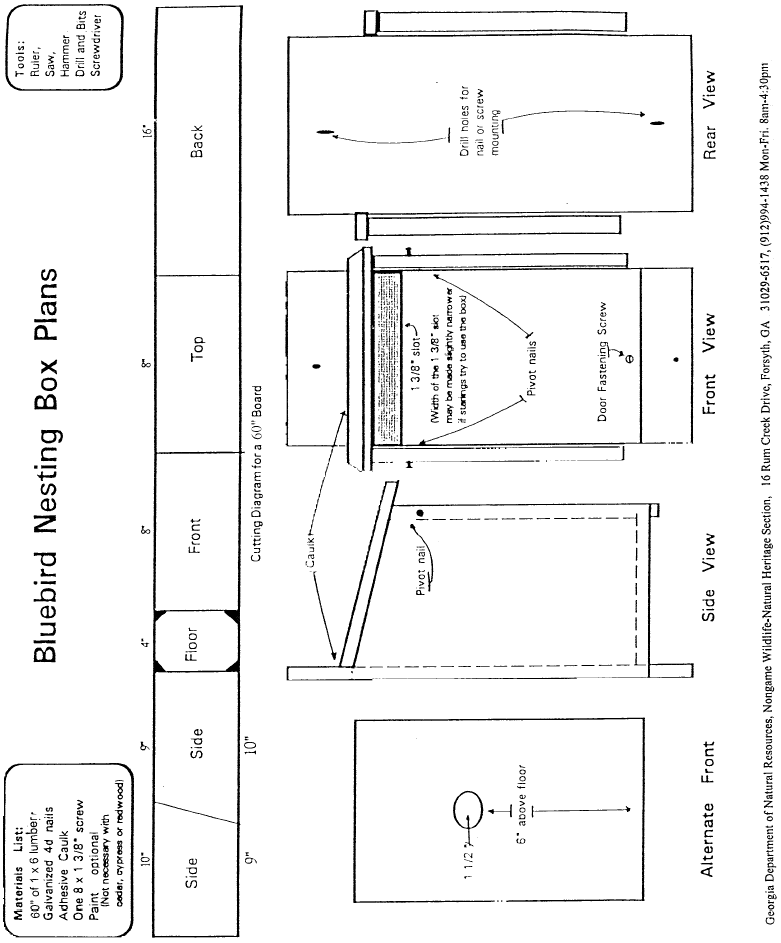
Constructing Bluebird Boxes
Alapaha Council
Adapted from Georgia Department of Natural Resources website
http://www.gadnr.org/
Plans are the end of this issue of Baloo’s Bugle
Constructing and erecting the Perfect Home for Your Bluebirds Construct boxes using untreated wood. Ideally, boards used in nest box construction should be ¾ inch thick. If smooth lumber is used in nest box construction, roughen the wood on the interior of the box just below the entrance hole; this makes it easier for young birds to climb out of the nesting box. Assemble boxes using screws, aluminum nails or galvanized nails.
Entrance holes should be cut precisely 1 ½ inch in diameter. Larger holes permit European starlings to enter the box. All boxes should be provided with drainage and vent spaces.
The outside of bluebird boxes should be painted a light color. Boxes painted light colors stay cooler than those painted dark colors.
Do not equip a bluebird nesting box with a perch. Bluebirds do not need perches; however, nest competitors such as house wrens and house sparrows will use perches to gain access to a box.
Boxes should be equipped with predator guards. One of the simplest ways to thwart predators from entering boxes is to smear automotive grease on the pole beneath the boxes. An alternative method is to place a sheet metal cone (36 inches in diameter) around the pole beneath the box.
If you have a problem with flying squirrels increasing the size of the entrance holes to your boxes, install metal entrance hole shields around the entrance holes of all of your bluebird boxes. These shields can be obtained from stores specializing in bird-related items.
Remove sparrow nests as soon as they are discovered. While this procedure may have to be repeated several times, eventually the sparrows will nest elsewhere.
Erect boxes 5-6 feet above the ground. Whenever possible, mount bluebird nesting boxes on poles made of metal or sunlight-resistant PVC pipes. Boxes placed on such structures are easier to protect from rat snakes, raccoons and other nest predators. A piece of ¾ inch electrical conduit makes an ideal nesting pole.
If you must mount boxes on trees, leave at least a one-inch space between the nail or lag bolt and the box. This will allow the tree on which the box is mounted to grow without forcing the box off its trunk.
Boxes should be placed in open habitats with sparse trees and low vegetation. Many bluebirds' nest box efforts fail because boxes are erected directly in shrubby and forest conditions.
Position boxes so that they face a tree or shrub located within 100 feet of the box. These woody plants provide safe landing areas for fledglings on their first flight. A young bluebird landing on the ground is vulnerable to cats, dogs and other predators. Bluebirds do not seem to prefer boxes facing in a particular direction.
Boxes should be erected 100 yards or more apart. Nesting bluebirds will often fight with one another when boxes are placed close together.
Monitor boxes once a week during the nesting season. Once hatchlings appear, do not check boxes after the young are 12-14 days old as the young might try to leave their nesting box before they are ready to fly.
Do not take nesting boxes down in the winter season. Boxes make ideal roosting sites for bluebirds on cold winter nights.
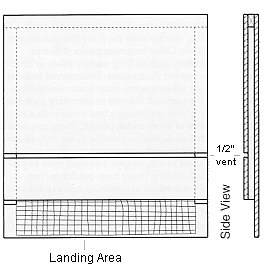
Single Chamber Bat House (Wall Mounted)
Alapaha Council
Many people have discovered the benefits and wonder of attracting backyard bats. We hope you will join them by providing new homes for these fascinating mammals.
Bat Conservation International, Inc. http://www.batcon.org
Materials (makes 1)
- 1/4 sheet (2' x 4') 1/2" ACX, BCX, or T1-11 (outdoor grade) plywood. DO NOT use pressure treated wood.
- One 1" x 2" (3/4" x 1 1/2" finished) x 8' pine furring strip
- 20-30 exterior grade screws, 1"
- One pint dark, water-based stain, exterior grade
- One pint water-based primer, exterior grade
- One quart flat water-based paint or stain, exterior-grade
- One tube paintable latex caulk
- 1" x 4" x 28" board for roof (optional, highly recommended)
- Black asphalt shingles or galvanized metal (optional)
- 6-10 roofing nails, 7/8" (optional)
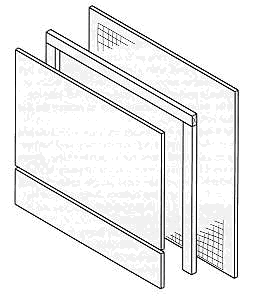
Construction Procedure
- Measure and cut plywood into three pieces:
26 1/2" x 24 16 1/2" x 24" 5" x 24"
- Roughen inside of backboard and landing area by cutting horizontal grooves with sharp object or saw. Space grooves about 1/2" apart, cutting 1/16" to 1/32" deep.
- Apply two coats of dark, water-based stain to interior surfaces. Do not use paint, as it will fill grooves, making them unusable.
- Measure and cut furring into one 24" and two 20 1/2" pieces.
- Attach furring strips to back, caulking first. Start with 24" piece at top. Roosting chamber will be 3/4" wide (front to back).
- Attach front to furring strips, top piece first (don't forget to caulk). Leave 1/2" vent space between top and bottom front pieces.
- Caulk around all outside joints to further seal roosting chamber.
- Attach a 1" x 3" x 28" board to the top as a roof, if desired (optional, but highly recommended).
- Paint or stain exterior three times (use primer for first coat).
- Cover roof with shingles or galvanized metal (optional).
- Mount on building (south or east sides usually best).
Durable plastic mesh can be substituted for roughening to provide footholds for bats. Attach one 20" x 24 1/2" piece to backboard after staining interior, but prior to assembly
Mini-Shadow Box
Baltimore Area Council
Supplies:
- 1 wooden yardstick
- ¼” plywood 10” x 1¾”
- Decorative Hanger
- Glue

Directions:
- Cut stick as follows:
- 2 - 10” pieces for sides
- 2 - 2” pieces for top and bottom
- 3 - 1¾” pieces split lengthwise, to make recessed shelves.
- Glue sides to outside of plywood back ,
- Glue on top and bottom pieces.
- Glue 2 of the narrow pieces to top and bottom, inside of box for added support
- Glue in 4 shelves.
- Let dry and sand rough edges.
- After glue has dried, paint or varnish
- Add ring to top back for hanging.
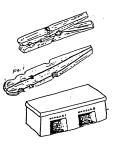
Note Holder I
Baltimore Area Council
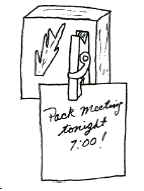
Varnish or paint wood scrap. Add ring to back for hanging, Glue on clothespin and add a twig for decoration.
Bamboo Wind Chimes
Baltimore Area Council
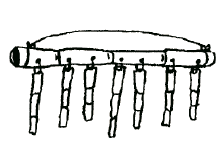
Supplies:
- 1 piece bamboo 8” long
- 7 pieces bamboo different lengths
- nylon thread
- drill
Directions:
- Drill holes in 8” bamboo at 1” intervals
- Drill hole through one end of remaining bamboo pieces
- Tie the 7 pieces of bamboo to the 8” piece
- Tie a thread from one end to the other for hanging.
Pinewood Derby Racer Holder
Great Salt Lake Council
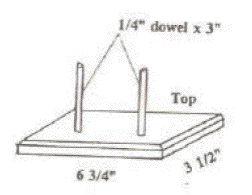
Check orientation of picture before proceeding
Materials
- 2 – 1/ 4 in dowels, 3” long
- 1 – wood plaque 6 3/ 4” by 3 1/ 2” by ¾ ‘ thick
- hanger brackets, stain or paint, drill
Instructions
- Drill holes for dowels
- Insert dowels 3” apart
- Stain or paint
- Attach hanger brackets on back
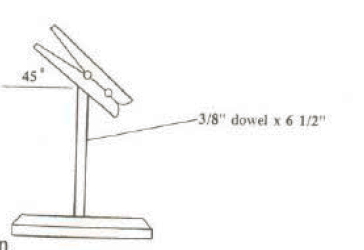
Note Holder II
Great Salt Lake Council
Materials
- 1 – 3/ 8 in dowel, 6 1/2” long
- 1 – wood plaque 2 3/ 4” by 1 3/ 4” by 1” thick
- spring clothes pin, stain or paint, drill
Instructions
- Drill holes 1/ 4” deep for dowel
- Insert dowels
- Glue on clothespin
- Stain or paint
GENIUS KIT I
Baltimore Area Council
Genius kits are fun for the boys and their families to do together. You will need a paper sack for each boy (or team). Place several different items in the sack. Make sure that you give each boy the same identical items. The more items placed in the bag the more creative they can be.
Each boy is given their sack and they and their families have one half hour to make something out of the items in the bag. They can only use the items in the bag and the bag itself. Have them bring with them from home only the tools they think they might need to make something such as: Scissors, glue gun, hammer, screwdriver, etc. The following is a list of some possible items that can be used in the kits:
Different size wood pieces Styrofoam peanuts
Garbage bag ties Toilet paper rolls
2 liter bottles Nails
Cotton balls Nuts
Washers Bolts
String, rope or yarn Small individual cereal boxes
Tacks Paper plates
Beans’ Macaroni
Dried Peas Fishing line
Colored paper Feather
Pinecones Six-pack pop can holders
Juice can lids Rubber bands
Plaster spoons Paper clips
Used spark plugs Canning lids
Egg cartons Paper towel rolls
Paper cups Small cans (tuna, cat food)
Beans Aluminum foil
Pop bottle lids Popsicle sticks
Please keep your pieces ‘boy things.” Enable them to build something solid. Don’t make this another paper craft.
Genius Kit II
Alapaha Council
A genius kit is simply a bag full of odds and ends, any and all scrap materials available in your neighborhood. The contents of each bag should be identical. Include a copy of the rules in each bag.
Some ideas for the contents are:
2 blocks of scrap wood3 nuts 12 beads
8 peanuts 2 screws 2 spools
1 tin can 1 cardboard tube 6 nails
1 wooden clothes pin 6 pipe cleaners
1 coat hanger 4 buttons 1 foot of rope
12 tacks 1 egg carton1 small tube of glue
6 assorted corks 3 pieces of scrap leather
1 jar lid 3 pieces of sponge 4 feet of string
3 pieces of cloth 1 board, 1” x 6” x 10”
3 bottle caps 4 pieces of dowel 4 straws
Rules for parent/son genius kit project:
- Use only the material supplied;
- You do not have to use all of it.
- Cut them up any way you wish.
- Use any tools you wish.
- Use your imagination and have fun!
- Bring your genius creation to the pack meeting.
Judging prizes could be given for:
Best animal Most useful Most ingenious
Funniest Best invention Most decorative
Best workmanship Most unusual Best contraption
Best “what in the world?” Largest Smallest
You can establish other categories if you want, such as having everyone work on games, machines, boats, airplanes, undersea creatures, animals, robots, etc.
Making Clay:
Sam Houston Area Council
Here are two ways of making clays for Cub projects
Cornstarch Clay Recipe:
Materials:
- 1 cup salt
- water
- 1/2 cup cornstarch
- Food coloring (optional)
Directions:
- Combine salt and 1/3rd cup water.
- Stir and heat the water until the salt is thoroughly dissolved.
- Take off of the stove and add the cornstarch and ¼ cup cold water.
- Stir until it thickens and has a consistent texture. After it cools, knead it a bit.
- Add food coloring while kneading, if desired.
Play Dough:
Materials:
- 1 cup flour
- 1 cup water
- ½ cup salt
- 1 tsp vegetable oil
- ½ tsp cream of tartar
- Food coloring (optional)
Directions:
- In a saucepan cook the mixture over medium heat,
- Stir constantly, until the mixture holds together.
- Take off the stove and turn mixture onto a floured board.
- When the clay is cool enough to touch, knead it and add food coloring.
Working on Science Belt Loop and /or pin??
The Scientific Method
Nancy in Texas
Adapted from www.ScienceBuddies.org)
The scientific method is a process for experimentation that is used to answer questions and explore observations.
Scientists use an experiment to search for cause and effect relationships in nature. In other words, they design an experiment so that changes to one item cause something else to vary in a predictable way. These changing quantities are called variables. Variables are a key element of the scientific method.
Here is an overview of the scientific method that you will need to understand in order to complete your science fair project. Don't worry about having to learn it all at once; this is just a basic introduction to help you see the steps of the scientific method from beginning to end. For each step, we offer a much more detailed explanation, including examples and samples from past science fair projects. You can access the detailed explanations by clicking on the link for the appropriate step or by using the menu on the left hand side of the screen.
- Stating the Question: What is it that you are trying to find out from your experiment? What is it that you are trying to achieve?
- Research Your Topic: Investigate what others have already learned about your question. Gather information that will help you perform your experiment.
- State Your Hypothesis: After having thoroughly researched a topic, you should have some prediction about what you think will happen in your experiment. This educated guess concerning the outcome is called your hypothesis. You must state your hypothesis in a way that you can readily measure.
- Test Your Hypothesis by Doing an Experiment: Now that you have come up with a hypothesis, you need to develop a procedure for testing whether it is true or false. This involves changing one variable and measuring the impact that this change has on other variables. When you are conducting your experiment, you need to make sure that you are only measuring the impact of a single change.
Scientists run experiments more than once to verify that results are consistent. Each time that you perform your experiment is called a run or a trial.
- Analyze Your Results: At this stage, you want to be organizing and analyzing the data that you have collected during the course of your experiment in order to summarize what your experiment has shown you.
- Draw Your Conclusion: This is your opportunity to explain the meaning of your results. Did your experiment support your hypothesis? Does additional research need to be conducted? How did your experiment address your initial question and purpose?
- Report Your Results and Conclusion: Since you are performing an experiment for the science fair, you will write a report and prepare a display board so that others can share in your discoveries.
Throughout the process of doing your project, you should keep a journal containing all of your important ideas and information. This journal is called a project logbook or laboratory notebook.
Scientific Method Quiz for Science Belt Loop
Nancy in Texas
Put the seven Scientific Method steps in their proper order.
State Your Hypothesis
Draw Your Conclusion
Report Your Results and Conclusions
Research Your Topic
Analyze Your Results
State the Question
Test Your Hypothesis by Doing an Experiment
- ____________________________________
- ____________________________________
- ____________________________________
- ____________________________________
- ____________________________________
- ____________________________________
- ____________________________________