TIGERS
Tiger Flag Ceremony
Pack 531, Old North State Council
Preparation - Let the scouts use their own words for the ceremony. The important parts are for what the colors stand.
Material - You need a piece of blue, white and red cloth and a small US flag.
The first Tiger comes in with the Blue material. Blue is for courage.
They can say something like: "I am blue. I stand for courage. Courage is more than just standing on a battlefield defending our country. Courage means standing up for what you believe."
The next comes in with white cloth. White stands for loyalty.
They can say something like: “White stands for loyalty. Loyalty means staying true to what you promised. As a Tiger Cub, I have a duty to obey my parents and do what is right. I am proud to be loyal."
The next comes with the red material. Red stands for freedom
They can say something like: “Red stands for freedom. Freedom isn't free. Someone had to die so that I am free and can be here today. The red is for the blood shed so that I can be free. Thank you for my freedom."
The last scout(s) comes in with the US Flag.
He says something like "I am the Flag of the United States. I am made of courage, loyalty and freedom. As a Tiger Scout, I am glad to have the courage, be loyal and thankful for my freedom so that I can be here tonight. Would you please rise and recite the Pledge of Allegiance with me."
When you recite the Pledge, don't forget, One Nation Under God is one complete phrase.
Tiger Activities
Greater St. Louis Area Council
Construction can include a great many things, some are building skyscraper or a kite. Another is construction of the mind, an example might be building their skills. Through Cubstruction we can teach them to build a birdhouse and their skills.
High-Flying Kite
Supplies:
- One1/8”dowelrod, 48”long
- Ball of strong string
- Wrapping paper
- Paper reinforcers
- Strips of lightweight fabric
- Hobby Knife Scissors Pencil
- Ruler
- White glue, paste, glue stick or tape
Directions
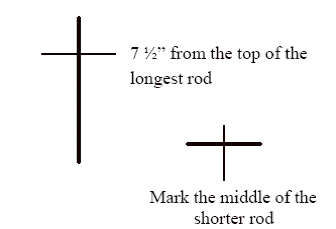
- Cut the stick to size, then notch ends (watch that your notches all face the same way – One should be 26” and the other 22”
- Mark the 26” dowel 7 ½” from the top. Mark the other in the middle
- Tie the two stick together at the marks. Secure them tightly
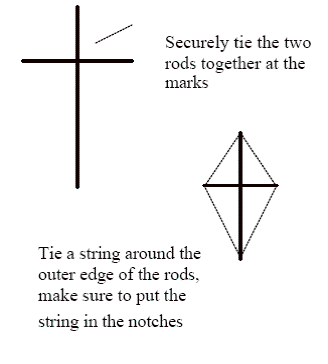
- String the outside edge of the kite frame, slipping the string through the notches at the ends of the rods. This is why the notched need to face the same way. Secure the string tightly around the outside edge.
- Use the kite frame for making a pattern on the paper. Leaving about an inch one ach side.
- Trim the paper and cut off the corners
- Fold the paper of the strings and secure with tape or glue
- Punch two holes in the paper. One 3” from the top and 4” from the bottom of the stick along the center rod. Put paper reinforcers on both sides of the holes to prevent ripping
- Cut a piece of string 30” long and secure to the long rod through the holes you made.
- Cut a piece of string; tie off at each end of the short rod leaving a gap of 4” between the string and the shorter rod. This will cause the kite to bend.
- Make a tail using the strips of fabric. I would make the tail 12-18” long. Tie shorter strips down the tail about every 3-4inches. This will stabilize the kite.
- Wind a lot of string to a pencil or Popsicle stick. Tie the end of the string about a third of the way down the string you attached to the kite.
- Find a big open space and let ‘em run. See who’s kite will fly the longest, the highest or even the shortest.
Design, Layout And Construct Your Own Water Park
Supplies
- Construction or plain paper
- Rulers
- Pencils
- Food Coloring
- CLEAR, Bendablestraws(straightstrawscanworktoo, justnotaswell)
- Modeling Clay
- Styrofoamorpapercups
Directions
- First draw out on the paper the layout of your waterpark. You can include pools, slides and maybe even a fountain. Be sure to have a specific starting point, usually higher than the rest. This will be your blueprint.
- Figure how many cups and straws you will need to build your project. Also grab about ½ a stick of modeling clay. These items will be your building materials.
- You will need a large area, preferably outside, weather permitting. Other wise you will want to be in an area you do not mind getting wet. You can call this area your construction site.
- Lay out your cups and straws to match what you drew on your blueprint. Lay every thing out before you try putting it all together. You may find you need something to set under some of your cups to gain height. You can turn a cup upside down and use it as you platform.
- Once you have everything set in place you can proceed with the final construction phase of your project. Using a pencil, poke a hole near the base of each cup where needed. Be sure not to make the holes too big. They only need to be big enough for the straw to fit snuggly in.
- Insert the straws one at a time, placing modeling clay around the holes in the cups and around any seems you made joining two straws together. This is necessary to keep the pipes from leaking.
- Once you are sure everything is connected and joints are sealed you can prepare your water. It does not take much water to get these projects to work depending on their size. A small picture should do nicely.
- To spice up your project you can add food coloring to the water. This makes it easier to see the water move through the straws. Start pouring the water in to your starting cup and watch it flow.
Be sure to be prepared for leaks!
The boys will have a great time designing and building. Through this project they can see how the construction process progresses. They will also learn how gravity works (and so will the parents).
Helicopter
Every one knows that when you run with a pinwheel the wheel will spin. What happens if you turn a pinwheel on its side and put it on top of a helicopter body? Try dropping this model off an upstairs porch or down a tall stairwell.
Supplies:
- 6”x6” Square of Paper
- Scissors
- Colored Markers
- Long Straight PinwithaRoundHead
- ½” Long Piece of Plastic Drinking Straw
- A Cork
Directions
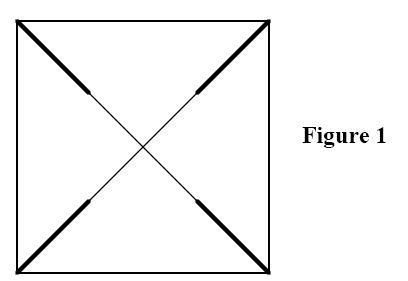
- Fold the paper on ce into a triangle. Unfold it, and then fold it into the opposite triangle.
- Unfold the paper. It should have creases going from corner to corner, forming an X. The center of the X is the center of the square. Make a cut from each corner halfway to the center along each crease. See Figure 1.
- Use markers to color both sides of the paper and the entire cork.
- When the paper has dried completely, make the wheel. Pick up any point; stick the pin through the point about ¼” in from the point, skip the next point, but pick up the next and thread it on to the pin just as you did the first point. Continue around the square, threading Figure 1 every other point on to the pin until you have four points lying flat. Now stick the point of the pin through the center point of the square. Your paper should look like a pinwheel.
- Slip the piece of drinking straw onto the sharp end of the pin while holding all the points on the pin; then push the end of the pin in to the side of the cork about ¼” from one end. Push the pin in firmly, but not all the way in. The straw should be able to move up and down slightly, and the wheel should feel springy.
- Throw the helicopter up and watch what happens as it drops. The longer the drop, the better, so look around for good launching places such as stairwells, upstairs porches and balconies.
Kids love to build! So find some tools, scrap wood, paper, string, clay and any thing else you can find around the house and see what your future construction engineers can design and build!