Write to Baloo (Click Here) to offer contributions, suggest ideas, express appreciation, or let Commissioner Dave know how you are using the materials provided here. Your feedback is import. Thanks.
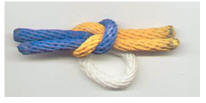
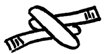
Here's a simple square knot made by dyeing cotton rope in appropriate colors,
This should help you teach the square know to your Webelos Scouts
# 1.Tie the knot, and use a little glue to hold it
together.
# 2.Attach a loop and you're set!
# 3.If you're using nylon rope, you'll need to melt
the rope ends a bit to prevent fraying.
# 4.We used clothesline cut into 4-inch strips.
# 5.We had to melt the ends to keep from fraying.
Since most cheap clothesline is made from nylon, the adults should do this step
so that the melted nylon does not burn the scouts.
# 6.We then painted one strip blue and one strip
yellow.
# 7.After the paint dried, we assembled a square
knot and fused a strip of clothesline on the back for the slider part."
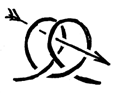
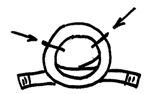
Clove Hitch Neckerchief Slide
Norm
üHere is a slide from my friend Norm that may
work to help your Webelos learn to tie the Clove Hitch.
üCut a 12 inch long piece of piece of ¼ rope
üWhip both ends
üTwist the rope and make two loops like so
üPlace one end over the other, then over a
5/8 rod or dowel
üPull tight
üThen remove it and tie it at the arrows
üAdd glue to the inside and let it dry
üWhen dry, remove the tie strings
üIt should look like this
Have you contacted a local Boy Scout troop yet?? Made all your
arrangements for your outdoor adventure with them? Please dont wait until
January (unless you are in Hawaii or Florida) and then try and get it in
before Blue & Gold?
CRAFTSMAN
TECHNOLOGY GROUP
Baltimore Area Council
The
requirements for the Craftsman activity badge include projects in wood, leather
and tin. This activity helps the boys develop confidence in their abilities by
encouraging them to use their talents and skills for more advanced handicraft
projects, or perhaps to develop a hobby in one of these mediums.
Where to Go and What to Do
üVisit a furniture factory, sawmill,
lumberyard, or cabinetmaker.
üVisit a tannery or leather goods
manufacturer.
üDemonstrate the proper care and use of tools.
üDemonstrate metal work, using a tin snips and
vise.
üNave a nail-driving contest.
üMake a tool chest.
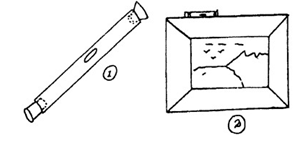
Carpenter's Level
Southern NJ Council
You can
make a carpenter's level out of a glass tube - like dentists use or the kind of
plastic tube a toothbrush comes in.
With the
vial from the dentist's office, remove one rubber cork from the end. Rinse tube
out good and then fill almost full of water and replace cork.
With a
glass or plastic tube, cork one end, fill nearly full with water, then cork the
end. (pic 1.)
Lay tube on
a flat surface. If this surface is perfectly level, the bubble inside the tube
will be exactly in the middle. If the surface is not quite level, the bubble
will be off center one way or the other. (pic 2.)
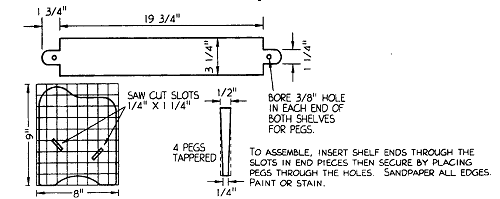
Book Trough
Southern NJ Council
Copy picture and enlarge. Then trace diagram of book ends onto 3/8" board or
plywood. Cut shelves from measurements. Make ends identical by clamping together
before cutting and finishing.
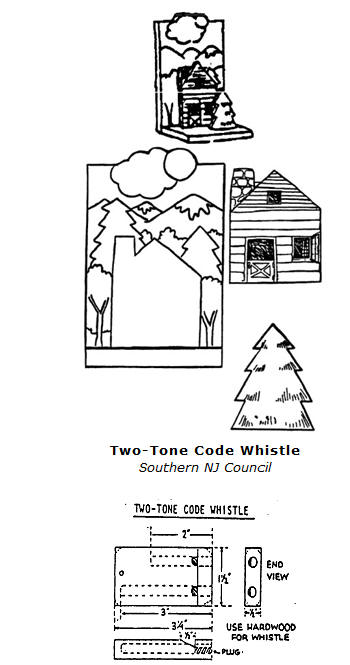
Mountain Cabin Bookends
Baltimore Area Council
Using 3/4" wood, cut one back
4" x 6", one base 3" x 4", one cabin and one tree for each bookend. See pattern
pieces
After making pieces, assemble
and paint as desired.
You can work out a series of
code signals with this two-tone code whistle. The twin tones make it penetrate a
long distance. Each hole may be used independently or both may be blended.
Walnut, maple or birch are
good hardwoods to use. Make sure the holes are completely free of sawdust. Round
off all edges and sand it smooth, then attach a neck strap lanyard long enough
so that you can tuck the whistle into your shirt pocket.
Note that the plugs are
flattened off at the top. Plugs should make a tight fit for the best resonance.
1. Drill holes as indicated in
piece of hardwood. Cut air escape notch.
2. Insert 1/4-inch plugs flush
to straight cut of notch. Cut off excess wood.
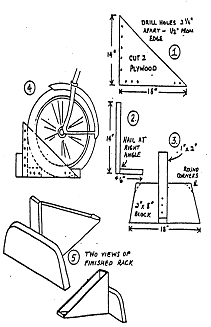
Personal Bike Rack
Southern NJ Council
Materials:
One 14" x 18" piece of 1/2"
plywood;
One 1" x 2" x 2'; one 2" x 8"
x 18"
No. 6 flathead screws (1-1 /
4" long);
Six-penny nails;
Varnish or paint;
White
glue or powdered resin glue.
1.Cut plywood triangles. Drill holes as show with
a 5(32" drill bit. Paint or varnish the inside of plywood at this time. It will
be difficult to do after rack is assembled.
2.Cut the 1" x 2" pieces. Nail the two longest
pieces at right angles.
3.Cut the 2" x 8" piece. Attach the nailed 1"x2"
with screws. Paint or varnish the 1" x 2" now. (Note the right angle is fastened
to the 2" x 8" with screws from inside.)
4.Fasten the plywood triangles in place with
screws through pre-drilled holes. Don't forget the small piece of 1" x 2" that
joins the tips of the triangle.
5.Sand and complete paint or varnishing the piece.
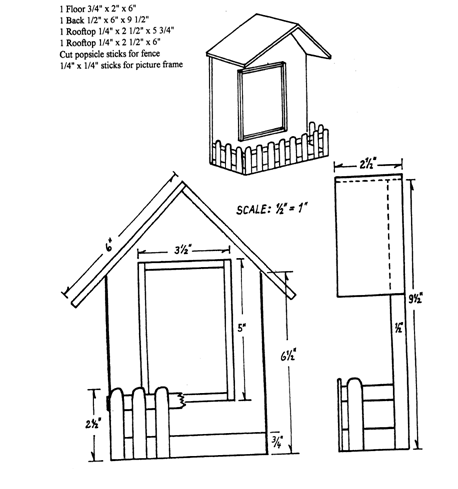
Picture Frame House
Southern NJ Council
Leather Eyeglass Case
Baltimore Area Council
Measure eyeglasses and cut
leather (a piece approximately 6 x 6") so glasses fit easily when case is
folded. Fold leather and punch holes for lacing using the running stitch.
Cut simple design into head of
a large nail with a file; then file off nail point. Dampen leather and use small
hammer to tap the design on.
Prior to the meeting -
Cut the dowel into slices about 1 1/4" thick, using the table saw. You will
need 37 pieces for each Webelos.
Have the Webelos -
Sand any rough edges.
Lay a
piece of waxed paper on the working surface. It can be easily removed from
the trivet after the glue has dried.
Begin
gluing the slices together as shown in the picture.
When
glue has dried, pull away waxed paper and cut the felt piece to fit the back
of the trivet.
Glue
felt in place.
READYMAN
COMMUNITY GROUP
Baltimore Area Council
The Boy
Scout motto is Be Prepared. It means that the Scout is always ready in mind
and body to do his duty and to face danger, if necessary, to help other people.
He learns first aid. He learns how to swim safely and how to ride his bicycle
without danger to himself or others. He also learns how to make his home safer
and the safety rules for passengers in the car. In earning the Readyman
Activity Badge, you will get a faster start on being prepared as a Scout. Many
of the things you learn help you advance as a Boy Scout.
Den Activities
üVisit your local ambulance service or fire
department rescue squad.
üAsk a member of the local Red Cross or
emergency trauma team to visit your den and show you how to save lives by
learning: Hurry cases, shock, other minor emergencies.
üLearn how to get help from the local
authorities such as the police, fire department, ambulance, or hospital, contact
the police department to find out how to report or summon help in these
situations.
üConsult with the local fire marshal,
emergency services team, or police department to find out how to plan an
emergency escape route, or find where most home accidents are likely to occur.
üInvite a member of the local Red Cross or a
qualified swimming instructor who is a Water safety Instructor to show your den
how to have a safe and fun time at the beach or the local pool.
üBuild a buddy tag board and use it on an
outing that involves water sports.
üAttend a Boy Scout first-aid demo.
General Directions for Giving First Aid - American Red Cross
üKeep the injured person lying down.
üDo not give liquids to an unconscious person.
üRestart breathing with mouth-to-mouth
artificial respiration.
üControl bleeding by pressing on the wound.
üDilute swallowed poisons and call the poison
Control Center.
üKeep broken bones from moving.
üCover burns with thick layers of cloth.
üKeep heart-attack cases quiet and give
cardiopulmonary resuscitation (CPR) if it is necessary and if you have been
trained.
üKeep a fainting victim lying flat.
üFor eye injuries, pad and bandage both eyes.
üALWAYS CALL A DOCTOR.
Fire Prevention
Safety Comes First!
Kitchen Fire Extinguisher
Materials:
üGlass bottle
üRed and black construction paper
üFunnel (optional)
üBaking soda
üBlack marker, scissors, glue
Directions:
Wash and
dry the bottle.
Cover
the outside with red paper; glue ends.
Draw
extinguisher shape on front of bottle.
Write
the words with black marker.
Fill the
jar with baking soda (the funnel helps, if you have one).
Place
next to kitchen stove.
If there
should ever be a stove fire, pour the baking soda on the flames to put them out.
Possible Kit (Its possible that what you forgot is here.)
35 mm film canister Rubber bands
Masking tape thumb tacks
paper clips Band-Aids
piece of chalk straight pins
Book matches Fishing line and fishhook
2 safety pins 1 quarter and 1 dime
2 kitchen matches 2 stamps
1 pencil stub 1 piece of string
Directions:
Wrap
masking tape and rubber bands around the outside of the film canister and
carefully put all other items into the canister.
And its
just possible that what you forgot is in there.
You will
survive a little longer.
Make Your Own First Aid Kit
What
to Include:
For open
wounds, cuts, skinned knees, and scratches
1
box 12 adhesive compresses
3
sizes sterile bandages
3
sterile gauze squares
a
small bottle antiseptic
For
blisters
Adhesive compresses or gauze squares
narrow adhesive
For
sprains
1
triangular bandage
small scissors
For
burns, sunburn
tube burn ointment 5%
For
splinters
small tweezers
needle
matches to sterilize
For
fainting
small bottle aromatic spirits of ammonia
For
bites or stings
small box bicarbonate of soda
For
toothache
small bottle oil of cloves
For
plant poisoning
small bar yellow soap
Ideas
for containers to use:
A
cigar box, a tin cracker or candy box paint and decorate. Put a list of
what-to-do inside the lid.
Make a cloth case with a strap.
A
cloth kit with pockets. Fold over the top, roll up, and tie.
Southern NJ Council
At your first meeting you will want the boys to
explain what first aid is. FIRST AID is immediate help right after an injury.
First aid isnt playing doctor. Its doing the things that must be done before
expert help arrives. How will you act in an emergency? Would you know what to
do? If you do, youll be cool and calm, because you know you can help. Your
confidence will show and it will help the injured as you ease their pain and
worry.
Activities:
üAsk a First Aid Merit
Badge Counselor from a Scout Troop in your area to attend the meeting and
explain the items in a first aid kit, or have him shoe what to do for hurry
cases.
üInvite a Scout Troop to
your meeting to show first aid for cuts and scratches, burns and scalds, and
choking.
üInvite a police officer
to speak on bicycle safety.
üHave a swim instructor
go over the safe swim defense plan.
üVisit a fire station
with an E.M.S. Unit.
üVisit a hospital E.R. or
an Emergency Clinic.
üPut together a first aid
kit for you Pack to take on outings.
üStage a mock disaster
involving injuries and have the boys treat the injuries. This could be done in
conjunction with a Patrol from a nearby Troop. With the Scouts demonstrating
more complicated skills and acting the part of the injured.
üAttend A First aid Rally
in your area
üVisit the local Red
Cross office and learn about how the teach First Aid
üPlan a fire escape plan
for your home.
First Aid Actions
Severe Bleeding
- Do not take any objects out that may have caused the bleeding and do not try
to wash the wound. With one hand take a gauze pad and apply pressure with your
hand. With the opposite hand wrap the wound. Continue to add pressure. If the
wound continues to bleed apply pressure to an artery and seek medical attention.
While doing all of the above elevate the wound above the heart to help reduce
bleeding.
Stopped Breath
- It is not necessary to determine if the victim has a pulse or not. In the
event that the victim has a pulse, one would begin doing rescue breathing which
is a process of blowing air into the lungs every 5 seconds in a effort to try to
get them to breathe on their own. In the vent that the victim has no pulse one
would begin CPR which is a process of blowing air into the lungs and pumping the
heart at the same time. It is best that you do not give rescue breathing or CPR
if you have not been trained. The best thing for you to do is seek medical
attention as soon as possible. The brain can only go without oxygen for 4 - 6
minutes without damage.
Internal Poisoning
- Poisons can be swallowed, inhaled, absorbed or injected into ones system. It
is important that you call the Poison Control Center and get instructions on how
to handle the emergency. Dial 911.
Heart Attack
- Seek medical attention as soon as possible. It may be necessary to apply CPR.
Shock -
Shock is a normal reaction to many emergencies and is the process of the body
shutting down the normal flow of blood on a temporary basis. To treat, ask the
victim to line down on their back and elevate their feet slightly. If they are
conscious, get them to take some deep breaths and give them some water to sip.
If they suffer from chills, offer them a blanket. If shock continues, seek
medical attention.
Cuts and Scratches
- Wash with clear water and bandage. Watch and treat for infection.
Burns and Scalds
- Burns can be obtained by heat, chemicals, and electricity or radiation. Rinse
all burns with dear water and wrap with dean and dry bandages. All burns except
some first degree burns needs to have medical attention.
Choking - As
long as a victim can speak, breath, or cough, encourage them to continue
coughing. If the victim shows signs of troubled breathing, apply abdominal
thrusts until the object is dislodged.
Things to Make
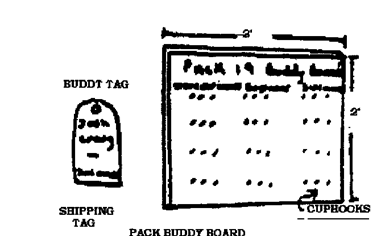
Buddy Board and Tags:
One of the eight parts of the Safe Swim Defense is the use of the buddy system.
In this everyone pairs off BUDDY TAGS with another person of his own swimming
ability. Buddies check in and out of the swim area together.
The swim supervisor issues everyone a buddy tag so
that he knows at all times that certain Scouts are paired with certain others.
No one swims without a buddy tag displayed in the proper spot.
Simple badge tags make good buddy tags. So do wooden
tongue depressors stuck into the ground or sand beach near the swim area. Both
may be marked in pencil or waterproof marker with the swimmers name and his
classification: non-swimmer, beginner, or swimmer.
Display the buddy tags by hanging them on inverted
cup hooks screwed into a rectangle of plywood. Buddies hang their tags on the
same hook. Have Scouts make a buddy board. Cut the wood, drill holes as show,
and mark off the areas of equal dimensions. Shellac or varnish the whole works.
Your Scouts may also make buddy tags for your pack.
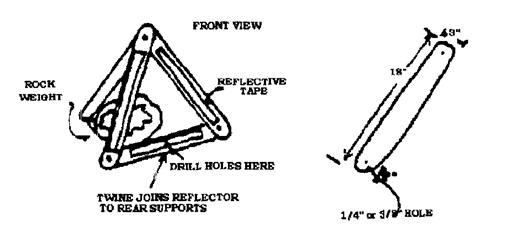
Car Breakdown Marker
Equipment Needed:
ü5 Wooden paddles cut
from 1/4 thick plywood/ wooden crate or similar
üROCK WEIGHT
ü3 large brass paper
fasteners or 1/4 x 1 threaded stock,
ülong bolts with wing
nuts,
üSelf-adhesive reflective
tape, and
üSome strong twine.
Cut paddles as shown. Cover one side of 3 paddles
with reflective tape. Drill 1/4 or 3/8 inch holes as shown. In actual use, bolt
or fasten the paddles together into a triangle shape as Illustrated. Fasten rear
supports by tying with twine. Place the warning marker about 100 behind the
disabled car parked on the shoulder of the road. Reflective tape faces oncoming
traffic. Weigh down the bottom rear support with a large rock or something
similar.
GAMES
Pressure Pad Relay:
Equipment - Each boy using his own neckerchief.
One boy lies about 30 feet in front of the team with arterial bleeding of the
left wrist.
There is one judge for each victim.
On signal, the first boy from each team runs up and applies a pressure pad over
the simulated would.
When correct, the judge yells off, the boy removes the pad and runs back to
the team, tags off the next boy who repeats the operation.
Bandage Demonstration:
Equipment - As needed. One member of a den is the patient; the rest are
first-aiders.
On go Number 1 runs to the patient and ties a head bandage and runs back;
Number 2 ties cross chest;
Number 3, thigh;
Number 4, ankle bandage;
Number 5, sling for arm; then
Numbers 6 and 7 go up and be chair carry transport for the patient back to the
starting point. NO TIME ELEMENT (Note: In case of a small den, one or more boys
may go up twice, until the project is completed).
Whats Wrong With Me? Write down several different accidents or
afflictions. (example: A broken legs A nose bleed, Choking, Shock, etc...) Place
these in a hat and have the boys draw them out one at a time. The boy that drew
will have to act out that particular problem. The first boy to identify the
problem must show how to treat it, he now gets to pick and act out an accident.
Fire:
Seat Webelos Scouts in a circle with one in the center.
The one in the center calls out one of the following and points to one of the
seated players: Earth, Air, Water, or Fire. (If there are more than four
players, the names may be repeated.)
As he points, he begins counting slowly to 10.
The player to whom he points must answer as follows:
Earth must name four animals,
Air must name four birds or flying insects,
Water must name four fish or sea creatures.
If Fire is called, he remains silent.
If the player succeeds before the count of 10, another seated player gets a
turn, and the Webelos in the center remains there.
If the player fails, he becomes the new leader and the old leader takes his
place in the circle.
Douse That Fire:
Each team has a pail with a candle stub in a holder on the bottom. Fill the
bucket to two inches below the candle wick and light the candle. Divide the den
into two teams and give each team a cp and a jar of water. On signal, the first
player on each team fills his cup, runs to the bucket, and empties the water
into it. He then runs back with his cup and the next player repeats the action.
Continue until one team has doused its fire by filling the bucket to candlewick
level. A team is disqualified if a player pours water on the candle flame.
Fire Hazard Hunt:
Prepare for this game by creating some fire hazards in and around your meeting
place -- matches left carelessly within reach of children; outside door blocked
by a chair, oily rags in a pile in the garage; grease spilled near stove burner,
newspaper piled near furnace; fireplace screen away from fireplace; frayed
electric cord, etc. Ask boys to find and list on paper as many hazards as they
can find. At the end of the game, check findings and explain the hazards. Urge
Webelos to check their own home.
Fireman. Save My Child:
Divide den into two teams. One member of each team (the child) sits on an old
throw rug or heavy cloth about 2 x 3 about 15 feet from his team. Each of the
other players has a four foot length of rope. On signal, the boys tie their
ropes together with square knots to form a rescue rope. When all ropes are tied,
a player throws the rescue to the child and the team pulls him to safety. The
den that ties all knots correctly and first pulls its child to safety is the
winner.
The Search For Bigfoot Game:
This is a series of tests for each den leading to the discovery of Bigfoot. It
can be adapted to either indoors or outdoors, but if you have a choice, make it
outdoors. The object of the hunt is to complete the tests and find Bigfoot in
the shortest time.
Station #1: Climbing the Mountain - Build a string trail, with the string leading high
and low between tree trunks, branches, etc. The den is blindfolded and each
member follows the trail by sliding one hand along the string. (If indoors, run
the string from chair to table to side of the room and back again.)
Station #2: One member of the den is lost and
presumably injured in the mountains. That
Cub Scout is sent some distance away and left lying on the ground. The other den
members must find him, apply some simple-first aid, and bring him back to the
stretcher made from two poles and a blanket.
Station #3: Finding Shelter
- One the way up the mountain, a fierce storm stops the den. The boy must build
a shelter with a blanket and a few poles that all den members can get under.
Station #4: After the storm,
the den finds Bigfoots footprints near the camp. (The footprints are huge
cardboard cutouts of an apes print and lead toward a wooded area or, toward
another room.)
Station #5:
As the den follows the footprints, the boys see Bigfoot (a leader in a fur coat
and mask) scurrying off into the woods (or other room). Start dens at four or
five minute intervals. Time each start. The winning den is the one which tags
Bigfoot in the shortest time.
Materials found in Baloo's Bugle may be used by Scouters for Scouting activities provided that Baloo's Bugle and the original contributors are cited as the source of the material.
Materials found at U. S. Scouting Service
Project, Inc. Websites may be reproduced and used locally by
Scouting volunteers for training purposes consistent with the programs
of the Boy Scouts of America (BSA), the World Organization of the Scout Movement (WOSM) or
other Scouting and Guiding Organizations. No material found here may be
used or reproduced for electronic redistribution or for commercial or other
non-Scouting purposes without the express permission of the U. S. Scouting
Service Project, Inc. (USSSP) or other copyright holders. USSSP is not affiliated
with BSA or WOSM and does not speak on behalf of BSA or WOSM. Opinions expressed
on these web pages are those of the web authors. You can support this website
with in two ways:
Visit Our Trading Post at www.ScoutingBooks.com or make a donation by
clicking the button below.